

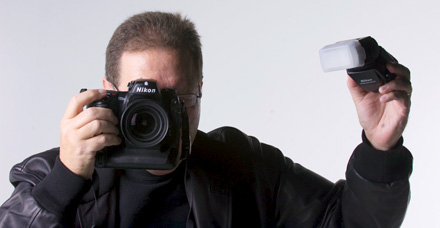
This past weekend I was talking to my Peachpit Press Editor, Ted Waitt, and he was asking for my advice about getting some new camera gear. The next thing he wanted to get into was lighting and he wanted to know what his options were. After talking for a few minutes, Ted said, “Ya know, you really ought to do something like that for your blog, where you recommend different lighting set-ups for people with different budgets and needs.”
I thought it was a great idea, and well, here we are: Welcome to my first “Lighting Gear Week.” Each day this week, I’ll be sharing my recommendations for different set-ups and budgets, just as if a friend had asked me what they should get. Here we go:
Day 1: Wedding/Portrait Location Lighting Setup (on a Budget)
I would tell a friend to start by getting a hot shoe flash (one that has the ability to “bounce” flash, and the ability to work in wireless mode, which is important since many of today’s DSLRs, like most of the Canon and Nikons, support wireless off camera hot shoe flash).
I think these hot shoe flash units are ideal for wedding and/or event photographers, or photographers who do on-location portraits. The key benefits are:
- Low cost
- Small Size
- Portability
- Flexibility
To do this right, I would tell a friend they’re going to need these four things:
- The shoe mount flash unit itself
- A lightweight portable light stand
- An adapter so they can mount their flash on that lightstand
- Some kind of diffuser to soften and spread the light from their flash
Now, here’s the specifics:
(1) Flash Unit:
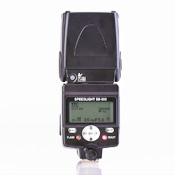 NIKON: If you’re a Nikon shooter, you can’t beat the SB-800 Speedlight hot shoe flash. It’s $315 (from B&H Photo—here’s the link to it), and honestly it’s amazing what you can do with this one little flash, and if you have a Nikon camera that has a built-in pop-up flash, you can use it to make your SB-800 an off-camera wireless flash (which is your goal). Other great things about this flash: it comes with a plastic snap-on diffusion dome, which helps to soften and spread the light a bit; it also comes with a little flat table stand , and it comes with some color gels so you can color balance your light, or use them to add color.
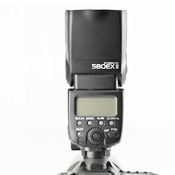 CANON: If you’re a Canon shooter, the Canon 580 EX II is an excellent flash, but there are two downsides over the Nikon flash: (1) it’s more expensive, at around $410 (from B&H Photo—here’s the link to it), and (2) you have to buy either a 2nd flash, or a transmitter to use the flash in wireless mode.
OTHER: If you don’t have a Nikon or Canon camera, sell that first, then we’ll talk about flashes. (kidding. Kind of). If you have another DSLR, take a look at the Metz flashes, like a 58 AF-1 flashes. They run in the $360 to $399 range.
(2) Lightstand
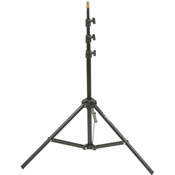 These flash units don’t weight that much, so you don’t need a big heavy lightstand (in fact, lighter is better), and you don’t need it to go higher than 8′ feet tall. I use an “Impact” (that’s it brand name) stand from B&H Photo; it only weighs 2.4 lbs. and it runs around $35 (here’s the link to it over at B&H).
(3) Hot Shoe Adapter/Swivel for the Lightstand
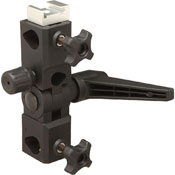 The idea here is that you’ll raise the stand, and then angle the flash so the light comes down at an angle at your subject. This means the adapter you get must let you do just that—angle the flash. But beyond that, the fourth thing you’re going to need to do is diffuse the light, and the most inexpensive way is to use an Umbrella to soften and spread your light (you’re going to position your flash so it shoots right though the umbrella). So, you’ll want an adapter that not only tilts your flash, but holds (and tilts) your umbrella for you at the same time. Impact makes one of those, too, called the “Impact Umbrella Bracket with Swivel Mount and Flash Shoe,” and it’s only around $14 (here’s the link to it).
(4) A Diffuser to Spread and Soften The Light
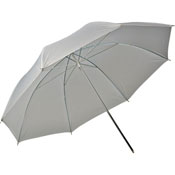 The cheapest, lightest, and easiest way to diffuse your light is to shoot it through a white translucent umbrella, and as luck would have it, Impact makes one of those. It’s 33″ and it’s dirt cheap, at just $10. Here’s the link to it. (Scott, didn’t you say you weren’t a big fan of umbrellas? Yes, I did. It’s just this is really cheap and will get the job done—especially if you shoot through it—rather than shooting into it and having it reflect, which is the method I don’t particularly like). Tune in tomorrow to see what I prefer to umbrellas, but when it comes to price—-this is the cheapest ticket in town).
THE BOTTOMLINE COST
So, your whole kit; flash, stand, swivel umbrella/flash adapter, and the umbrella itself, would run about $375 for Nikon users, or $475 for Canon users (Note: if you’re a Canon user, to use your flash off the camera [which is what you want to be able to do during portrait shoots for formal bride shots], you’ll also need to buy either Canon’s wireless ST-E2 transmitter for $210, or a sync cord to connect your camera to your flash on the stand, so figure on another $70, for that. Don’t shoot the messenger).
A FRIEND WITH CASH
If my friend said he didn’t mind paying a little more for some better gear, I’d still have him/her get the same exact flash units (Nikon or Canon), so that doesn’t change, but you could buy higher quality accessories like a Westcott umbrella (and spring for the 43″ model at only $10 more), and a Bogen/Manfrotto 3361 light stand (around $69), and maybe a nicer umbrella swivel (like the Lumedyne, for around $40).
Well, that’s it for Day 1, and our super “Budget” location shoot kit. Tomorrow we’ll take it up a notch, and see what we’d do if my friend had a little more cash, and wanted more flexibility, and the next level of lighting control.
Scott, you’re the BOMB!