

Think like a digital ninja.
First of all I’d like to thank Scott and Brad for inviting me to write – I’m a big fan of what they do and how they empower the world to be better creators. Without people like them spreading the amazing wealth of information we have at our fingertips it would have been more difficult for me to migrate from a zoological career catching snakes in the Australian outback to where I am now – creating conceptual imagery for brands and magazines.
We live in a time where what we imagine, we can make – there has never been a better time to be an artist. I wanted to take this opportunity to talk about my digital workflow in the hopes that you will find it useful.
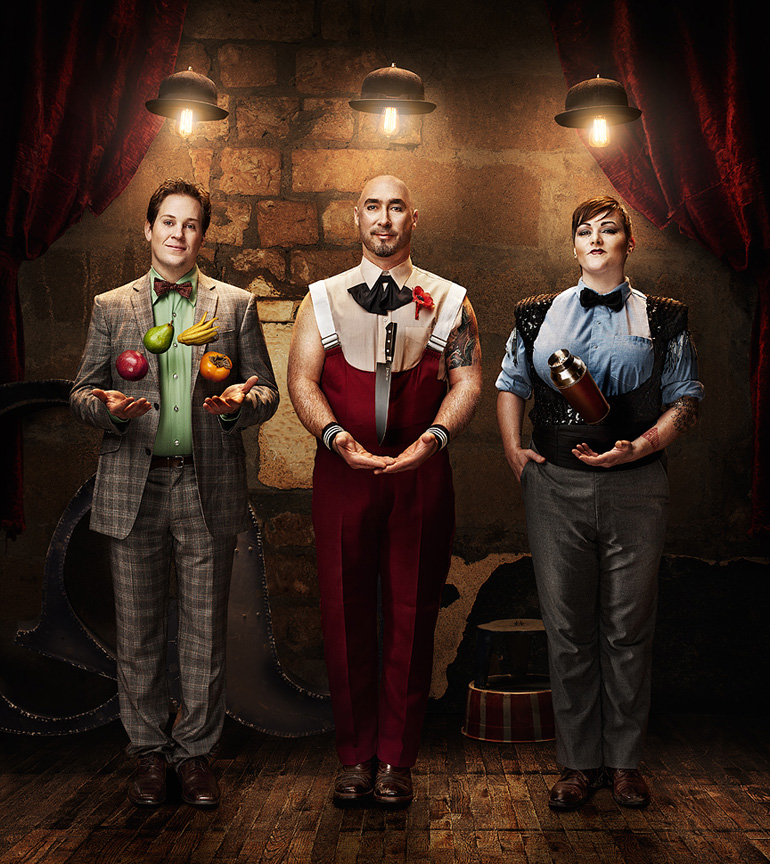
I deal in high-impact imagery. I try to photograph ideas more than portraits – directing scenes and characters to tell a story. I started out as a photojournalist shooting first wildlife, then wild places, and now; wild people and stories. I have a background in retouching and compositing, skill-sets which I now leverage to create images that would be impossible to make happen otherwise. As far as aesthetic qualities, my work is characterized by contrast, depth, rich color and texture. I also incorporate compositing into many of my images, one of the components of a digital workflow that we’ll be dealing with here. Rather than talk about them, you can check out my images here.
Photography, particularly in the commercial world, has become far more than just shooting film and handing it off to the client. The digital revolution has not only led to the incredible democratization of creation we see today (I highly recommend you watch press pause play), but also an entirely new way to approach creating images.

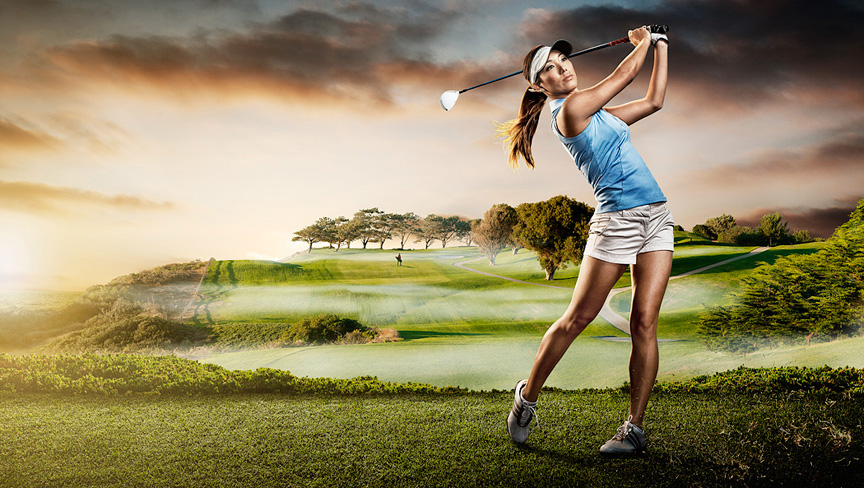
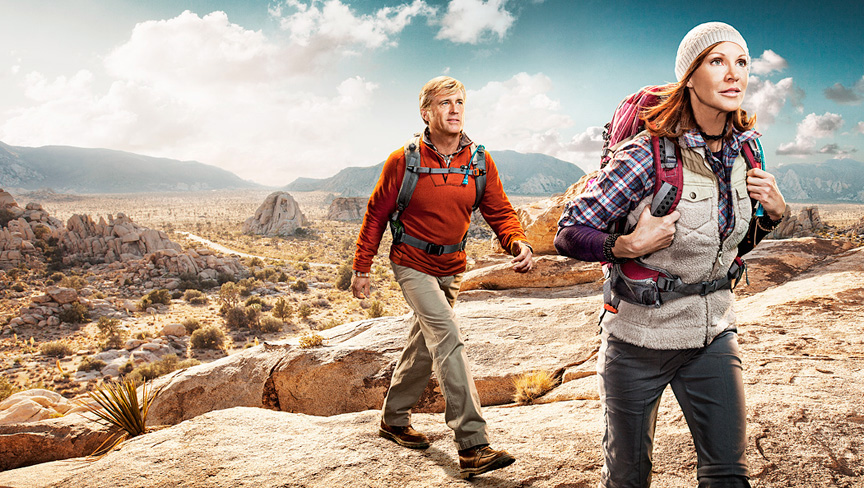
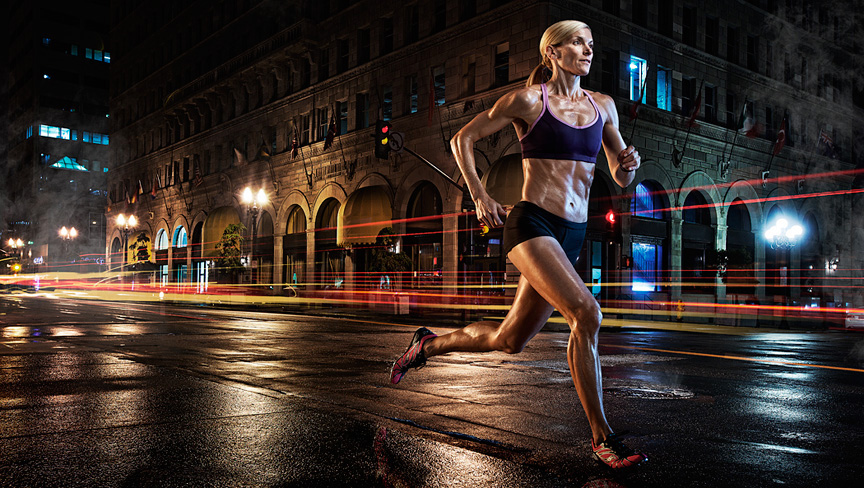
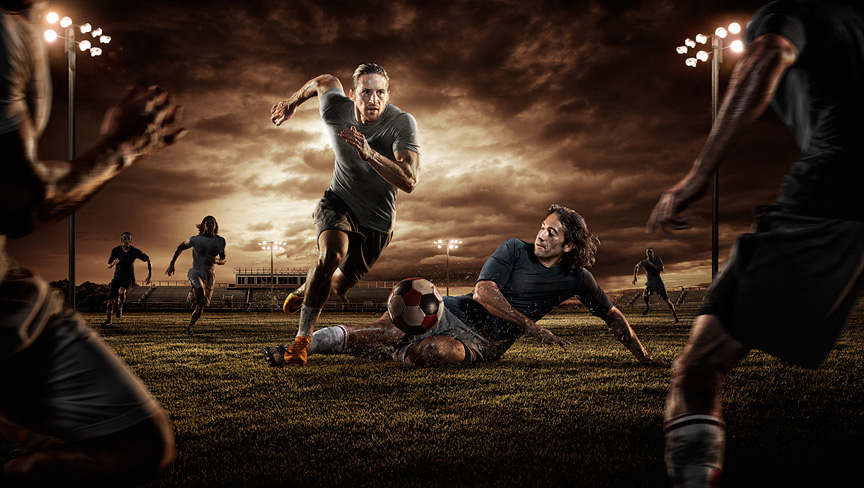
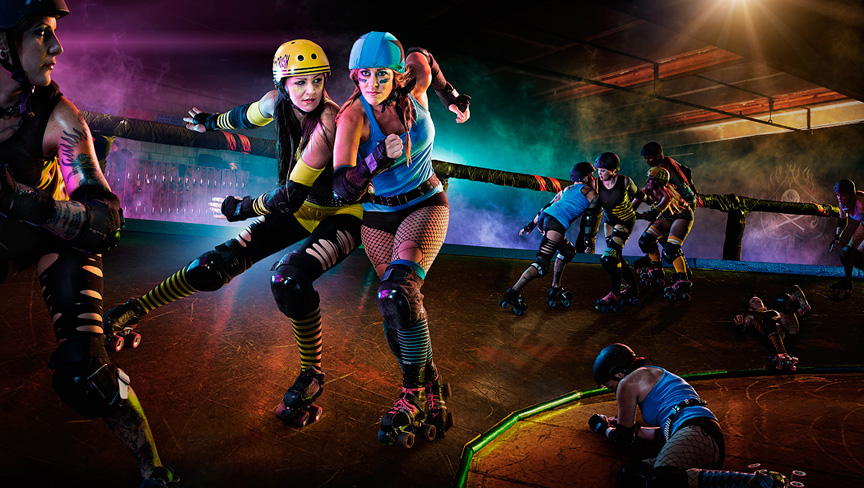
The digital workflow allows us to create anything we can imagine. I can shoot elements in Africa, Australia and Southern California and blend them seamlessly so that the image looks like it was shot in one frame. For example, I just finished a campaign working with Art Director Jethro Ames and local ad agency Parkerwhite where I built 8 different images that communicate the beauty and heroism of athletes in moments of peak action. About half the talent we shot in a studio on green screen and the other half were on location – where the background was remixed beyond anything we could have achieved in a single frame. This allowed us to create scenes in the same way that a painter or illustrator would build a scene. It’s difficult to describe, so check out a highlights video we put together here:
I’m going to go over some of the fundamental elements in a digital workflow the way that I see them.
Green screen
I refer to it as green screen, but…
…you can look at it as any type of shoot where you’ll be masking the elements from the background to be used in a layout, design brief or composite image. These days, many clients like to have access to masked digital assets so that they can repurpose them for multiple uses. I like to use green or blue screen as it is often the fastest background to key someone from, which is especially important when you’re working with many assets or on set doing quick comps (the reason for this is that green and blue are the furthest colors from the red/yellow pallet of skin and hair).
Be warned though, as a general rule you might want to consider photographing your talent on a background that is most similar to the background that you’ll be placing them on. For example – putting your talent on a blue sky background? You’ll want to shoot on blue screen. Putting your subject on a dark, moody background? You might want to consider shooting on black. Every case is different, and you need to think like a retoucher when choosing the background you use. Whenever shooting on a colored background, remember to put enough distance between it and the subject, or you could find yourself with contaminating colored spill from the strobes casting reflected light.
Why use green screen techniques? In the commercial world, our biggest asset is time. Though you can use the pen tool to mask almost anything, when you’re working on deadline – everything you can do ‘in-camera’ to speed up your post work makes a difference.
Tethered Capture
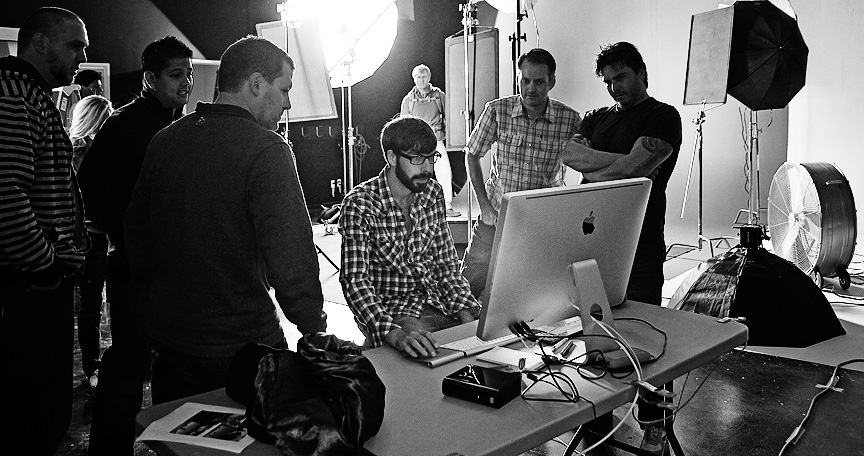
Tethered capture is probably one of the biggest technical assets that we as image makers have available when building images. Whether you’re on a set of 15 people with a dedicated digital tech, or in your home studio with your digital SLR tethered to your macbook pro, the ability to see in real time on a large screen what you’re photographing is tremendous. Tethered capture is useful in making sure your images are in focus, that lights are firing and also important in a compositing workflow because you can make sure elements fit together in real time. It also allows you to make very informed decisions about composition and lighting as you’re seeing the full resolution image almost instantly. To catch a glimpse at how we use tethered capture, take a look at the following behind the scenes video from a recent ad shoot:
http://vimeo.com/37505128
We use a program called Capture One, made by the same team who make the Phase One digital medium format system and I have found it to be the most reliable option for a tethered workflow whether shooting 35mm or Medium Format. I have also used Lightroom to a lesser extent, but find that Capture One is the most stable system at this point . If you are just experimenting with tethering, Adobe Lightroom is a solid platform to try, especially if you already own it – all you need then is a long USB cord to connect to your camera. Tethered workflows are not without hiccups, though. Be sure to use a quality USB or firewire cable and make sure to keep it under 15ft (so your signal isn’t diminished). Also try to capture to a fast drive, preferably something internal rather than external – to maximize speed and stability.
Compositing
The beauty in building composite images is the flexibility in what you can create. Compositing isn’t something I always do, quite the contrary, in most cases I’d much rather create something for real than build it digitally. However, it’s a tool we have available, and we use it when we need to achieve something that is technically, logistically or monetarily impossible. With the amazing technology that we all have access to, anything is digitally possible. However, shooting for composites requires a certain shift in your mindset. The biggest things to keep in mind when shooting elements for composites are to maintain consistency between assets in terms of lighting, color, contrast, perspective and also building realistic shadows and interaction between assets. Much of this is addressed in Photoshop, but when shooting for composites, the two biggest issues to address are lighting and perspective.
Although I like to create hyper realistic scenes, where the lighting is a little bit supernatural and subjects are lit to build depth and dimension, I like to keep consistency between the background and talent in terms of light directionality and quality. For that reason, I tend to light the subject based on the quality of light in the background image. For example if your subject is to be placed on a stadium background use hard, gridded light from behind. Recreating moonlight? Use a combination of soft and hard light with a cool color temperature. And so on and so forth.
Perspective is probably one of the most misunderstood and difficult to correct concepts when building composites but easy to control if you’re aware of it from the outset. Unfortunately, many of the composite images you see are actually built from stock photographs, where the retoucher has no control over perspective. This is something that is infinitely easier to correct during the shoot process than afterwards (though with creative use of the transform tool in photoshop, you can make some good headway). All you need to do is take note and maintain consistency in terms of camera height, pitch, focal length and camera-to-subject distance. Easy things to be aware of – but being aware of them is the important part. This is another reason why shooting for composites is an art form in itself and not just something you do in photoshop. None of these principles are inherently difficult, but they require a shift in how you think about the image making process.
I suppose the biggest thing that I am hoping to communicate here is the shift in how I think about image making beyond just photography. The commercial world is not only about being a great photographer with an artistic aesthetic, but also about offering value and being able to solve problems. Hopefully my basic overview of the digital process gives you an idea of how understanding the way a retoucher thinks can make you a better commercial photographer.
In the mean time let’s be friends on:
You can also see more of my work on my website, DeanBradshaw.com.au
Very cool conceptual work Dean! Thanks for sharing!
Absolutely superb!
Great images that are an absolute pleasure to look through and great advice!Thanks for sharing.
Art at another level. The artistic aliens dropped you off on Earth on their way to somewhere else.
Inspirational images Dean. Great vision, execution and an open source attitude. All good!
Awesome images and awesome introduction to the process behind these.
FAV!!!!
Great Blogpost, gratulations
lg calvin
Stunning hyper realistic images without being too OTT. Great work. :)
Sometimes you see someone’s art and you are immediately inspired and you also realize that there is a another level to strive for toward photographic excellence. Your work is awesome Dean. Thank you for sharing with this audience!
Great work as usual!
Really really cool! Thanks for sharing, Dean!
Excellent read. I loved it. Thanks!
Dean is an absolute master at what he does.
Awesome post. Thanks a lot Dean for the priceless info and great work and also thank you Scott and Brad
absolutely fantastic write up and killer work!
Great work, and very useful tips Dean. Good to see an Aussie doing well.
Great work, really interesting, thanks for sharing!
Funny as I watched Dean’s BTS video two days ago and I was wondering if Scott and him know each other. I’m a Kelbytraining member and I’d kill to see some class from him (shoot & retouch). Maybe they’re already preparing some good stuff, let’s hope !
By the way, thank you for this article et videos, you rock.
Fab images Dean, it would be amazing if you could do a class at Kelby training on the composition and ritaching of you images!
Thanks everyone! Glad you enjoyed the post :D Stay in touch on twitter and facebook for more images from a couple of other campaigns dropping soon…
Wow! Just had to wipe the drool from my keyboard. Very inspirational work. Thanks for sharing.
Awesome work dean and great article dean/brad/Scott. Great to see a fellow Aussie going strong.
Awsome pictuers! I can only chime in and say that I’d love to see Dean do an advanced retouching class at Kelbytraining.
THIS is what I would love to be doing. Thanks so much!
From all the team at House of Radon we wanted to say we love your work and thank you for sharing our documentary PressPausePlay!
So you use adobe acr or lightroom for raw convention or you only use capture one?
Great post and amazing work.
Hi Dean, fantastic post. Your images rock and it’s very cool to see from concept to final product. For sometime now i’ve wanted to learn how to composite in photoshop, But really learn some made skillz. Where to start? I truly appreciate some direction from you seeing as you’ve mastered this and more. Where does one start? What resources can I tap to learn some kick @ss compositing? I have no fear in taking courses or paying for learning. I really would love to get some insight from you when you have a moment. Thanks again for sharing your vision and talent with us. Marc-