

Happy Monday everybody — ready to learn about Actions? Wild cheers ensue! (Hey, it could happen). Anyway, I still get questions about Photoshop’s Action feature, so I thought I’d do a ‘quick start’ kinda post to get you up and running in five minutes.
What’s an Action?
If you’re wondering what “Actions” are, basically it’s like a tape recorder in Photoshop that records your steps and plays them back really fast, so you can automate repetitive tasks. Best of all, simple actions (yes, you can create really complex ones if you want), are really easy to create and use.
In our example, let’s say you want to resize a high-res image for posting on Facebook, Twitter, etc., and since you’re resizing it down pretty small, you want to sharpen it before you post it (you lose some sharpness when you size down like that, so I always apply a little sharpening to bring it back, and maybe even a bit more than I lost so it looks nice and sharp). So, rather than going through the process manually from now on, you’ll create a simple action; assign it to an F-key on your keyboard, and from now on the process becomes a 2-second, one key automated thingy.
Let’s get started:

STEP ONE: Open an image you would normally post on social, then go under the Window menu and choose Actions to bring up the Actions panel (shown here). To create your own custom action, press the ‘New Action’ button (it’s looks like the New Layer button — I’m clicking right on it in the capture above).
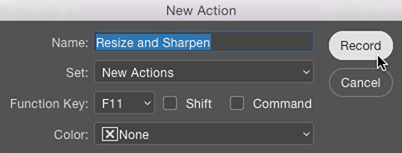
STEP TWO: This brings up the ‘New Action’ dialog (shown above) where you name your action (I did), assign it to a Function Key on your keyboard (I chose F11, as seen here). You’ll notice there’s no ‘OK’ or ‘Done’ button. Instead it says ‘Record’ because once you click that it is now recording your steps.
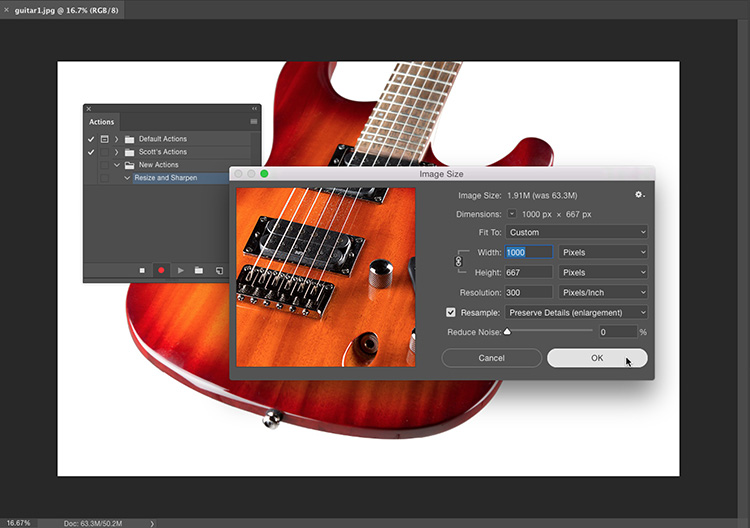
STEP THREE: Now do the things you want Photoshop to automate from here on out. In this case, we’re only doing two things, and the first is resizing the image to 1000 pixels wide (as seen here). Note: take a look over at the Actions panel on the left. See how there’s a red dot? That’s the ‘Record’ button, and it’s letting you know it’s recording your steps. Just a handy visual.

Above: After you resize your image, then go under the Filter menu, under Sharpen and choose Unsharp Mask. Input your favorite settings (I used 70, 1.0 and 10 here, which are pretty decent settings for sharpening low res 1000-pixel images like this for the Web). NOTE: Take a look over at the Actions panel and you can see it now lists the first thing we did to the photo — Image Size. The red dot tells you its still recording.
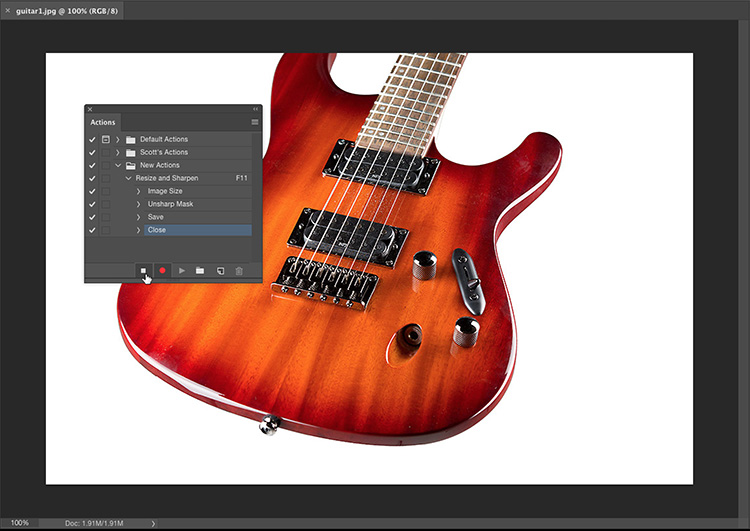
STEP FOUR: After you’ve run the Unsharp Mask filter, go ahead and Save the photo, and then close the image window. Yes, it records the ‘Save’ and the ‘Close.’ Now press the square ‘Stop’ button at the bottom of the Actions panel (as shown here). That’s it — you just created your first action. At this point, I usually open a different image, and I then I click the ‘Play’ button (it looks like a triangle — just to the right of the red record dot), just to see if the action works properly (of course, you could also press F11 on your keyboard, and it will run the action). Doesn’t matter which one you use — you’re just testing it to see if it works. Now you’re ready to rock! (Guitar pun intended. I know. Groan). ;-)
Q. Hey, how many steps can an action like this record? Just two?
A. Nope — it will record for as long as you do stuff — your action can have one step, 10 -steps, 500-steps or more — I haven’t found a limit (there may actually be one, but I haven’t found it yet).
Next Time: Applying an Action to an entire folder of images
Where Actions get really fun is when you create an action, and then apply it to an entire folder of images at once, and you simply walk away from your computer (or switch to another program), and in the background, Photoshop just cranks away working on your behalf, totally unattended, like some autonomous robot from Skynet who will soon become self aware and take over the world. But not this year, so they’re safe to use for now. I’ll show you this ‘Batch Action’ feature on another day — for now, go and make your first action.
If you want to learn more about Actions…
And all the other automation stuff Photoshop and Lightroom can do (and there is plenty), we have a awesome course on it (here’s the link).
I’m up in Chicago today with my Lightroom seminar
So looking forward to meeting a whole bunch of photographers up here today (and tomorrow in Detroit — got a packed house!). Hope if you’re there, you’ll come up and say hi between sessions. Next month I’m in Minneapolis and Indianapolis. :)
Best,
-Scott
P.S. Only 10-days ’till the Photoshop World Conference (Whoo hoo!). It’s not to late to come join us, ya know. Weather’s beautiful in Orlando this time of year. :)

Love actions, especially Luminosity Masking created by actions!!
Yes, I’ve done already an action. Especially I wanna give you thanks for the idea of making answers with useful queries!
These are really helpful post. learning new tricks.