


Let There Be Light
Thanks Scott for the opportunity to be a quest blog writer this weekâ¦it's such an honor dude. And perfect timing as I am preparing for my own Lightpainting Workshop on May 28-30, in Loveland, Colorado.
Okay⦠Let's learn how to Lightpaint.
Humanity is drawn to light. It is in our DNA. We can't help but look towards the brightest part of a picture. As a photographer it is my responsibility to help guide the viewer to the subject in the picture, and I can do so with light.
But sometimes a flash or strobe just isn't graceful enough. That's when I turn off the studio lights and delve into the most creative lighting technique of all. Lightpainting⦠it's the perfect combination of photography and artistic expression.
The word photography in the Greek means "light writing." Simply said, Lightpainting is the revealing of the subject from darkness with light. In general, Lightpaintings make use of long exposure times like 3 seconds, 10 seconds, 30 seconds, 2 minutes, or more.
Let's begin with some basics and Lightpaint a "Table-Top" Still Life. I will need a dark environment for my little subject â¦the Yellow Tail Fly. I will use a Manual Exposure of which I have a basic starting exposure that I begin many of my Lightpaintings with: ISO500, 30 seconds at f/8.
During the 30 seconds exposure time I will use a mobile light source to illuminate the subjects in the scene and reveal them from the dark with Lightpainting.
For my Table-Top still life and live model Lightpaintings I use a small Stylus penlight with a single LED bulb made by Streamlight.
First I arrange my subject and composing the scene. Then, like with all Lightpaintings, I secure the camera on a sturdy tripod. With the studio lights turned "on" I use Auto Focus on the subject and then turn "off" the auto focus. This is so the auto focus does not activate or "search" in the dark when you turn off the lights, open the shutter, and begin to Lightpaint.
I use the Auto Focus (AF) back button. By simply releasing your thumb from the AF button on the back of the camera it stops activation of the Auto Focus operation. Or you can also simply turn OFF the AF switch on the barrel of the lens or camera.
I also use a Manual WB of 10,000 Kelvin when Lightpainting with any LED flashlight. This setting helps add a warm color tone to the overall picture. And I will also activate the Long Exposure Noise Reduction mode in the camera. This prevents any noise speckles from appearing due to the long exposure time that generates heat inside the camera.
I'm now ready to turn OFF the room lights and make my first "TEST SHOT" without adding any Lightpainting to the subjects, just to see if there is any unwanted ambient light creeping in from a window or the door.
With a dark or "Blank" image on the LCD screen I'm now I'm ready to add some Lightpainting. I like to apply the light from off camera angles to create a dramatic lighting effect. In this image titled Yellow Tail Fly, the light from my Stylus is coming into the scene from the upper right corner of the frame.
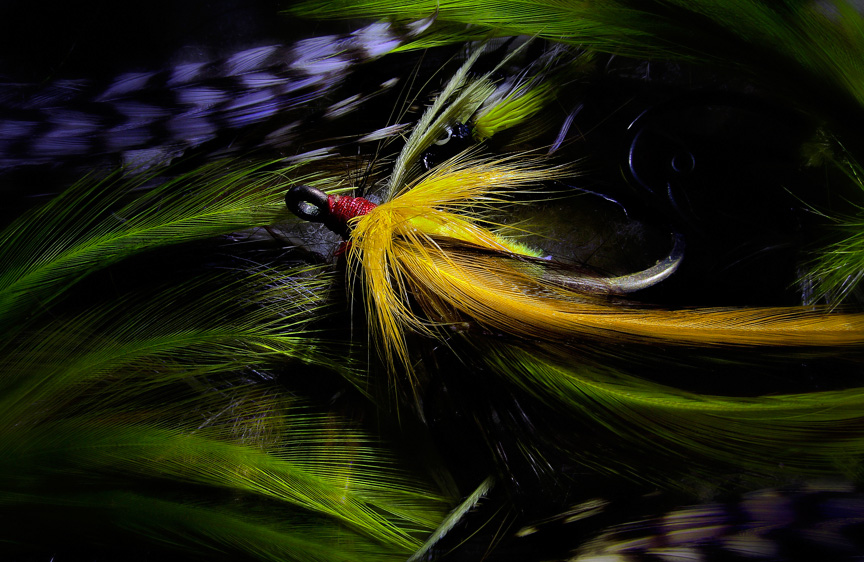
Yellow Tail Fly: Nikon D7000, ISO400, 30 seconds exposure at f/32, Nikon 28-300mm VRII zoom lens at 300mm, WB 6700K, Manfrotto Tripod with 410 Gear Head, Stylus penlight, SanDisk 32GB Extreme Pro Flash Card.
The closer the light source is to the subject, the brighter the subject becomes. Also said, the longer time I spend illuminating my subject the brighter the subject becomes. Too much light or too much time spent applying light can overexpose portions of the imageâ¦and vise verse.
I try to keep the light source (Stylus) moving while applying the light, usually in a swirling or brushing motion. This helps soften the transitional edges between light and shadow, which is key in creating a painterly quality to the picture. You are in effect "painting with light."
My basic Manual Exposure setting of ISO 500, 30 seconds at f/8 is a good way to begin, but it can vary depending on intensity of your flashlight and the distance from flashlight to subject, and also how large your subject is. Don't give up, I sometimes make 10-15 Lightpaintings before I get one that I like.
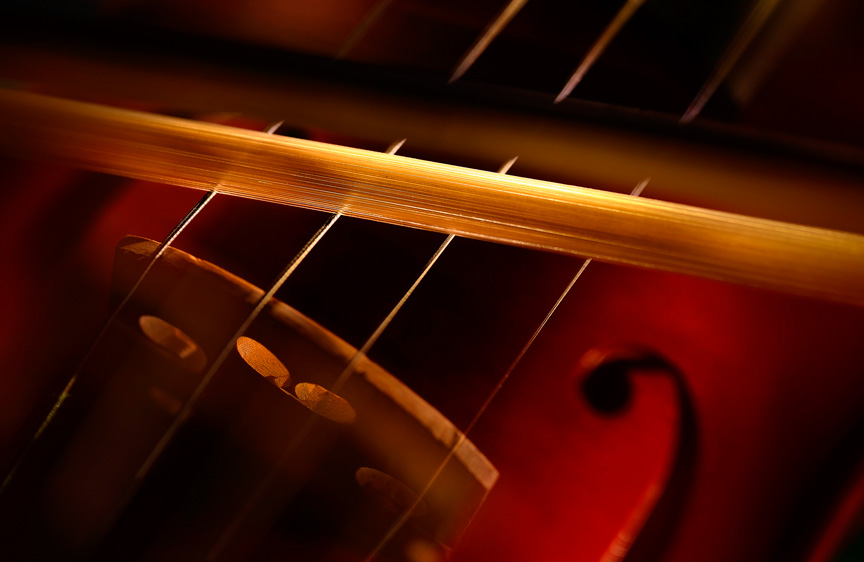
The Red Violin: Nikon D800, ISO100, 1 minute at f/6.3, Nikon 105mm MACRO lens, WB 10,000K, Manfrotto Tripod with 410 Gear Head, Stylus penlight, SanDisk 32GB Extreme Pro Flash Card.
Here is another "Table-Top" Still Life, but it has 2 variations from the Yellow Tail Fly. I used a lower ISO of only 100 and I increased the exposure time to 1 minute. Why? â¦because I felt I would need 1 entire minute to "precisely" apply Lightpainting from only a few inches away, and from multiple Off Camera angles. Lightpainting so close to the subject using ISO500 would result in way overexposing the subject.
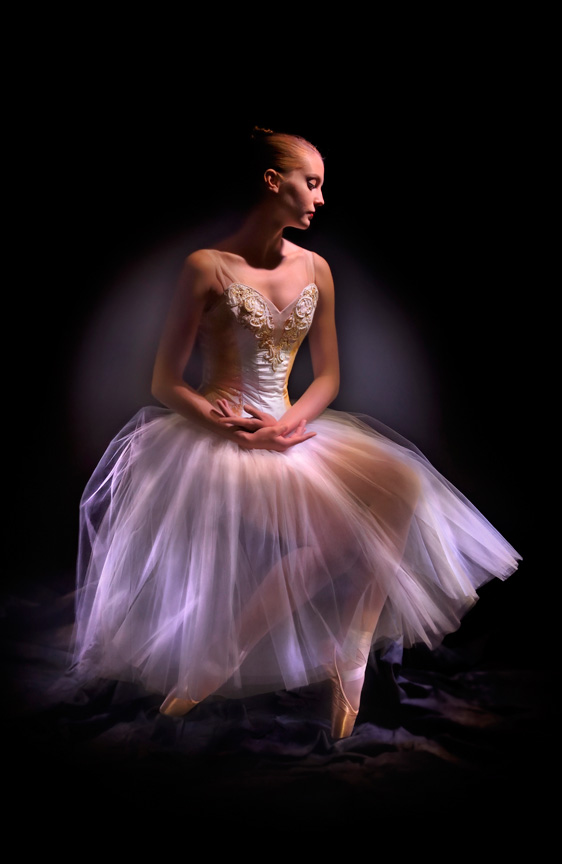
Ballet Romantica: D810, ISO1000, 30 seconds at f/5.6, Nikon 24-70mm lens, WB 10,000K, Manfrotto Tripod with 410 Gear Head, Stylus penlight, SanDisk 32GB Extreme Pro Flash Card.
Lightpainting people is a lot of fun â¦as long as the model remains perfectly still during the long exposure time of 30 seconds. My advice is to find a very patient subject.
For this image I increased the ISO to 1000 but still used just a single Stylus penlight for this Lightpainting of a Ballerina. I only Lightpaint the model’s face for 2 seconds and about 3 feet away. Any longer or closer and they will blink.
Because there is no light on me I can actually be "inside" the picture, but not be seen. This enables me to Lightpaint the costume artistically from only 2 feet away. The "brush strokes" of Lightpainting on the Romantica costume really look interesting.
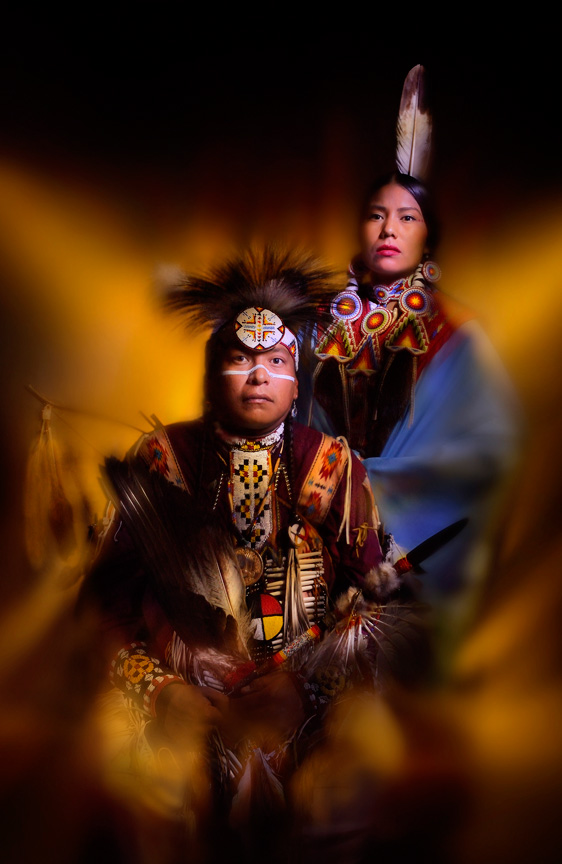
Lakota Portrait: Nikon D800, ISO1600, 30 seconds at f/14, Nikon 24-70mm lens, WB 10,000K, Manfrotto Tripod with 410 Gear Head, Stylus penlight, SanDisk 32GB Extreme Pro Flash Card.
I still used the same Stylus penlight to Lightpaint my two distinguished Native American subjects, but also used a larger 125 Lumen LED flashlight with a Full CTO (orange) warming gel taped over the front to Lightpaint the background.
And I incorporated a NEW technique that I simply call "Soft Focus." I used only 15 seconds of the 30 seconds exposure time to Lightpaint my subjects in focus. Then I purposely unfocused the lens by manually turning or "throwing" the focus ring to infinity, and resumed Lightpainting the outer edges of the scene and the background for the remaining 10 seconds.
The results is unique, as my subjects are in perfect focus, while my background and outer edges of the scene are out of focus. This "Soft Focus" technique has become my favorite stylization addition to many of my Lightpaintings. Adding Gaussian Blur in post doesn't look the sameâ¦"Soft Focus" Lightpainting is truly unique.
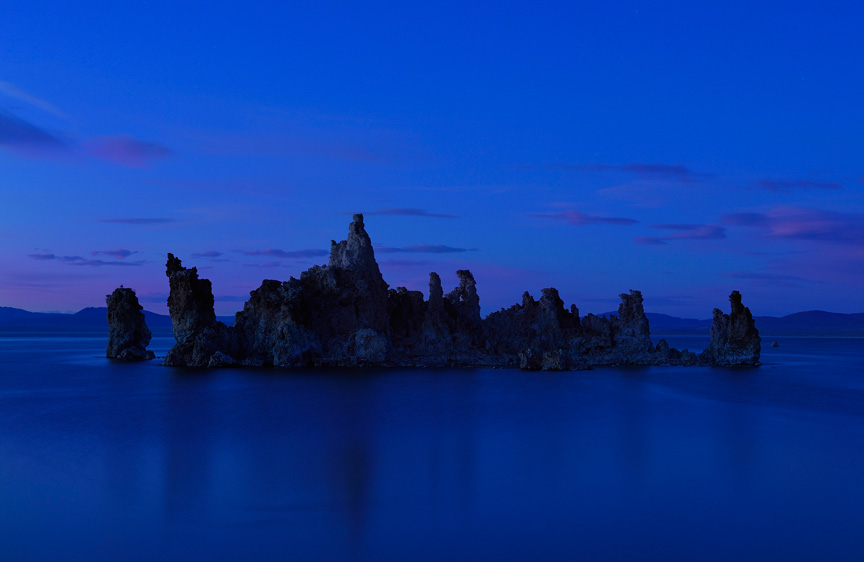

Tufa Twilight Reflection: Nikon D4s, ISO500, 30 seconds at f/8, Nikon 24-70mm lens, WB 4000K, Manfrotto Tripod with 410 Gear Head, Brinkmann Max Million II (2 million candle powered rechargeable spotlight), SanDisk 32GB Extreme Pro Flash Card.
Twilight is my favorite time to Lightpaint outdoor landscapes. The big gear difference is my light source â¦I use the Max Million II rechargeable 2 million candle spotlight by Brinkmann.
These 2 images illustrate a "Before" and "After" comparison. At twilight the Tufa formation becomes a silhouette, which is the perfect time for me to reveal it with Lightpainting. The WB of 4000K makes the twilight sky a beautiful pastel blue. I add the warm "Golden Hour" light from my Brinkmann Max Million II spotlight from an Off Camera location to the left of the Tufa. I'm standing on the shore about 300 feet from the Tufa.
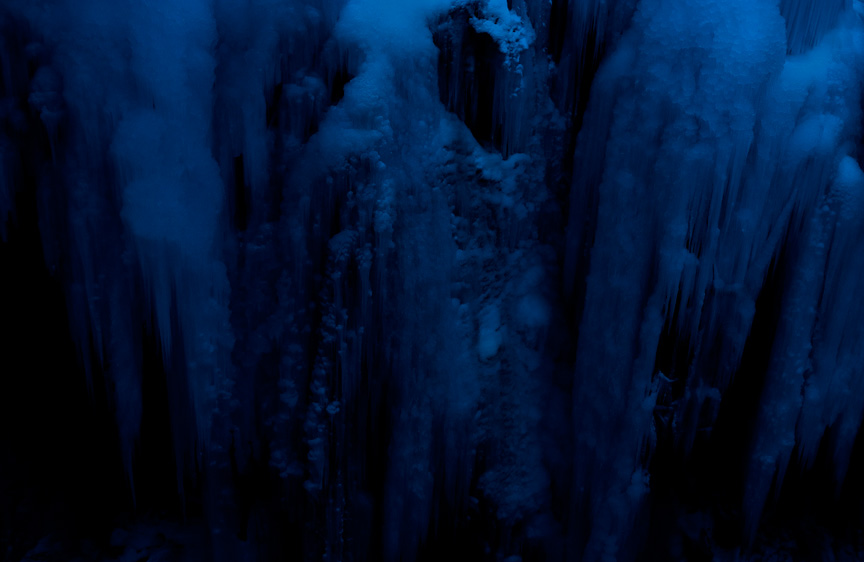
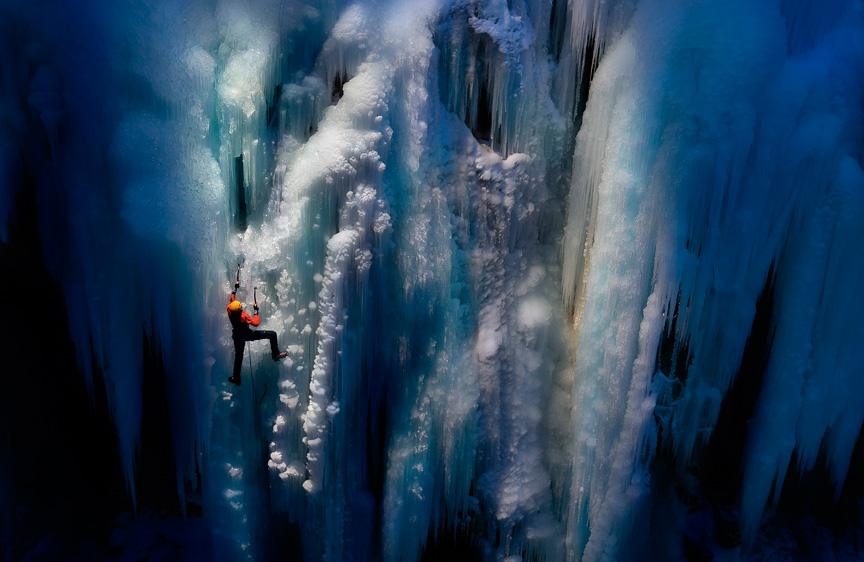
Stairway to Heaven: Nikon D200, ISO100, 13 seconds at f/8, Nikon 24-70mm lens, WB 3030K, Manfrotto Tripod with 410 Gear Head, Brinkmann Max Million II (2 million candle powered rechargeable spotlight), PocketWizard Multi MAX Transceiver, SanDisk 16GB Extreme Pro Flash Card.
This image of international Ice Climber, Chris Alstrin, was one of my favorite career projects. Even though this section of the Ice Gorge in Ouray, Colorado is huge, it only required 13 seconds to "shower" Lightpainting down on Chris from my location on the rim of the gorge using the Brinkmann Max Million II spotlight.
Shot at twilight Chris remained perfectly still while he examined his climbing route during the 13 seconds exposure time. I triggered my camera, located across the Ouray Ice Gorge, remotely using a PocketWizard Multi Max Transceiver.
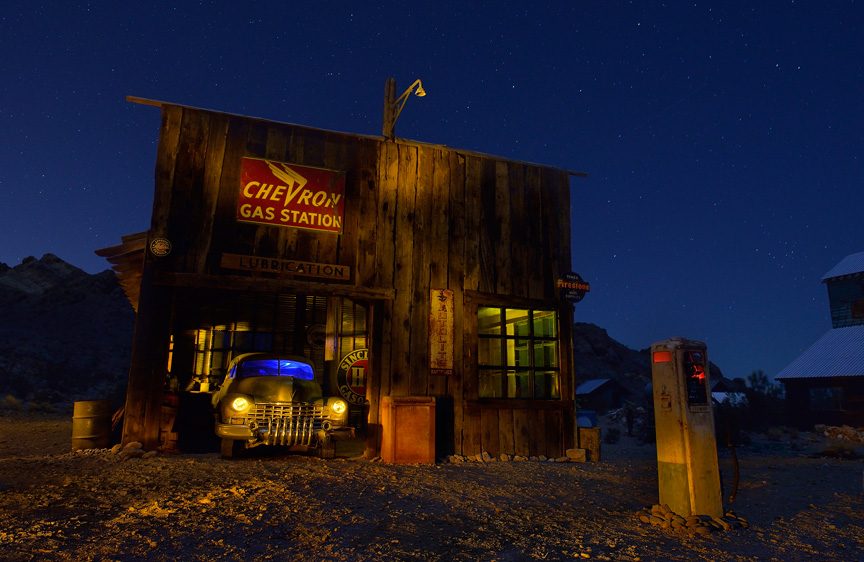
Twilight Gas Station: Nikon D800, ISO800, 30 seconds at f/8, Nikon 24-70mm lens, WB 4000K, Manfrotto Tripod with 410 Gear Head, Brinkmann Max Million II (2 million candle powered rechargeable spotlight), SanDisk 32GB Extreme Pro Flash Card.
This Lightpainting was made in Nelson, Nevada in November last year. Despite its complexity to make, it still follows the basics for Lightpainting.
All my Lightpaintings whether it's a small still life, a model, or a landscape, are a single RAW file with no separate layers assembled in post. But for this lesson I have broken down the final Lightpainting into separate images below showing how I applied the Lightpainting during the 30 seconds exposure time.
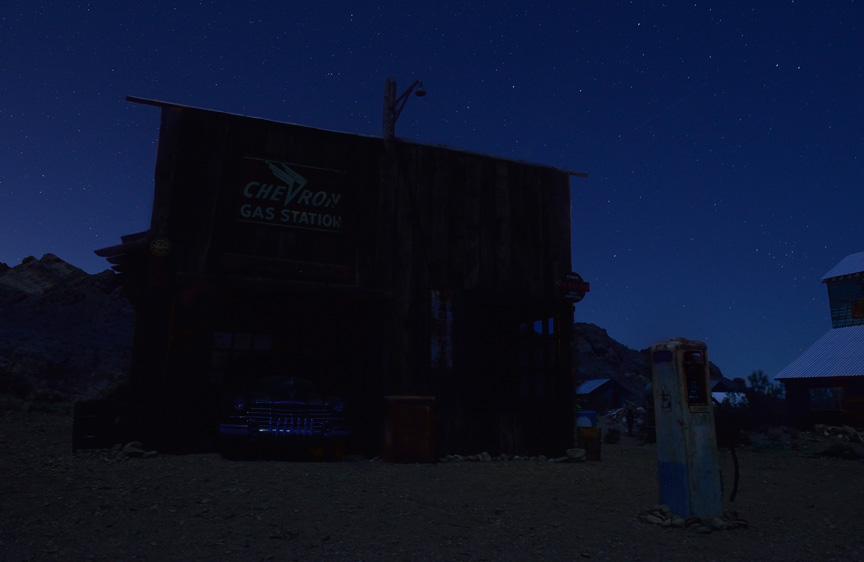
As is my basic to begin all Lightpaintings, this image is my TEST SHOT to see what the ambient light is doing with the Manual Exposure settings of: ISO800, 30 seconds at f8. There is a half-moon high in the night sky, thus, the ground has a slight illumination. But the scene is mostly a silhouette of the garage, car, and gas pump against the starry sky.

I have placed a head lamp with a blue gel on the driver's seat. It remained turned "on" during the entire 30 seconds exposure, and as you can see it illuminated the interior of the car with blue light.
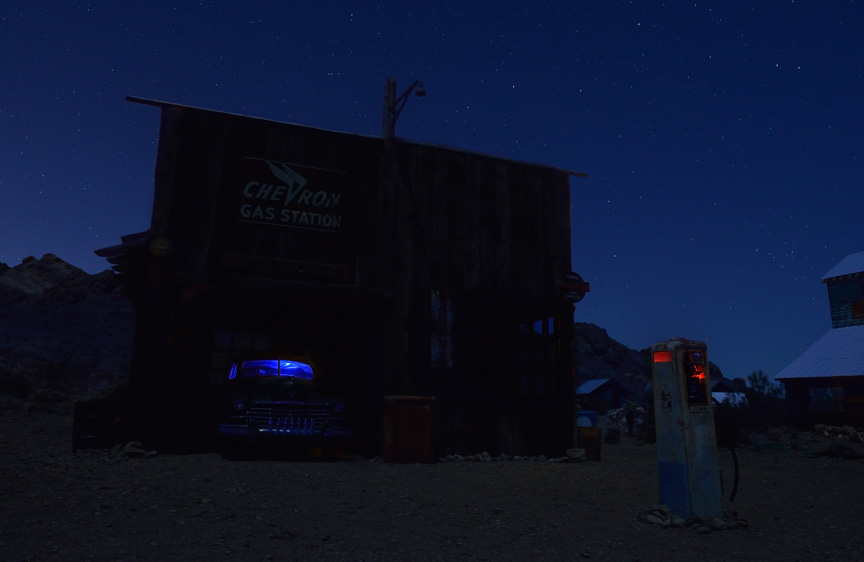
I placed a Stylus penlight with a Red LED inside the gas pump. It remained turned "on" during the entire 30 seconds exposure, it illuminated the inside of the gas pump with a red glow.
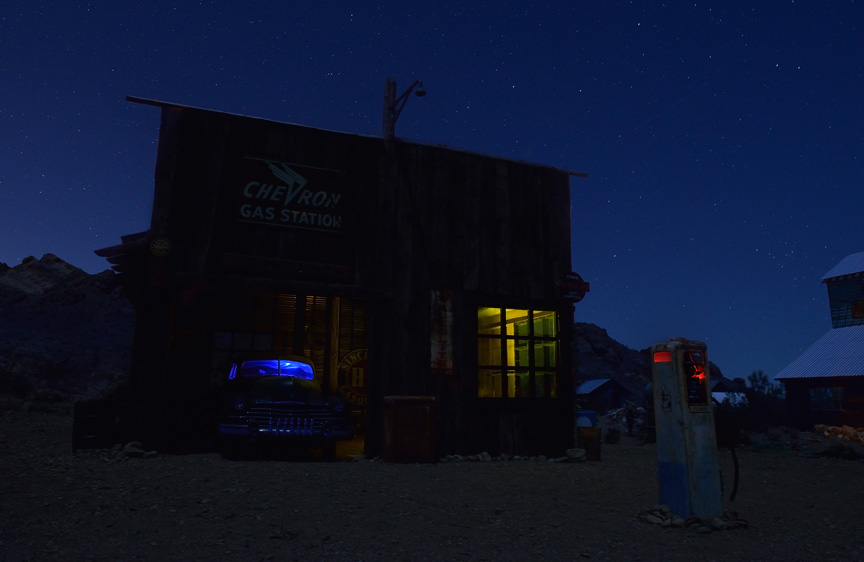
I have placed a head lamp with a yellow gel on floor of the garage near the front window. It remained turned "on" during the entire 30 seconds exposure and illuminated the inside half of the garage yellow. With all these small lights set in place and turned "on" for the entire 30 seconds exposure time, I'm now ready to press the shutter button and begin my Lightpainting.
I stood outside the scene to the left and used my Brinkmann Max Million II to add about 5 seconds of Lightpainting through the left side window of the garage. This illuminated the interior back wall of the garage and the Sinclair sign.

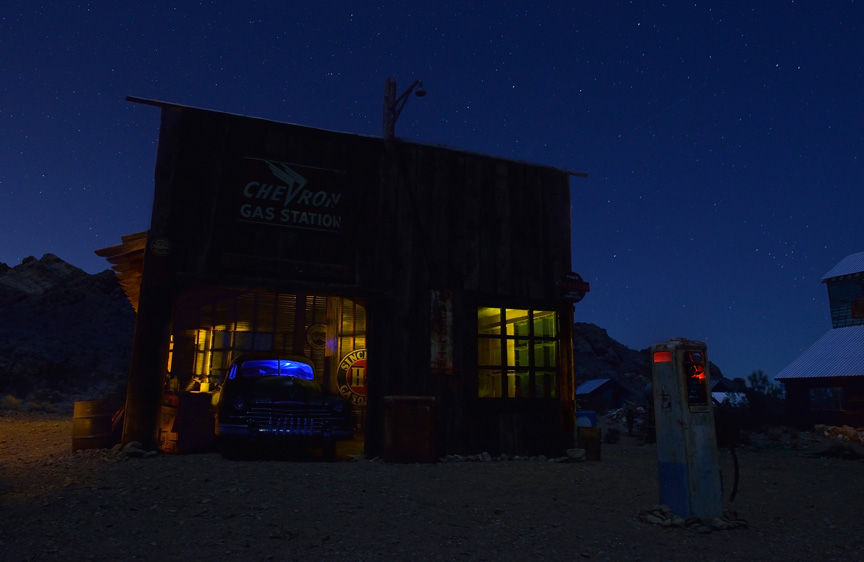
I then walked in front of the car and popped 1 second of Light from the Brinkmann into each headlight. Now the car looks "alive" with headlights mysteriously glowing.
Finally, I step out of the picture to the left and Lightpainted the garage exterior for about 10 seconds. Then I "skipped" a little Lightpainting along the ground and the gas pump for about 5 seconds. "CLICK!" The 30 seconds exposure is done, and the shutter closes. The Lightpainting is completed in 1 RAW file, as is my style for all of my Lightpaintings⦠as mentioned earlier, I do not layer multiple images in post.
All this was done in 30 seconds??? Yes. If the exposure time was any longer the star movement would be recorded. I used every second of the exposure time to walk around (Ok, I run around like crazy) and completed the Lightpainting in a single RAW file capture.
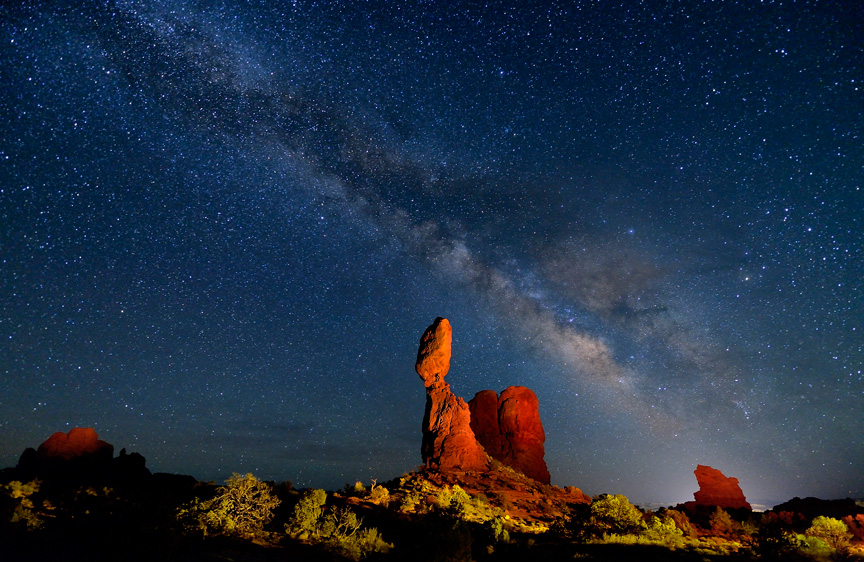
Balanced Universe: Nikon D800, ISO4000, 25 seconds at f/2.8, Nikon 14-24mm lens, WB 4000K, Manfrotto Tripod with 410 Gear Head, Brinkmann Max Million II (2 million candle powered rechargeable spotlight), SanDisk 32GB Extreme Pro Flash Card.
Balanced Universe breaks the mold of basic Lightpainting with its unusual exposure settings of ISO4000, 25 seconds at f/2.8. The extremely high ISO and wide open aperture enable the Milky Way and cosmos to be seen over Arches National Park.
I used the exposure time of 25 seconds to Lightpaint the iconic Balanced Rock formation from my OFF Camera location with my Brinkmann Max Million II spotlight. While my WB of 4000K kept the Universe a deep blue, I used a Red Gel over the front of the Max Million II to Lightpaint the Balanced Rock and removed the red gel to Lightpaint the bushes and scrub oak.
Well, I hope you have enjoyed this step-by-step article teaching how to Lightpaint.
I will be teaching several classes at Photoshop World 2015 including a Lightpainting Workshop, a Lightpainting step-by-step class with a LIVE model, Sports Action with Speedlights – High Speed Sync, Location Portraits with Speedlights, Shark Tank Critique panel, and the Art of Photography panel.
Thanks Scott for the opportunity to Guest Blog for you. Can't wait to see everyone at PSW 2015. Adios, Dave
You can see more of Dave’s work at DaveBlackPhotography.com, follow him on Instagram, and check out his classes on KelbyOne.
Proud owner of 6 Max Million lights :)
Cool stuff Dave. Thanks for sharing.
Great blog post, Dave. Very inspirational.
If anyone gets a chance to see Dave teach, jump on it! I saw him at PSW a couple of years ago, and I thought he was one of the best instructors there.
–John
He gave an emotional talk at the finaly too!!
Thanks for the tips Dave. Nice work.
This was so inspiring. I will be trying with the still lifes and move up to larger projects. Dave, these images are beautiful!