

How to Create an Architectural Photo: Manhattan Style
I'd first like to thank Scott and Brad for inviting me to be a guest blogger! When I was asked to write a post, I was very excited and immediately began thinking about what to share. I love when photographers show how they created one of their favorite images from start to finish, so that's what I'm going to do for you.
Although architecture is a relatively small niche of photography, there are many architectural photographers out there; each with their own style of shooting and retouching. Some do very minimal retouching, if any, to their photographs, but I am not one of those. I put just as much time, love and attention to detail in post as I do on set. Every square inch is accounted for whether I'm behind the camera or behind the computer monitor, and here's how I do it.
The Assignment:
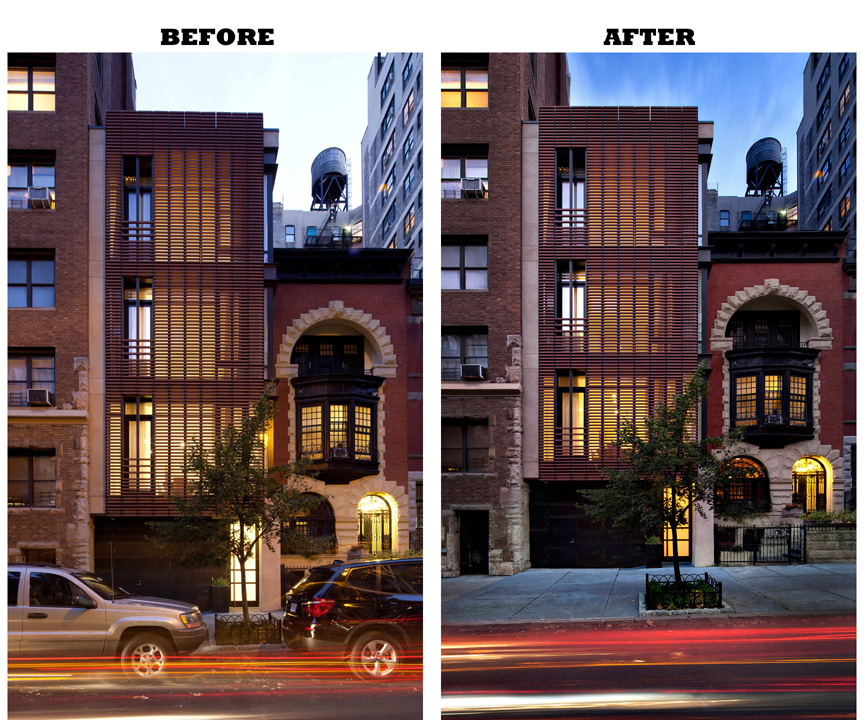
The image I'm going to talk about is of a residential townhouse on the Upper West Side. This street happens to be one of the few in that neighborhood that's not landmarked, so the architect was able to redesign the entire fa§ade with a modern twist. It's very different from the rest of the townhouses on the block (and really all of New York City), yet the colors and materials used allow it to blend well with its surroundings.
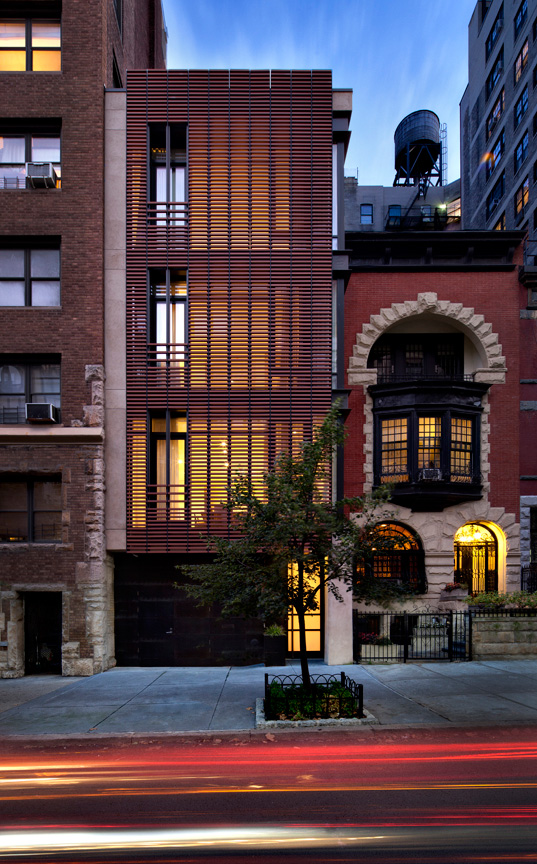
Final Image
The client wanted a dynamic shot of the building with no cars parked out front. I knew that the best time to do this would be about 15 minutes after sunset time. Twilight skies emit a vibrant blue color, and with the lights in the townhouse turned on (which my client had arranged for), the house really comes to life. I also had to find out the street cleaning hours for the building so that I could get a clean shot without the cars. Since there would be cars parked outside during the optimal twilight period, I planned on doing the same shot at two different times with the intention of compositing them in post.
Shooting at Night:
I arrived a few minutes before sunset to prepare for the first shot (sunset times can be found at SunriseSunset.com). While waiting for that magical blue light, I took note of the street cleaning time, which was going to be Friday from 11:00am - 12:30pm. I stuck three small pieces of Gaffer's tape on the street where my tripod was set up so that I could return to the exact same spot on Friday. I also waited for a few cars to pass by to get a few swooshing lights going across the bottom of the image for added color and drama.
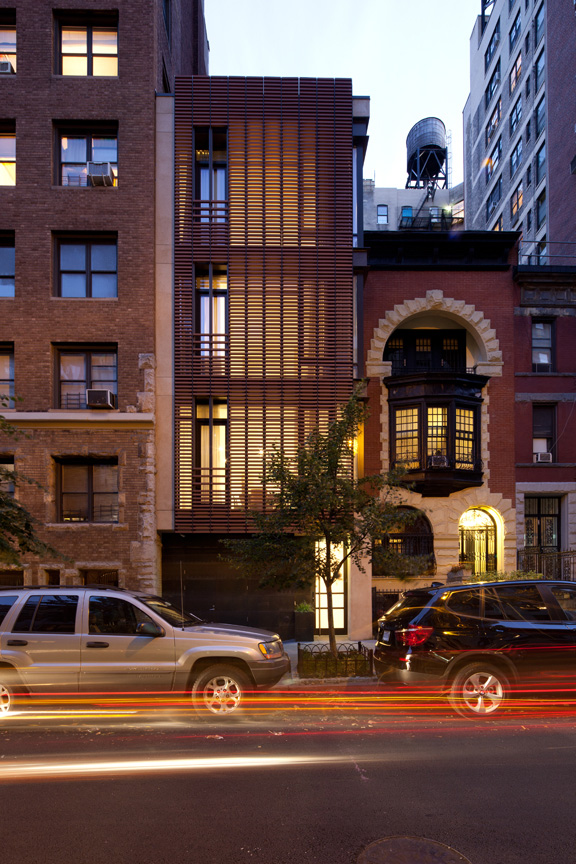
Unretouched twilight shot of the building
On Friday I returned to my spot during the street cleaning time to recreate the same shot, only this time there would be no cars parked out front. I positioned my tripod over the tape marks that I'd left from the night before and composed the image as best I could to mimic the composition of the twilight shot. I knew the alignment wouldn't be perfect, but it would be good enough since I only needed to use the sidewalk portion of this picture.
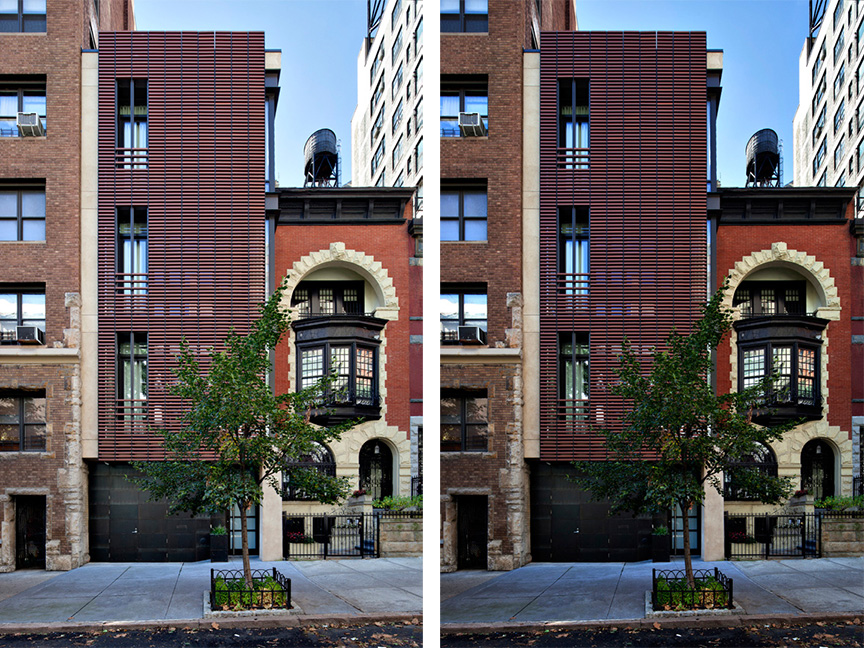
Left: unretouched daytime shot of the building. Right: same shot only darkened using Curves in Photoshop
Post-Production:
As you can see above, the daytime shot was made darker to make the sidewalk appear to have been shot at twilight. I layered and aligned the daytime and twilight shots together, created a mask, and painted in the sidewalk from the daytime shot.
Left: original, RAW twilight shot. Right: final image after retouching
Equipment:
I created this shot with my Canon 5D Mark II and a Canon 17mm Tilt/Shift lens at ISO 200, f/11, and a shutter speed of 6 seconds. I use tilt/shift lenses for about 80% of my work, both exteriors and interiors. Even with this small townhouse, the 17mm TS lens needed to be shifted upward to capture the entire building. When I can't get the whole building in one frame, I'll compensate by taking two shots - usually the bottom portion including some of the street, and then the upper portion including some extra sky - and then I stitch them together in Adobe Photoshop. In this case, only one shot was needed.
I always shoot on a tripod so that I can bracket the exposures for manual HDR processing. I say manual because I don't use HDR software, which processes and merges the bracketed exposures together. Instead, I choose which parts of each exposure I like the best, and I blend them by hand.
Final tips for shooting urban architecture:
- The size of the building will determine which lens you need to use (I strongly recommend using tilt/shift lenses for architectural photography).
- Season - are there trees in front of the building? If so, would the shot look better with foliage?
- Scout out parking rules and regulations - it's best if you can shoot the building without cars parked out front.
- Time of day - if you're shooting during the day, it's important to consider the direction of light to avoid harsh and unwanted shadows.
The final ingredient for shooting architecture is passion. Study the location you are going to capture. Visit it during the day and also during the night to see how it looks in different light. Think about the purpose of your photo and who your client is. An architect wants to see the beauty in what they created through form and functionality. Thanks for reading, and I hope you learned something useful!
Architecture by workshop/apd
You can see more of Donna’s work at DonnaDotan.com, and follow her on Google+, Facebook, and Twitter.
Excellent- really nice work here. The thing about Tilt-shift lenses (I have a 24) is when you shift up to straighten lines ellipses become distorted as in the water tower at the top of the image- that kind of drives me nutso, because the point of a T/s is to fix perspective aberration but only up to a point, eh?
I could easily remove the water tower in post since it’s not an important element of the shot (although they are very “new york” and I like having them in shots). The best solution would have been to shoot from one of the apartments in the building across the street so that I could get some more height.
Interesting and enlightening post. Thanks for sharing your thoughts and workflow. I like your solution for dealing with parked cars (my pet peeve).
Got to know, how did you leave the swooshing lights in when you masked out the cars? Very nice, great to see your workflow. I’m forced to do some architectural shots as an amateur so I look forward to visiting your website!
See reply above!
Donna, thanks for taking the time to share some of your ideas. The parking times, the use of gaffer’s tape, and the sunset times are very practical tips. Your final composite is excellent. I’m also interested in how you did the taillights in the final image.
The sidewalk is from the daytime shot, but the swooshing car lights are from the original night shot (I combined light streaks from several different shots).
Donna, like the final result. You darkened the sky a bit toward a medium blue to add to the overall mood and the final processing added a bit of clarity that did not look contrived. The lights and darks were balanced to bring out the great features of the building’s architecture. Also, this pic depicts a real scene because some of the lights are on while others are not. Some, who try this transformation make the mistake of having every light in the building blazing which looks manipulated. (Great tip on the tape to mark your original tripod location.)
Very helpful tips. Thanks, Donna.
I really enjoyed this one. Very nice work and I love seeing how its done!
Nice work Donna. Love your website imagery too. I found you on the B&H/Canon lens site. I’m curious about the use of tripods in the city. I’ve heard that you need specific permits there to even open one up on public property. Is this true? Or is it better to beg forgiveness than to ask permission? ;)