

Regaining Your Digital Life
So You Can Have More of a Personal Life
I frequently find myself scratching my head…why is it that each new tool that is supposed to save us time seems to keep us occupied more often. The more people try to enhance their productivity, the more likely they are to stay attached to their computers. This is really a shame as the goal is to get more time back, more time for shooting, more time with family and friends, or even just more time to sleep.
I make my living being fast in Photoshop. Whether it's for clients who hire my shop to create broadcast graphics and multimedia projects or for those who read my books and watch the weekly podcasts. It is my job to get things done… in this spirit, let me share ten things you can do to speed up Photoshop and carve out more time for your personal life. On their own, not one of these are not going to change your world, but together you'll find yourself with literally hours freed up each week.
Scratch Disk & RAM
For many of us, the days of RAM costing as much as the computer seem like recent memories. I remember buying my first Mac clone for my startup business, a Power Computing tower. The RAM cost more than the computer. Hard drives weren't much better.
Just last week, we added a new Mac Pro to the office. A quick online shopping experience and we added 8GB of RAM for $269 and 1 TB if internal storage for $145. The cost to take the machine to screaming fast? About $425 with next afternoon delivery. That's not to say you should go crazy with upgrades, but $400 well spent makes the machine significantly faster at opening files and managing memory.
While we are on the topic, if you are going to Photoshop CS4, be sure your graphics card is beefy with Open GL support and you'll see a much more responsive Photoshop.
Shoot Raw and Use Camera Raw, Lightroom, or Aperture
I am continually amazed at how many people do not shoot Raw, and I mean just Raw. I recently ran a survey over at my Photoshop CS4 blog (www.CSFour.com) to see people's shooting habits. Here's the breakdown:
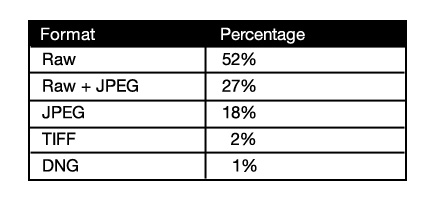
So the good news is that half of you are shooting Raw, the bad news is that the rest of you are shooting Raw+JPEG, JPEG, or TIFF. I won't preach the benefits of Raw from a quality point, just speed.
If you process your Raw files using programs like Camera Raw or Lightroom from Adobe or Aperture from Apple, then your repetitive work vanishes. I recently shot a hospital tour with one other photographer. Between the two of us we racked up 1,600 images in 6 hours. The thing was, once a picture was tweaked, we could apply those settings to most of the other exposures shot in the same location.
Some of you will argue that you need JPEG. Okay, I can accept that. Just use the free Instant JPEG From RAW utility available at www.rawworkflow.com. You can also easily process JPEGs from any of the apps mentioned above.
Shooting Raw means you can learn from most of your mistakes without losing the shot. The incredible latitude of Raw allows you to easily fix problem images without having to reshoot or perform major surgery.
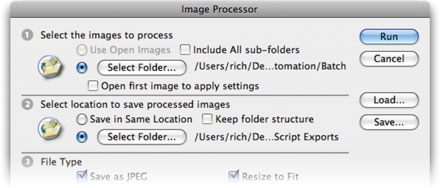
Use the Image Processor Script
One of my favorite features of Photoshop is the Image Processor Script (originally called Dr. Brown's Image Processor. The Image Processor command can be used to convert and process multiple images. It made its official debut in Photoshop CS2. It can be used for any of the following tasks:
- To convert a set of files to JPEG, PSD, or TIFF format. You can also convert files simultaneously to all three formats.
- To process a set of camera raw files using the same camera raw options.
- To process a set of camera raw files using the same camera raw options.
- To resize images to fit within a specified pixel dimension.
- To embed a color profile into images or convert files to sRGB and save them as JPEG images for the Web.
- To include copyright metadata into the processed images.
I won't bore you with the details here… just download this PDF and read pages 19-20 of the PDF. It has detailed step-by-step instructions.
TIP: Apply One Raw Setting to All Files
If you need to process a group of camera raw files taken under the same lighting conditions, you can open and adjust only the first image to your satisfaction. In the Image Processor dialog box be sure to check the box next to Open first image to apply settings. You can then reuse the same settings to the other images.
Utilize Workspaces and Customize Your Menus
The Photoshop on your computer is your Photoshop. Even if it really isn't yours (because it belongs to your company or school) you still need to customize it to fit. Think of it as a precision sports car, you're going to need to adjust the seat, tweak the mirrors, and dial in your favorite music. That's what workspaces and menu customization are all about.
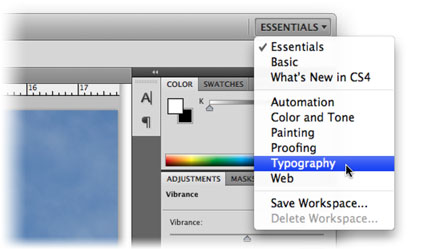
You can save any combination and arrangement of panels that you want to reuse. Then you can access it in one click with Workspaces. Effectively, using Workspaces enables you to switch between different production tasks (such as image touchup and type work) with ease. Plus, it is a way to customize the application and make it feel more welcoming to you. Let's try it out.
- Open the panels you need, and arrange them into the desired positions.
- To save the current workspace layout, click the Workspace switcher and choose Save Workspace in CS4. Older versions of Photoshop should choose Window > Workspace > Save Workspace.
- Enter a unique name for the workspace, and click OK.
- To activate a workspace in CS4, choose from the Workspace switcher in the Application bar (older versions of Photoshop, choose Window > Workspace). To update a workspace, re-save it with the same name. To delete a workspace, click the Workspace switcher and choose Delete Workspace.
While you are at it, be sure to customize your menus. There are A LOT of items in the Photoshop menu that you likely don't use on a regular basis. Pruning your menus means less time wasted as you hunt for a particular command.
- Choose Edit > Menus.
- Click the second disk icon to the right of the list showing Photoshop Defaults.
- Name the new set something logical (like your name) and click OK.
- Click the disclosure triangle next to a menu category
- Navigate through the list of all menu items, clicking the visibility icon to hide items.
- Click the Color (usually labeled None) to change an items color.
- When finished, click the disk icon to save changes, and then OK to apply the set.
While working, you can always access hidden items. Simply choose Show All Menu Items from the bottom of the selected menu. Now, isn't that much neater?

Keyboard Shortcuts
After taking about menus, it's only appropriate to talk about keyboard shortcuts. Seems like there are two camps… the zealots and the naysayers. Let me make this analogy, you'd never see Big Electric Cat's Scott Kelby pick notes one at a time from a menu.
- You need keyboard shortcuts… but how do you learn them? The answer is strategically.
- Keep a pad of paper next to your desk. If you find yourself going to a menu item or tool more than 5 times in a work day, write it down and look up its shortcut.
- To see a list of default shortcuts, choose Edit > Keyboard Shortcuts. Click the Summarize button and target your desktop and click Save. A new HTML document opens showing you the majority of keyboard shortcuts. You can browse this for the most common tools. While in the Edit menu, you can also customize your own shortcuts.
- What the definitive guide? It's a bit out of date, but it still rocks. Head over to Amazon and pick up a used copy of Photoshop 7 Power Shortcuts by Michael Ninness. This book rocks and I wish Michael had time to revise it.
 Batch Rename Files in Bridge
Many people make the argument that you shouldn't rename files, I don't subscribe to that belief. When its time to give pictures to a client, I believe in clear and concise labels that leave little to the imagination.
Harnessing the power of Adobe Bridge makes renaming files a snap. This means your clients or coworkers can find things more easily without calling you. It also allows you to free your mind up for more important things than remembering obscure codes and digits.
- If its not running already, launch Adobe Bridge CS4. In Photoshop, you can click the Bridge button at the top of the Application frame.
- Navigate to a folder with images.
- Press Cmd+A (Ctrl+A) to select all the files within the folder.
- Choose Tools > Batch Rename. A new dialog box opens.
- You must specify a destination for the renamed files. You can choose to keep them in their current folder, move them to another folder, or copy them to another destination.
- Specify New Filenames using a combination of pop-up menus and a text field.
- Check the Preview of the new filename for accuracy.
- Specify that you want the files to be compatible in Mac and Windows.
- When ready, click the Rename button to complete the batch rename. The Batch command is a useful way to improve the organization of your files.
 Adobe Output Module
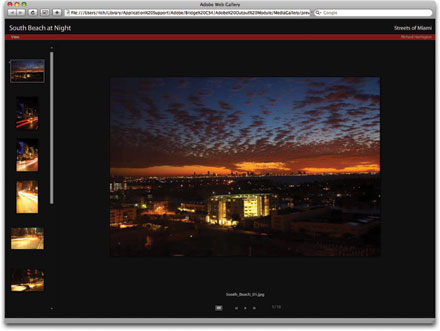
While we are in Bridge, I'd be remiss if I didn't point out the new features in Bridge CS4 collected in the Adobe Output Module. When you launch CS4 you'll eventually discover that both the Contact Sheet and Web Gallery functions are gone. Fortunately while Adobe taketh away, they also giveth. The new (and better) replacement is the Adobe Output Module in Bridge CS4. Here you can easily generate contact sheets or slideshows as PDF files or rich Flash based websites. These let you quickly show clients a collection of images without a lot of work on your part.
I'm not going to go into exact details here. Rather, you can download the PDF we mentioned above and read pages 25-30, which covers all three tasks in detail. It's a free chapter from my new Photoshop CS4 book and it covers automation in detail. If you aren't using these features, you must, they look great and are an absolute snap to use.
Actions
Photoshop's actions technology lets you record nearly every command (or better yet, a series of commands) and then play them back on another image. You can use basic actions, such as a resize or file format change, to quickly convert files at a push of a button.
These simple actions can be recorded, and then mapped to empty function keys (F-keys, F1-F12) at the top of your keyboard. By using combinations of Shift and Command (Ctrl) as key modifiers, a standard keyboard has 48-60 customizable keys (depending on the size of your keyboard).
Use those Function keys! Remember that list we talked about making in the Keyboard Shortcuts section? Turn it into a scorecard and keep track of your most frequent commands. You can then map those commands (or tasks) using actions.
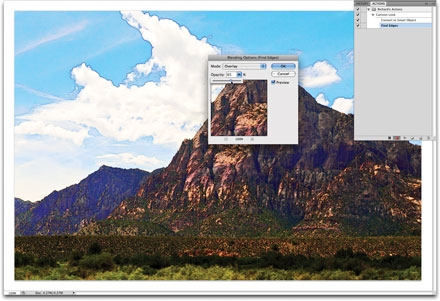
Here's a sample recipe, just open up a photo:
- Call up the Actions panel and click the folder-shaped button to create a new set. Name the set using your own name and click OK.
- Click the New Action icon. You can give the action a name now or rename it later. In this case, name it Cartoon Look and click the Record button.
- Choose Filter > Convert for Smart Filters to make the layer a smart object, then click OK.
- Run the Find Edges Filter by choosing Filter > Stylize > Find Edges. There is no dialog box for this effect.
- To achieve the look we need to fade the filter, click the Blending Options icon for the smart object.
- Try the Overlay blending mode and adjust the Opacity slider to taste.
- Click Stop
Now run the action on your on some more images. For more on actions, be sure to check out www.panosfx.com, www.actionfx.com, www.atncentral.com, and www.adobe.com/exchange.
Droplets
So you like Actions? Then you're sure to love droplets. Photoshop allows you to save any action as a droplet… which is a drag and drop destination. Let's try the action you just made.
Choose File > Automate > Create Droplet.
Click the Choose button in the Save Droplet In section of the dialog box and navigate to a location in which to save it. In this case, name the droplet Cartoon Look and save it to the desktop.
Select the set and action that you want to use. In this example, choose the Cartoon Look action you just made.
- Choose a destination for the processed images. In the Destination menu, choose Folder and create a new folder on the desktop called Droplet Results.
- Specify the file-naming convention and select file compatibility options for the new files. Feel free to choose a naming convention that makes sense to you. Be sure to make the files Mac and PC compatible.
- Choose to log errors to a file. Set the log to write to the desktop in a file called Error Log. This way the action won't abort for one corrupt file
- Click OK to create the droplet.
- Drag a folder of images onto the droplet (don't worry the originals will be preserved).
Now… go figure out something more useful than a cartoon effect… I'm sure you have weekly tasks that are repetitive and lead to carpal tunnel syndrome.

Daily Learning
What's the best way to get faster at Photoshop? The answer is simple, daily learning. With the time you are saving above… Iâ˜d recommend 15 minutes per day. The time you spend on yourself will give back immensely. The only way to master Photoshop is in small doses that are applied on a consistent basis. So here is my daily prescription based on personal experience.
Monday
Read the Photoshop Insider - www.ScottKelby.com
Watch Adobe Creative Suite Video Podcast - www.creativesuitepodcast.com
Tuesday
Read John Nack on Adobe - blogs.adobe.com/jnack/
Watch Photoshop User TV - www.photoshopusertv.com
Wednesday
Read Raster|Vector - www.RasterVector.com
Watch Photoshop CS4 Sneak Peak - www.csfour.com
Thursday
Read Planet Photoshop - www.PlanetPhotoshop.com
Watch Photoshop Killer Tips - www.photoshopkillertips.com
Friday
Read Photoshop News - www.photoshopnews.com/
Watch Understanding Adobe Photoshop - www.rhedpixel.tv
For podcasts, you can either subscribe in iTunes or the Adobe Media Player. This will make it easier to watch "offline." I'm the type of geek who catches up on Photoshop TV while standing in line at the grocery store.
Conclusion
Thanks to Scott for loaning me his soapbox and for you the readers. I hope you can use the advice above to get some of your personal time back… your kids are only young once and I'm sure there are some friends you've neglected. Remember balance is key, you have to get your work done, but need to be continuously improving yourself. With each software upgrade, you too need to upgrade. Otherwise you waste both time and money.
–Richard Harrington
Richard Harrington is the author of Understanding Adobe Photoshop CS4 and Photoshop for Video. He also produces weekly podcasts on Photoshop and Aperture that are available for free at RHEDPixel.tv.