

Hope you had a really relaxing Memorial Day weekend. I had a lot of fun going back and doing something this weekend I’ve wanted to do for a while, and that is to go back to some of my original files, and reprocess them from scratch to make new versions that:
(a) Reflect what I like today, as my tastes on post-processing have changed
(b) Let me use the latest tools and plug-ins
(c) Let me experiment more than I had the time to do, probably because I was on a tight deadline
…and I’m delighted with the results.
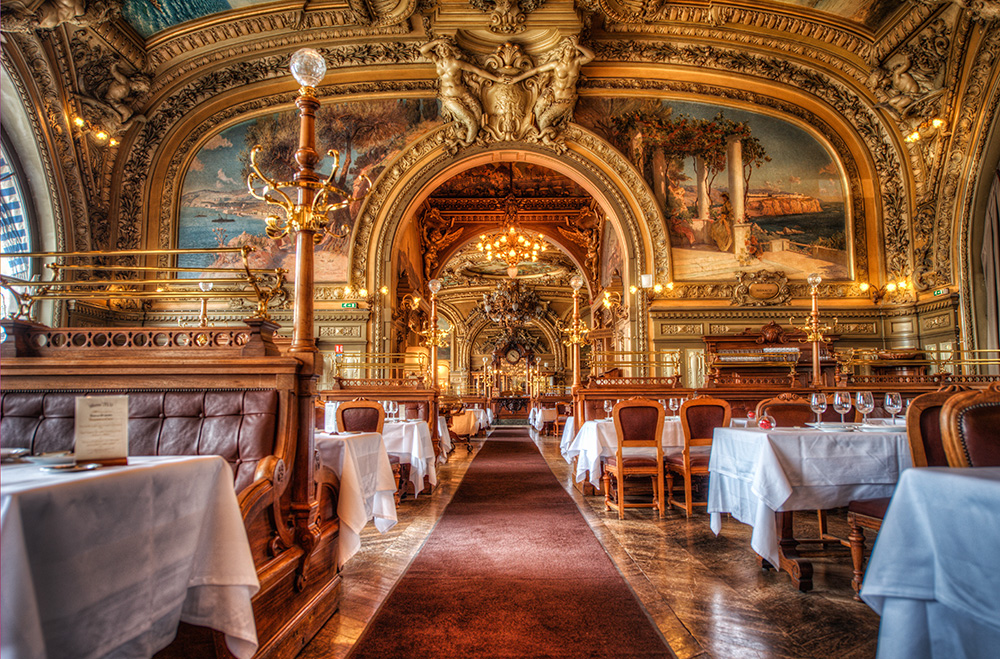
Above: Here’s the one I did back in 2012 â” note the HDR look, blue table clothes, overall glow, etc.
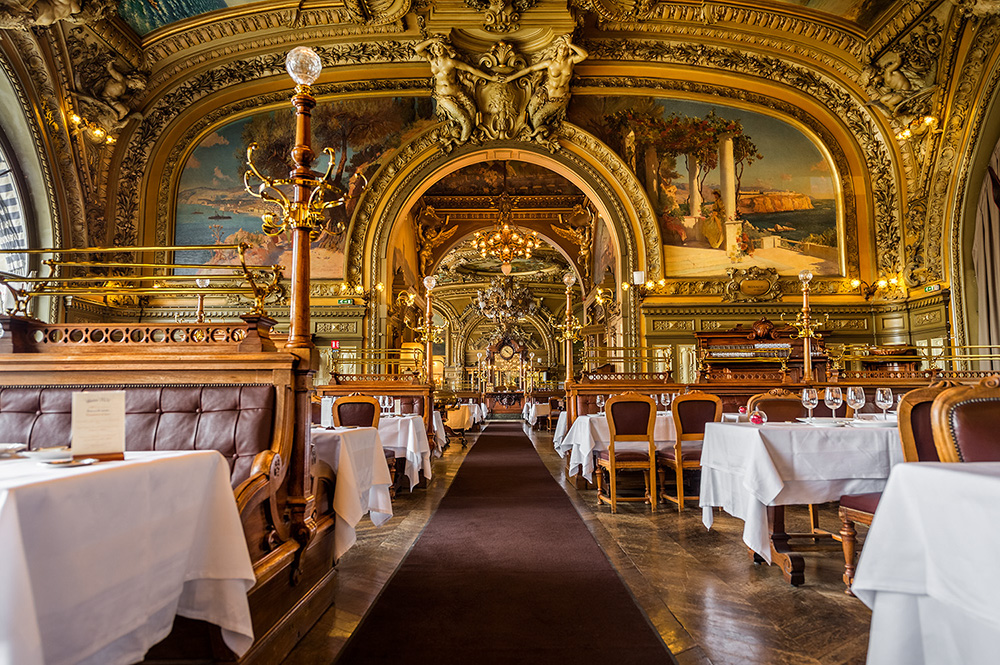
Above: Here’s the reprocess I did this weekend, using Lightroom CC’s built-in HDR feature. No glows. No HDR look. It looks liked the place looked.
You might like the old version (the top one) better…
…and that’s OK. I’m doing this for how my tastes have changed and how my tools have changed â” you may still like the older one, and that’s fine (I just hope you at least like one of them. LOL!).
My Process
Most of what I’ve been doing is going back to images I bracketed in camera, and now I’m reprocessing them in Lightroom CC using the new built-in 16-bit HDR feature, which is awesome for making realistic HDR images. It really has been a lot of fun (especially since I’m in the middle of a major refresh to my portfolio layout and contents â” more on that when it’s done), but in that vein I’m officially (?) pronouncing this day:
Reprocess Your Old Images Tuesday
Dig back into your archives and reprocess some of those older images â” images you processed at a different time in your life, with less post-processing skills than you have today, and lesser tools to do it with, and I promise you â” you’ll be tickled with the results.
Hope you have fun digging up some of your shots and rediscovering them with new processing, today!
All my best,
-Scott
P.S. I wrapped up my series on “What I’d love to see in Lightroom next” over at LightroomKillerTips.com if you get a sec.
Hey Scott … personally, I like the new LR-CC HDR much better! Like you, my taste have changed in processing also. I’m taking your advise and doing some reprocessing!! I’ve got some old panos and HDRs I want to run through LR-CC to see how it goes. Thanks for the idea!
Have a Great Day!
Dennis
I agree, since LR CC I find that I very rarely use NIK HDR PRo 2. I love the more natural look to my HDRs, no glow, exaggerated texture, color etc. AND the biggest plus for me is that since I started using yours and RC’s recommendation of 2 images instead of three or more I have better results!
Thanks and have a great week!
Hi Gene,
I’d like to know in which episode and show they talked about 2 images for HDR, please.
Thank you
It was during the LR CC Launch event several weeks ago when they were running day long web casts. I’d check, if your a Kelby/NAPP member, their LR CC/6 Learning Center.
Thank you Gene. I think I found it here http://kelbyone.com/lightroomcc/lightroomcc-resource-center.php (Making HDR images)
Good spin on Throwback Thursdays. This post brings up two things to mind:
1. Now that you have a deal with Canon, try the 17mm TSE – you can create panoramic images with an almost 100% perfect blend.
2. Lightroom future wishlist – batch processing for panos and HDR blending.
Select the files, then Ctrl+Shift+H will do the HDRs in the background. Ctrl-Shift-M will do panos.
Not quite hidden batch, but it’ll let you move on to other things while they’re running.
I love these new in-app features. A minor improvement for the future would be new flags to identify component images (say HR and PAN or H and P) in the filmstrip and for the resulting composite to appear contiguous with those selected images (the way that a virtual copy does). Perhaps it’s some nuance of file naming that I’m missing but my composites always appear at the end of the filmstrip.
Scott,
I rework some of my
images whenever a new version comes out epically if it can give me the look I want. I even rework some images after viewing
tutorial on K1. I am working my way
through all the tutorials and classes and I always find some little tip or
trick that helps me!
Thanks
Ken
Thanks Ken – I pretty much do the same thing. When I learn something new in a class, I can’t wait to try it out. :)
Thanks for ditching the HDR look! The new version is far better as a photograph. I have been tooting this horn fro a long time, glad to see that voices people are likely to hear are changing their sensibilities too.
I absolutely welcome the new addition to HDR inside of Lightroom CC, especially since I also favor the natural HDR look. I thought the HDR inside of Lightroom CC was 32bit….Then maybe it converts to 16 when it opens in Photoshop.
I also really like the new Photomerge inside of Lightroom as well. Not only does it save a step, but it also lets you make adjustments to the RAW files after the fact. I’ve been using both features quite a bit. I still want to try stitching some HDR images into a Pano inside of Lightroom CC. I’ve yet to do that.
Scott, by the way, tomorrow marks 1 year ago since I was a guest blogger! Wow the year has flown by! http://scottkelby.wpengine.com/2014/its-guest-blog-wednesday-featuring-brian-rodgers-jr/
..and an awesome Guest Post that was! I love the video you included, too! I think a year has been too long — let’s do another! Whatdayasay! :) [by the way, you’re right, it’s not really a 32-bit HDR, – it’s 16-bit). :)
Haha, I think you may have been out of the office when it was posted. Indeed it has been too long! Any time Scott, I’d love to, just let me know when :) I’ve been pretty happy with the results of the 16bit HDR, no complaints, plenty of bit depth
Yeah!
I do this all the time! so fun :)
I know, right! :)
Love the concept. I think it really depends on what you are going for. Both images have a lot working for them here. I think a blend of both would be incredible!
Take some of the garish HDR stuff and use the detail of it (Luminosity Blend Mode) on the newly processed image. Both have fascinating intricacies, I would love to see them somehow combined to emphasize certain areas a bit more on the more natural image.
Either way, I think both are very strong, excellent work, as usual. I am no stranger to reporcessing. We can learn so much, even in one years time.
I must be doing something wrong with Merge to HDR in LR CC. The result I get from merging bracketed shots always gives me a result with Highlights -100, Shadows +70, White Point +15 and Black Point -15 and the white balanced move to the warmer side. I have tried this on several sets of bracketed shots and it is always the same. If I apply those same settings to the base exposure shot and compare that to the merged DNG I don’t see any difference. What am I missing?
Hi Chip – what you’re seeing are the results of you having the “Auto Tone” checkbox on. That basically just hits the Auto button in the Develop Module for you. You can turn that off :)
Thanks so much for pointing that out. Went back and reprocessed quite a few images.
I really love the reprocessed one. I don’t like the HDR-looking images even though I use HDR a lot.
I just did the same. Revisited some old images this morning and got online and saw your post. I guess its true about great minds thinking alike :) I really like your reedited version. Nicely done.
Crap, mine are always perfect….Bahahaha
I only wish I had more time to do this! In your examples I miss some of the maroon/red in the newer edit. I agree the cleaner look is so much more appealing and suited to stand the tests of time. Great post as usual Scott.
I agree. I like the more magenta white balance in the old photo, but prefer the look of the new photo. (The high clarity or HDR look is not something I tend to like, though it works for some photographers.) So new photo, with a color balance more toward the old–maybe not quite as maroon as the original, but halfway in between. But, hey, that’s just personal taste. The new one is better.
Hi Scott,
Reprocessing an old image is a dangerous game I have found! I can spend hours on a certain image, admire how have far I have come with my photo-processing, only for my wife to say ‘I prefer the one you did before’! It’s easier for people to like the version they are familiar with, hence why people prefer an original song to the cover version.
I love HDR, so really love the colours and detail of the first picture, but I also love the realism and sharpness of the newer version. Lightroom’s strength as an HDR processor, is it’s realistic nature, but when I process an HDR image now, I almost always create 2 HDR’s; one properly tone-mapped and one realistic version. Then I use the realistic version as my main image, while adding details I like from the tone-mapped version. I know it all comes down to personal taste, but that way I find you are getting a realistic yet ‘popping’ image.
All the best!
Pete
Nice result, but some folks are going really crazy with the HDR effect.
It’s always fun to revisit old photos. I’ve been doing this for awhile with my “revisited” category (http://japandave.com/photography/revisited/). As an extra twist (and as a personal challenge) I have limited my re-edits of old photos to using iOS for the re-editing, using SnapSeed or the like. Luckily a lot of them will open raw files. I do this in part to force myself to really use totally different tools (instead of just a newer version of Photoshop).
Anyway, nice job! I like parts of the first edit better, but the new version does look very nice.
HDR is a fad, it’s always been a fad. Every HDR photo I’ve ever seen has burned my retinas.
This brings up the thought of having each of your Photoshop/Lightroom gurus do their take on the same image , or images in the case of HDR, without any interaction during the process. It would make for interesting reading.