

Hi gang, and happy Friday. Today I thought we’d do a simple lighting tutorial — one where we’re working on balancing the existing light in our location with the light from our flash so the image doesn’t look so much like it’s lit with a flash (even though of course we know that it is). We’re going to do this by adjusting our shutter speed to control the existing room light (the ambient light) behind our bride to get that perfect mix between it and the flash.
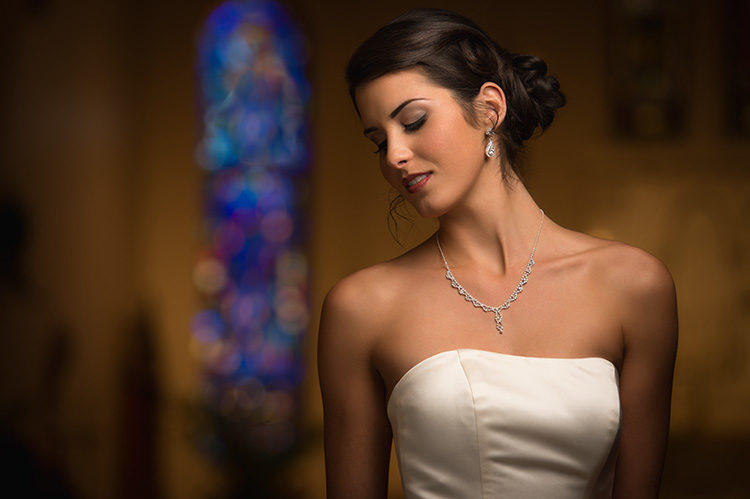
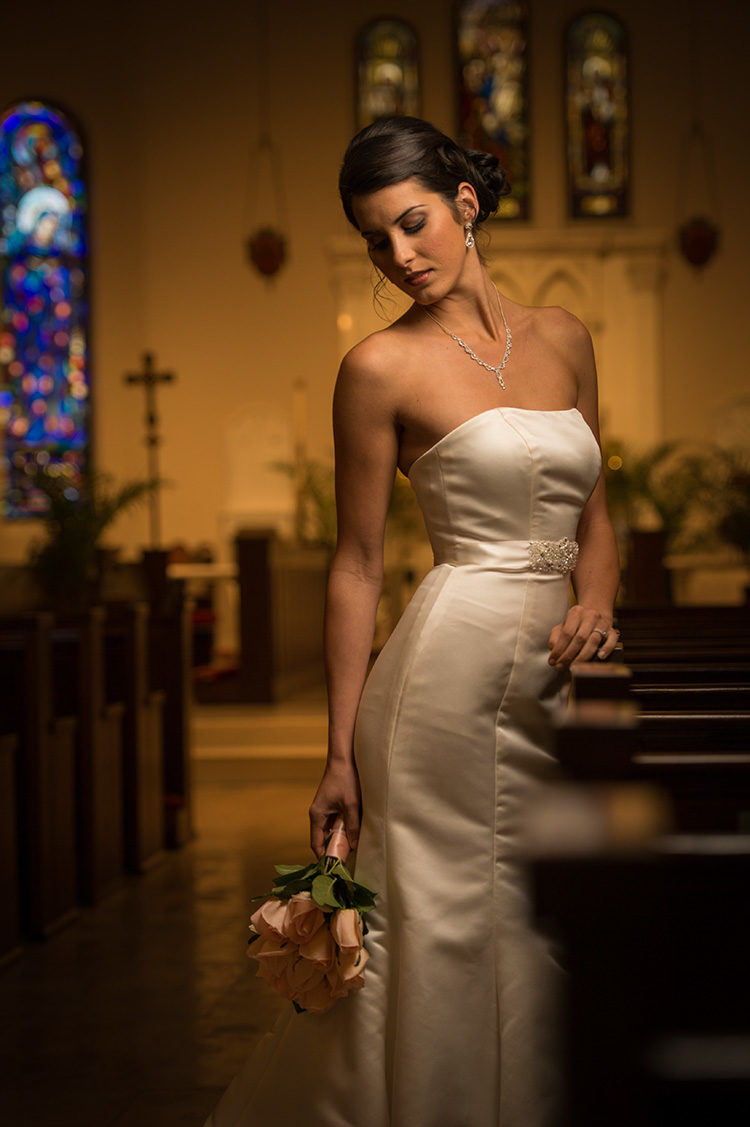
Above: First, here’s the final image
We’re not breaking any new ground here positioning wise — it’s a classic “Bride standing in the aisle” shot. The area behind her is dimly lit but we want to see it in our image (seeing the church she was married in is very important the bride), so we’re going to work to control the lighting in the background so we get a nice blend.
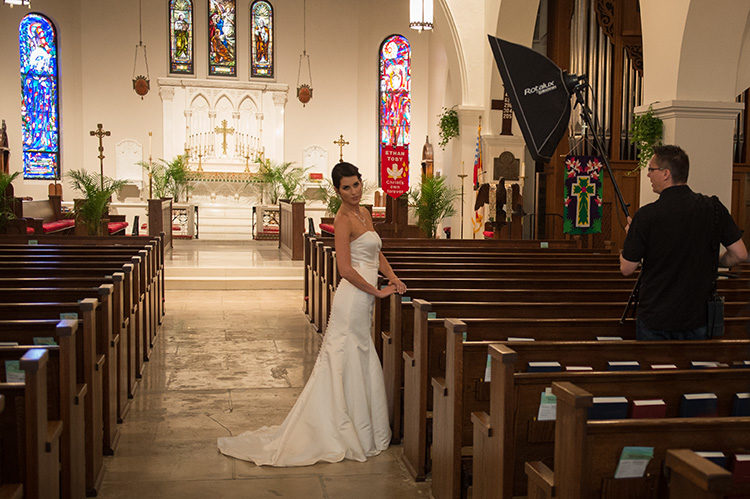
Above: Get the flash in position, then turn it off for Step One
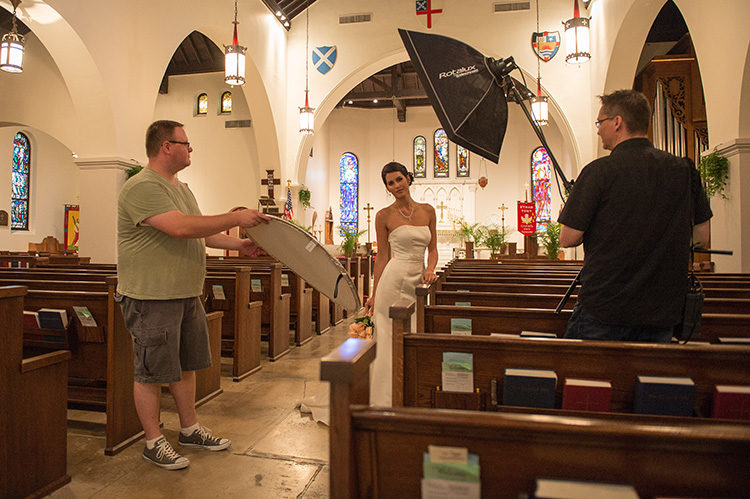
This behind-the-scenes shot shows the simple, one-light set-up I’m using for this shoot. I’m using an Elinchrom Ranger Quadra, with one flash head running off a small portable battery pack and a small square 27 softbox. Of course, you can do this exact same thing with a hot shoe flash and a 24” Lastolite pop-up EZ-Box soft box (after all, they both create the same thing — a bright flash of light).
The flash is mounted on a lightweight regular ol’ light stand. So, why not a monopod mount like I often use? It’s because when you want a break between shots, you don’t have go looking for a place to lean it against or a table to sit it on — you just put it down on the floor, so it’s totally a convenience thing.
When I’m shooting on-location flash, I have a three-step formula for getting the look I’m after:
(1) Turn off the flash, switch your camera to Manual mode and set your Shutter Speed to 1/125 of a second. This is my standard shutter speed starting point when I’m shooting location flash. It’s kind of a nice, safe starting point that just works. Now move your f/stop until the meter inside your viewfinder shows your exposure is correct (it’s not under or over-exposed; it’s the proper exposure). On Nikons, this meter appears on the right side inside of your viewfinder; for Canon cameras, it’s along the bottom of the viewfinder. If you can’t get to an f/stop that makes a proper exposure (it can get pretty dark in a church), you may have to raise your ISO a bit, maybe from 100 to 200 (or 200 to 400).
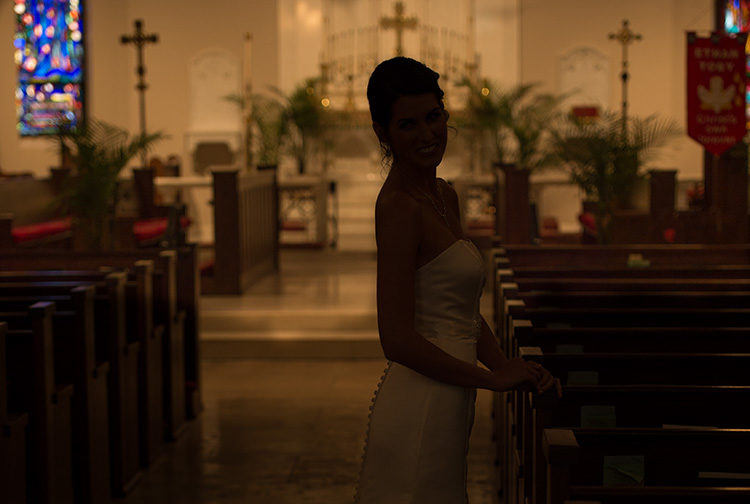
Above: Now under-expose by around two stops
(2) Now, I darken the exposure by around two stops (so now I’m intentionally under-exposing. If my camera said that at f/2.8 my exposure was correct, I’d raise it to at least f/5.6 or higher to darken it by at least a full stop) and take another test shot. I’m trying to make the bride so dark she’s nearly a silhouette. I’m doing this because I want the bride lit with only the light from my flash — not the ambient light in the church. I want the ambient light to only light the area behind her.
I do see one problem with the shot above, and it’s that the background (the church) is a little too dark. This is where the Shutter Speed control comes in because it controls the room lights. Think of it as a dimmer switch for the church lights. If you need to turn up the lights a bit, all you have to do is lower the shutter speed a bit so lowering the shutter speed to 1/60 of a second would add more light behind her (as seen in the following image, where I did that).

Above: Now turn on the flash with a very low power setting
Once your subject looks like a silhouette, turn on the flash with a very lower power setting (like 1/4 power) and take a test shot (seen above). The light from the flash itself looks “OK” but the whole scene just looks a bit too bright and that keeps the light from mixing well so it doesn’t look really beautiful quite yet. However, you can really see the difference lowering the shutter speed from 1/125 down to 1/60 did — the church behind her is much brighter. In fact, I think it’s now too bright, so that was too big a drop in shutter speed, so I’m going to have to split the difference — trying 1/80 of a second. That will dim the background lights from where they are now. This doesn’t change the power or brightness of the flash — this just affects the background room lighting (remember the dimmer analogy).
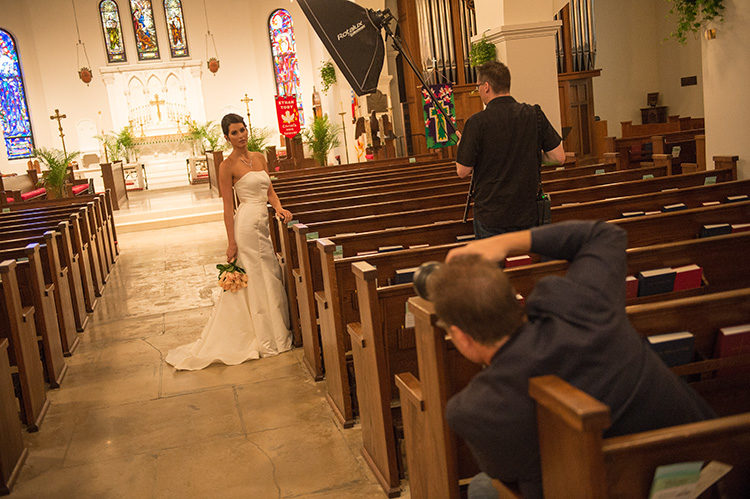
Above: Another Behind the Scenes shot: I’m raising the Shutter Speed to 1/80 of a second and taking another test shot
So here I’m turning the camera to get a vertical shot and trying that slightly higher shutter speed of 1/80th of a second. I haven’t changed the power of the light yet at all — it’s still at 1/4 power.
Above: Here’s the shot and you can see we’re starting to get there. The 1/80th of a second seems like the sweet spot, so now if I make any changes, I’ll probably slightly raise or lower the power of the strobe itself to make sure the light isn’t too bright — a very common mistake and the thing that makes your shot look too “flashy.” If we want it to blend and look natural, it can’t look “flashy.” It has to make you wonder, “Is that lit with a flash?”
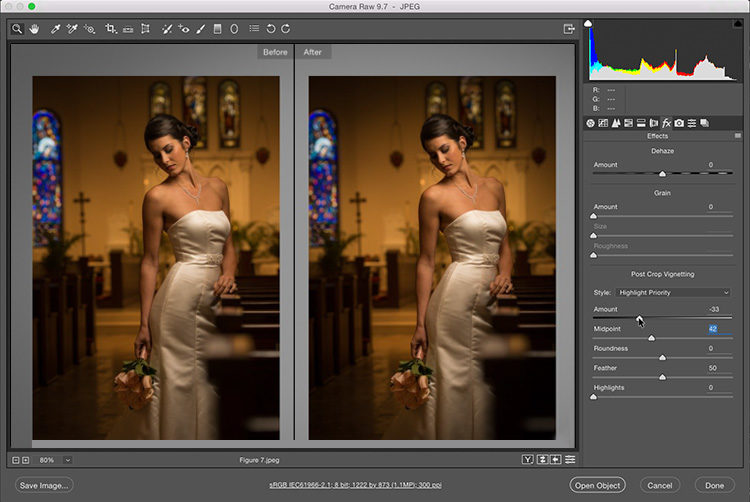
Above: Using Photoshop’s Camera Raw to enhance your lighting (you can do this in Lightroom just the same)
To make the lighting look even better and more dramatic, I edit it with Photoshop’s Camera Raw (or Lightroom’s Develop Module — they are the exact same thing), where I go to the Effects panel, and under Post Crop Vignetting I drag the Amount slider to the left (as shown here), which darkens the edges all the way around your image. This helps to create a more directional look to your lighting — it looks like the light is centered on your subject and it falls off to dark around here. It’s a simple thing, but it has pretty big impact.
Above: Adding a reflector
After looking at the previous image up close, I felt that the area around her eyes looked a little dark, so I had my First Assistant Brad Moore bring in a reflector to bounce some of the light from the flash back into her eyes. We took a test shot using the silver side of the reflector and it was just too bright and too harsh, so we flipped over the reflector to the white side and that did the trick.
There’s still a problem…
Which someone pointed out when I posted the image on Twitter. They noted the bright area of light in the stained glass window to the left of the bride and pointed out that if this was someone else’s image and I were critiquing on our weekly show “The Grid” (where once-a-month we do blind critiques of submitted images), that I would point out that it was distracting. He was right — that’s exactly what I would have said, and so I used Photoshop’s “Patch” tool to remove it.
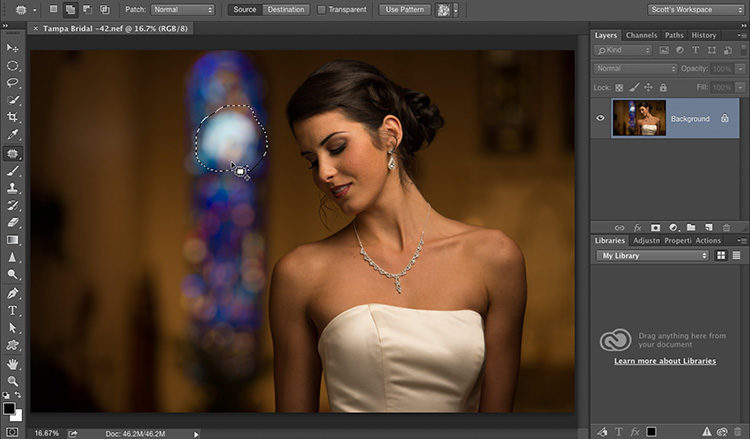
Above: To use the Patch tool to fix that bright spot in the stained glass behind her — take the tool and draw a loose selection around what you want to remove [as seen here].
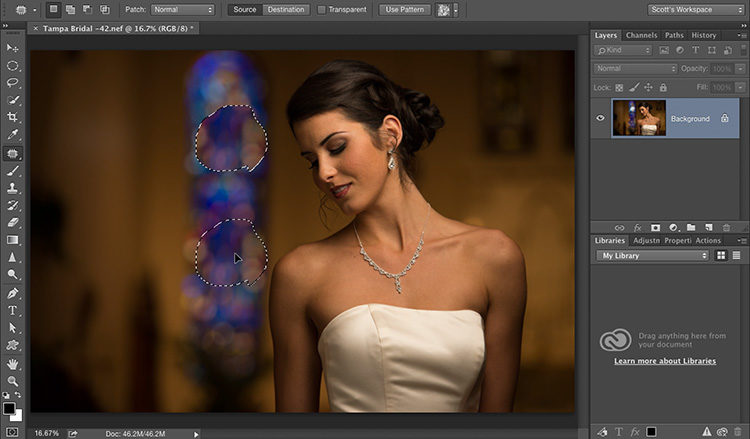
Above: Then click inside that selected area and drag to an area with similar tones somewhere else in the image (as seen here where I dragged the selected area to a lower area of the stained glass.
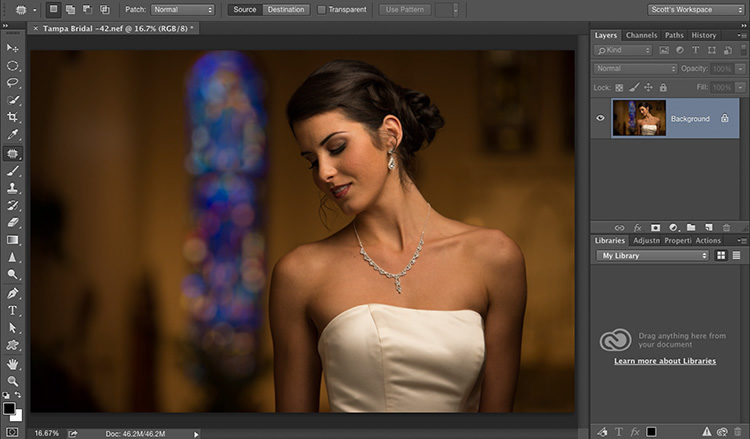
Above: Now release the mouse, and it snaps back into place and the problem is gone! It really works amazingly well in most cases.
Above: I finished the image off with nothing but the standard portrait retouching stuff (removing blemishes, smoothing skin, etc.).
To finish up:
I hope this article helped you “see the light” (totally intended pun) on two things:
(1) The shutter speed controls the amount of light in the room (if you wanted it completely dark black behind her, raise the Shutter speed to 1/200 of a second with strobes, and 1/250 of a second with hot shoe flash). And…
(2) your job is to balance the flash and the room light, while keeping the lighting looking soft and subtle by doing test shots and then looking at the shot and seeing if it looks too bright and thus too “flashy.” Less is more in situations like this, so if you were going to ‘under-light’ or ‘over-light,’ it’ll look more natural underlit (but the goal, of course, is simply to balance it correctly).
If you dig flash stuff like this, and you want to get more into lighting, here’s a class to watch this weekend — it’s called “Just One Flash”. It’s one of our most popular (and I love the instructor. So devastatingly handsome he is). Here’s the official trailer:
Hope you’ll catch that class this weekend.
Hope you found this tutorial helpful, and that it helped ignite your fire for one you can do with just one light.
Have a safe, happy weekend and we’ll see ya here next week. :)
-Scott

Hi Scott,
What about gelling the flash? Are you purposefully shooting the flash with it’s natural light for an overall warmer tone from the incandescent light in the background? And if you did, would you balance for the out incandescent light in the church cooling down the overall look? I find church lighting to be less than helpful. You’re either shooting for the windows back lit by sunlight, or metering for the incandescent to get interior detail, or chucking it all going greyscale… Or spending a lot of time in photoshop or lightroom painting the color corrections into one or the other.
Thanks!
Scott, Thank you for this tutorial. As you kept pointing out on the last “The Grid” (“Shoot This – Not That”), I already have the equipment. Now I just need to get out there & use it for more creative & better composed shots (like the one in this tutorial). As a thank you – if you want to shoot the Super Bowl, please feel free to give Roger Goodell a call & mention my name. However, please know that I’ve never met Goodell & he won’t have any idea who you’re talking about. That being said – thanks again & have a great weekend!
Hi,
I was the Twitter guy who pointed out the bright light. It’s good to see an honest professional photographer admit a slight mistake and even put it into print.
I wonder who many other professional photographers would have done the same? I’m betting very few…
Gi / iNdepthphoto