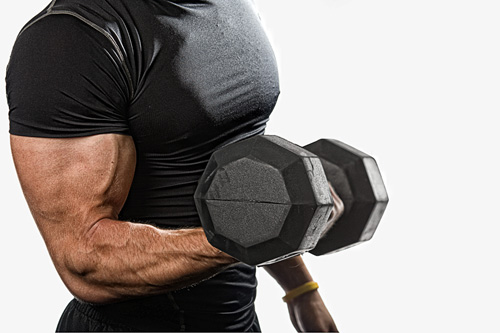
Above: Here’s the last set from my shoot at Fight Factory, and that’s Mo (you remember Mo from Monday and Tuesday’s posts) doing some curls. When he was done, he handed the dumbell to me, and I was pinned to the floor for 40 minutes.
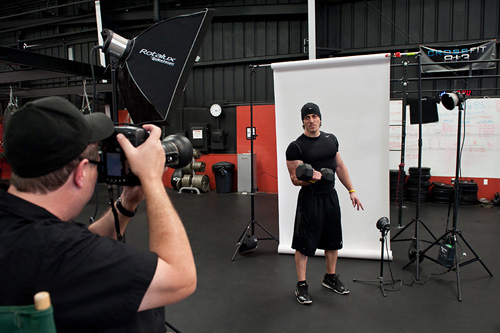
Above: Here’s the production shot (photo by Brad Moore). Pretty simple set-up, but it’s the only one where we actually used all three flashes. The main light is to the left of me, and that’s powered by the Ranger RX pack. The kicker light behind him is a bare bulb flash with a metal Grid attached to the front to focus the beam. Then, on the floor right behind Mo, you see the third flash, positioned down low, aiming upward to light the white seamless paper. But, there’s a problem. And I caused it.
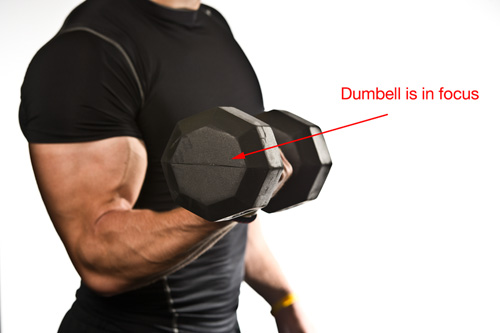
Above: When I first got there, I did a few test shots using just the available light in the gym, so I set my f/stop to around f/4. But then when we set up the strobes, I never switched back to an f/stop that would give me focus throughout the image, like f/8 or f/11. Of course, I didn’t realize this until I opened the images hours later in Photoshop and realized that only part of each image was in focus. Uggh!
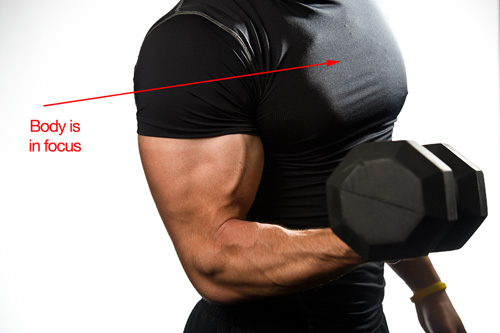
Above: In this shot, the dumbell is out of focus, but his body is in focus. Although I hate having to use Photoshop to fix mistakes I should have gotten right in the camera, in this case I was thrilled to be able to use Photoshop to fix my mistake. My plan was to combine the in-focus parts of the two images, into one image where everything was in focus.
Photoshop To The Rescue!
I used the Pen tool to select the in-focus version of the dumbells, and dragged it over to the photo where Mo’s body was in focus, and positioned it over the out-of-focus dumbells. It took all of two minutes to get the size right (they were taken at different focal lengths) and the proper position, but it worked and created the shot you see at the top of this post. Whew! That was a close one.
MY LOCATION LIGHTING GEAR
I had some questions after Monday and Tuesdays post about my location lighting gear, and I posted some photos of it packed up in its travel case so you can see how small it all breaks down to. Those images are on my Facebook page at facebook.com/skelby
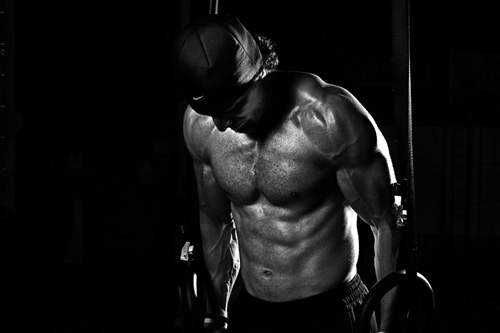
Above: Here’s another shot of Mo on the rings. I showed the production photo of this shot on Tuesday (link), but I noted that the flash with the softbox was turned off—that other shot was just lit with the bare flash and reflector with grid. Here’s what it looks like when the softbox is on, adding a little fill light.
B&W Conversion
I converted this to Black & White using Nik Software’s just released Silver Efex Pro 2.0, which I have to say is absolutely amazing. Every pro I know was already using Silver Efex Pro 1.0—but 2.0 kicks so much @#$, I can’t imagine they all won’t upgrade as soon as they try it. Seriously great upgrade. Way to go Nik! BTW: I just used one of their built-in presets. Also, you can download a 15-day free trail copy of the plug-in right here.
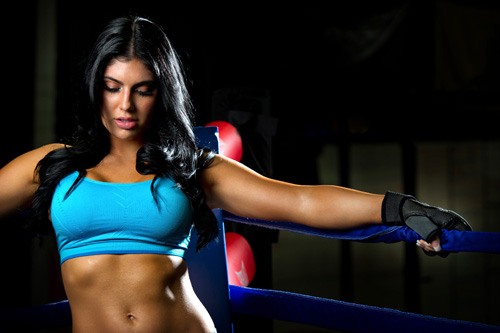
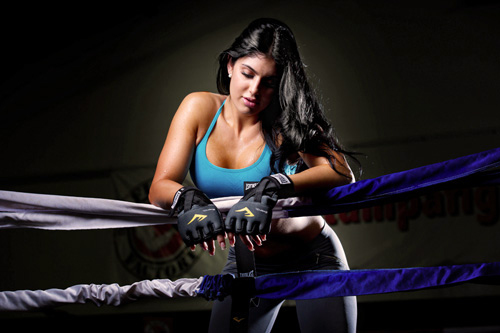
Above: The gym arranged to have Dallas, a model and friend of the gym, do a few shots inside the boxing ring that’s the center piece of the gym (real fighters train here, too). They wanted a shot where Dallas looked exhausted between rounds, with her arms “on the ropes” and I got the capture you see here.
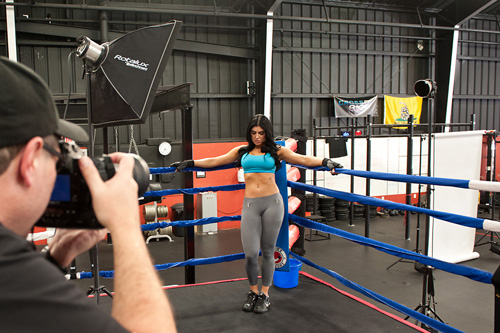
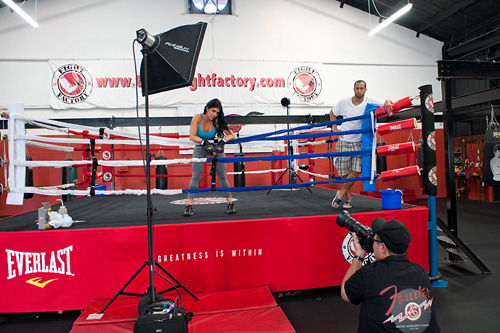
Above: Here’s the production shot for that image (thanks Brad) and I’m just using two lights: The main light up right and to my left, and the same bare bulb flash with a metal grid that we’ve been using all day coming in behind Dallas and to the right. We had to put the stand up on some workout pads to get it up high enough. I’m shooting with a 70-200mm f/2.8 lens.
Now, when you look at the production image versus the final image, you might be wondering why my final image is so dark. I intentionally underexposed the shot by at least two stops, so my subject would be mostly lit with the just the strobe, and not the flat even boring ambient light in the gym. If I hadn’t, the shots would pretty much look like the production shots you see above (no offense to Brad whatsoever—the production shots looks exactly as they should—they’re exposed for the ambient light).
Above: Here’s another shot, but this time I’m outside the ring, down low shooting upward (as seen below).
Above: Here’s the production shot for that image. Same two lights, same modifiers, positioned the same way (each facing each other diagonally), we’re just shooting from a different position. You can clearly see the workout mats we stacked up to get the main light high enough.
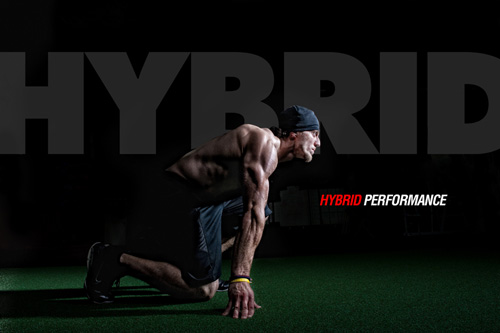
Above: Here’s Mo again (he had quite a workout that day) in a dramatic lighting look, as he gets ready to sprint. I added the text (at the client’s request). The large faded text in the background is the font Futura Extra Bold and the smaller text is Helvetica Condensed Bold Oblique (Oblique is a type geek word for “Italic”).
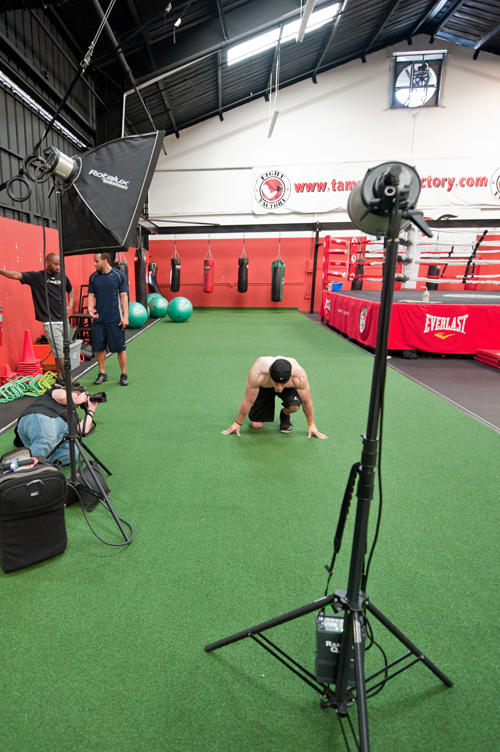
Above: This is just a one-light shoot–the light on the left side isn’t turned on. That’s the Ranger Quadra, with one bare-bulb flash and a reflector, aiming straight at Mo. You can see how small the Quadra battery pack is in this shot—that’s it hanging on the light stand.
That wraps up this shoot. A funny thing just happened: as I’m writing this, a commercial for Fight Factory: Tampa just came on TV. Too cool!


I really like it)
Great shots Scott! I love the one where Mo’s getting ready to sprint, the lighting’s awesome!
PS: Ken, what’s up dude? Beat by two Alexs!
Out of town on Rock and Roll business (Scott was notified) 8-)
Ken:
You sure you aren’t on a fishing boat in the middle of the Atlantic? :D
–John
Close, we were fishing alright! 8-)
It looks like you had a lot of fun at the gym! I laughed so hard about being pinned to the floor after you were handed the dumbell : )
Thank you for making my day!
Along with all the other photos, great shots! Especially the merge of the out-of-focus shots, wouldn’t have noticed at all if you didn’t say anything.
A few questions though…
Did you apply Color Efex Pro’s Tonal Contrast to the top image?
And what type of editing did you do to the ‘HYBRID’ shot? was that the natural falloff from the light?
Thanks for the great post (and thanks, Brad for the production shots)!
– Brandon
Hi Brandon:
Good eye—I did use Color Efex Pro on the top image. In particular, the Tonal Contrast preset. Then I sharpened the photo to death. :)
As for the hybrid shot—that is the natural fall off, but I did darken the background above him a little, because you could see some of the exercise equipment behind him (lit by the ambient light) and it was distracting.
Best,
-Scott
Thanks, Scott!
Great job :)
– Brandon
Probably an easy one, but how did you get the “hybrid” text behind the subject?
Very nice lighting work. Are you enjoying the little quadras? They are one of the lighting kits I am considering.
Those are some serious biceps !!!! Especially love the shot of Mo on the rings.
excellent photography! nice shoot :)
I’ve loved watching this unfold all week, awesome images. Thank god for Brad! P.S Doesn’t the guy in the upper left hand corner of the last production shot have Matt Kloskowski’s shirt on?
Hi Sarah:
Your comment “Thank God for Brad!” I say that same thing all the time. :)
-Scott
Scott:
I really enjoyed this week-long series of your shots of Mo. Having Brad do the production shots were very helpful. If you could post those kinds of shots in the future, it would be really helpful for visualizing how you set them up.
The shot(s) of Dallas was the icing on the cake! Lighting was terrific…but not the lighting you usually see for a woman. Who cares?….It worked!
Have a great weekend!
–John
Awesome work Scott. Thanks for showing all the behind the scenes stuff. I’m trying to get better with my lighting, but for now I only have three speedlights (and several modifiers) to work with. I’m wondering if all of the shots you got would have been possible to pull off with speedlights. I’m guessing that the biggest problem would be trying to overpower the ambient lighting (depending on how bright it was).
ok…. I think it is time you let the cat out of the bag…… That is really your bicep in the picture… that’s why you wear that jacket all time… tryin’ to hide the guns!! :-)
Nice work as always… especially like the sprinters shot, excellent one light work….
Hey Darin:
The gun show’s in town! :)
-Scott
I really enjoyed this article Scott. I’ve been following you for a few years now and you haev really helped bring my understanding and adoration of the craft along very nicely.
I’ve asked you this on Twitter before, I”m sure your far too busy, but I was curious if you had a post or feedback on your favorite iPad apps for photographers.
Best wishes!
-Michael
Hi Michael:
I saw you comment, and I actually have it planned as a post here on the blog. Other stuff just keeps coming up, especially this close to Photoshop World, but it’s definitely on the short list of topics. :)
-Scott
Geez Scott, would you stop modeling for you own shoots? I know it’s hard not to, but please try! :-)
I thought that starting this post with a self portrait was a perfectly acceptable and legitimate way to begin the discussion. Don’t hold it against me just because I’ve spent a few extra hours doing curls. :)
-Scott
Beautiful work as always Scott.
Have an awesome weekend!
Thanks Chase. You too! :)
-Scott
What is it that Jeremy Cowarts says, something about (and I know this isn’t exact) “Sometimes photoshop helps the photo and sometimes photoshop is the photo.”
Tim, you have some GREAT work on your site. I would suggest Scott feature you sometime.
I loved this primer Scott. Thanks for the quickie lesson. Do you think you would have comparable results with small lights (ie: a couple of SB-900s ) plus a soft box and grid? I’m trying to lighten my on location load as much as possible. Thanks!
Trask & Omar – I hope Scott answers you both as I’m interested in his take on this. Having spent the day yesterday at the Joe McNally & David Hobby FlashBus Tour, my answer would be yes, you most certainly could have done this with small lights & a few modifiers.
Maybe Scott or Joe or David will chime in here…..
I’ll be attending the FlashBus Tour in Houston and I’m very much looking forward to it. I’ve read nothing but great reviews of it so far.
Dianne, this can be done with small flash but if I had the Quadras, I would use them. More power and more light in your control, more expensive too!
Hi Omar:
I think you could definitely pull something like this off with a few SB-900s and some similar modifiers. However, if it’s anything like my last SB-900s shoot, after about 10 minutes of full power shots, at least one or more of the the SB-900s will overheat. :(
-Scott
I would have liked to see MO shots of Dallas. The Pen tool for focus? Have you talked about that before? I dont recall seeing that.
Maybe I did not understand. Pen tool or Selection tool?
I like the lighting of the photo on the astroturf to get the definition of the muscles.
Awesome photo shoot, the shots came out so cool. I really appreciate the F4 vs F11 shot only because I have made that mistake before and it’s nice to know one of the photographers I look up to is human too. Thanks for sharing (I feel much better now.)
-Craig
I love the photo walk through. This is really helpful for a chap like me. On the dumbell photo, did you increase the clarity (and contrast) to get the definition and detail to stand out?
Nice series of photos.
chad
The bicep shot was a nice save, but the dumbbell has depth of field that that guy doesnt.
The shots of Dallas are excellent, particularly considering the lighting conditions. One comment though: she’s dry. A little sweat would have nailed it to my eye.
Hi Ubi:
If you click on the image to zoom in to the large photo, you see that we had her apply body oil, and then one of friends sprayed her with water, so it would bead up. You can see that, and the shine, on the larger photo.
-Scott
Studly pix, Scott. I went to the gym’s website, out of curiosity — looks like job #2 is to sic RC on that site so it can do justice your photos!
A “type geek” would say that an oblique font is simply one where the regular Roman characters are slanted over, but an Italic font is different altogether from the Roman version, and you can often tell the difference by looking at a lowercase “a”. I’m just saying, is all.
Hi Andrew:
I have to imagine you’re a lot of fun at parties. ;-)
-Scott
ouch. burn!
Hey Scott love the pics. I really wish their website had done a better job displaying them though…they dont even seem resized correctly for web (they arent crisp). It might be my browser but um…….it’s dissapointing they didn’t really do your amazing pictures justice.
beautiful shots as always scott. the black and white shot esp. is ridiculous. i’m a bit surprised the client didn’t go for bw shots for everything, as this high sharpened gritty look would seem to be a perfect fit to promote the gym.
question about the Nik software you mentioned… it looks awesome, but i’m wondering how to justify spending $200 when there are so many different ways to convert color to bw in photoshop?
Great series Scott and nice workaround for the top ‘Dumbell Curl’ shot.
Great to see how a simple lighting technique produces such great results. Particularly liking the ‘Hybrid Performance’ shot and how the lighting really brings out the definition in that guy!
My only question is where on earth did you get those photos of me from? :)
Cheers,
Glyn
Awesome Scott as usual. Mo has some massive guns but his shorts make him look about 3 feet tall. :-)
How much do you charge for something like this?
I’ve been trying to figure for close to a week now how Scott darkened ffac2sm.jpg, ffac4asm.jpg, and ffac4sm.jpg.
My limited experience pointed me to a gradient fill (Layer -> New Layer Fill -> Gradient), but when I experiment with this I endup with a harsh line seperating the background and foreground.
Thanks.
This is briliant….. I am a newbie… trying to start my career as a Photographer. Your blog is inspiring for me :)
its really awesome work,kept up :)
Congratulations! That’s really amazing, I love it,thanks for sharing!!