Back From a Week in Paris (and a new photo series emerges)
Wow, what a week!
We shot three online classes (including “A Week in Paris with Jay Maisel” plus my on-location class on shooting travel photography, and a class on Lightroom/Photoshop for Travel Photography). We taped starting at 9:00 am each day and went non-stop until after midnight every day. We literally fell into bed each night, but we still had loads of fun (it’s hard not to have fun in Paris, even when you’re working).
Easier HDR
My new Nikon D4 actually makes shooting HDRs a lot easier, because not only can I finally just take three bracketed shots (one two shots under, one two shots over, and the regular exposure), but I can set my Self Timer to take all three shots for me (I know Canon’s have been able to do this for some time, but this is the first Nikon I’ve had that will do it. Not even the new D800 will do it — just the D4). So, I shot more bracketed exposures by far than I normally would.
The “Third Frame” technique
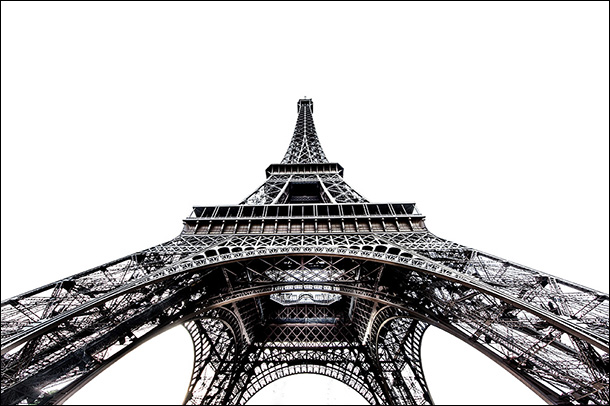
When I was going through my images, I saw that sometimes the third frame (the one over-exposed by two stops) would make part of the sky solid white, and when I saw the 3rd frame of my bracketed shot the Eiffel tower, it reminded me of the London Eye shot I had done with the solid white background, so I took it into Lightroom and pushed the Highlights and Whites until the sky went solid white, then I brought in lots of Clarity and Blacks to make the blacks pop, and it looks pretty cool. Then, I went back and started over from scratch by first doing the full HDR treatment (using Photoshop CS6’s updated HDR feature, and the built-in “Scott5” preset) and then I mixed in the sky technique from Lightroom, and it just came together.
If you look closely, I leave just a little bit of color in all the shots, so they’re not fully black and white. When I showed a few to Jay Maisel on my phone, he really liked them, and said “They kind of look like metal etchings” and I kind of agree. So, after the Eiffel Tower shot, I set out to shoot a few more iconic Parisian places, like Notre Dame, the Arc de Triomphe and The Louvre (below) and did the same thing.
Expanding the idea
Once I showed these to my wife Kalebra (who was along with me on the trip, and really made the trip a blast for me), she said, “Don’t you have other iconic places you could use this technique on?” I realized I had a lot of bracketed shots from previous trips, so I dug up a few and I’m sharing some of those below.
The reality is….
The reality is…. even if you have the properly bracketed shot, not all iconic monuments or buildings work with this look. I like ones where I shot it really wide with my 14mm or so, but even at that, some of them just didn’t look right, but I’m posted the ones I’m OK with so far (but I have more to try out from my archives).
Not for everybody
I know, like HDR in general, this look won’t appeal to everyone, because the only look that appeals to nearly everybody is no “look” at all, so I just think these are for me. In fact, I like it enough that I’m thinking of places I’d like to head back to, and go into them with shooting for this style in mind (which is what I did with the bottom two shots from Venice — taken after I processed the one from the Eiffel Tower).
One for the road…
I figured I’d bring it back around with a final shot from Paris below — this one a side-angle view of the Eiffel Tower with the 14mm (I only took two lenses — my 28-300mm, which was my main lens, and then the 14mm which I used in churches for a super-wide angle look or for this series).
Tomorrow, the Paris back story
I have a lot more to share about Paris, and our experiences there (both good and bad), but I wanted to share these first, so tomorrow I hope you’ll stop in as the story continues. Have a great Monday everybody. :)
