Behind the Scenes at a Major Sports Shoot

I’ve had a number of requests this year to go beyond just sharing my camera settings, and share a little more of the “behind the scenes experience” of shooting a major sporting event. So, two weeks ago when I got an opportunity to shoot a Major League Baseball game (Tampa Bay Rays vs. the Toronto Blue Jays), I kept my iPhone’s camera handy so I could chronicle some of the goings on for you, (though the image above, which I call “Steee-rike!” [notice the ball at his hip] was taken with my D3).
Getting Credentials
As anyone who has tried knows, getting credentials to shoot a major sporting event is hard, and getting harder every day. I shoot for a wire service, and thankfully they take care of the credentials for events I’m assigned to cover, but in other cases (like this one), it came through a “hook up” from someone I knew within the organization, but those are few and far between.
If you’re interested in this subject, check out my buddy Mike Ollivella’s Guest Post here on my blog about getting credentials and breaking into the shooting sports. It was a big hit, and Mike answers a lot of questions that other people hadn’t. (Here’s the link).

The Bad News About Parking (and why you need to get there early)
The parking situation can be really dicey for photographers, because even though there is often a media parking lot, photo credentials don’t always come with a parking pass to enter this lot, and without that pass, you generally can’t talk your way in (I’d say the amount of parking passes I get is about 1 in 3).
This means that: (a) you’re going to be paying for parking, and (b) you’re going to be parking a decent distance from the stadium, and that means that you’ll be hauling all your gear quite a ways. If you don’t mind paying $20 or more, you can park somewhat nearer the stadium, and if you get there early enough, you’ll get a good spot in the lot. One reason you might want to consider this is that when the game is over (which could be at night), you’ll be walking these streets all alone, after nearly all the spectators have gone home, carrying thousands of dollars worth of camera gear, so I like to make that scary walk as short as possible.

Getting there Early
I try to get to the stadium (field, court, arena, etc.), at least one hour before game time, if not earlier. I’ve never gotten there so early that I regretted it, because it takes a while to get from your car to where you’ll be shooting (and get through all the things I’m about to mention).
In some cases, they will mail you your credentials in advance, in some cases you can pick them up a day or two before the event in person (depending on the event), and sometimes you just have to pick them up on game day at the Media Center at the stadium. So, you have to get to the stadium, and then find out where the “Media Entrance” is (it’s not always obvious), and it’s been my experience that the media center is always on the opposite side of the stadium from where I parked. Also, rarely do the parking lot attendants know where the media entrance is, so it’s kind of pot luck on this.

Once you find the media entrance, you go in, find the media registration table (shown above in iPhone photo), and pick up your credentials. Some venues have a lanyard so you can hang your pass around your neck, and some don’t, so make sure you bring a lanyard in your camera bag.
Also, for some sporting events, you’ll be issued a Photo Vest you have to wear while shooting, so security can easily identify photographers. You have to sign these vests out—they are registered to your name, and you must turn these in when you leave or they totally freak out on you.
Be Prepared to Have Your Gear Searched
They always have a security guard or police officer search your camera bag as you enter the stadium, so be prepared to hoist your gear up on a table, and open the bag for inspection. Once they peek around a bit (they are usually pretty quick about it), they put a colored tag on the bag to show that its been inspected.
The Media Center
Your first stop after you have your credentials and clear security, is usually the press room, or photographers room. These range from very nicely appointed, carpeted, air-conditioned comfortable lounges to bare bones solid concrete rooms with no windows, concrete floors, fold up tables, and bare fluorescent bulbs.

Luckily, the Rays really treat the media right, and they had a really nice media center, with 50″ flat panel HDTVs all around, fully carpeted, lots of Air Conditioning, and plenty of room to relax and have a meal, but I can tell you—that’s not usually the case—it just depends on the venue.
Most have tables with power plugs, because a lot of us have to upload images while the event is either still underway, or we have to upload them immediately after the game. There is almost always free wireless, and the network name and password is usually posted right on the wall. The Rays had a nice Press Box upstairs as well for working Media.
Photographer Briefings
Depending on the sport, you may have to attend a mandatory photographer’s meeting. When I shoot motorsports, this has always been the case, and during these meetings they give you a safety briefing, let you know where you can and can’t shoot, go over the course rules, and they remind you in no uncertain terms that if you break the rules, they pull your credentials and escort you from the premises, so you don’t want to mess up and break a rule, even by accident, because they take safety very seriously.
The Situation on Food
Most of the venues I’ve been to do feed the photographers, which his another reason to get there early, because once the game starts, it’s hard to find time to grab a bite (and you run the risk of seeing the food run out, which I’ve seen happen by half time more than once).

Above: They had a really nice Mexican buffet, which just shows what a great sense of humor they have, because essentially what they’re doing is filling you up with Mexican food, and then 15 minutes later they’re putting you all in very close quarters for three hours. What a gas!
Again, the amount and quality of the food ranges widely from venue to venue, but again, the Rays did it right (and certainly better than most). They had a Mexican buffet (shown above), then “make your own custom sandwich” bar (shown below—iPhone photo), and a full salad bar—plus all sorts of beverages—all free for the media. The food was quite good, and they had all the fixin’s and plenty of tables, but again, this isn’t always the case. Usually, the bigger and newer the venue, the nicer the media room (and the spread). I can’t imagine what the new Cowboy’s stadium media room is like.

Above: Make your own sandwich bar, right next to a fully decked out salad bar. This is sports photographer food heaven, but they’re not all like this—trust me.
You will find some venues that actually have a grill, and they cook up everything from hamburgers, hot dogs, to pasta and Ruebens all on request, and all for free, so again, it just depends on the venue, but the good news is; they almost always provide some food for photographers on the house.
Storing Your Gear
At some point, you’re going to be out shooting, and your camera bag, and back-up gear is going to be somewhere else. Generally speaking, there is always some staff in the photographer’s room, so you don’t have to worry about a stranger wandering in and grabbing all your gear, but that’s not to say another photographer couldn’t slide a lens out of your bag. I haven’t heard of this happening, but I’d rather err on the side of safety, so I lock my bag, and then I use the built-in locking cable on my Think Tank bag to tether my camera bag to a table or steel bar, or something that can’t easily be moved.

Above: That’s some of my gear on the floor of the Photo Pit. Everyone stacked their gear up at the back of the pit, but there was a security guy right there in the pit, so I didn’t sweat it too much.
At this game, you bring your camera bag right into the photo pits where we shoot, so you just drag it on in, get out your gear (as seen above—iPhone photo), and then zip it right up. It’s pretty much out in the open, but there’s a security guard in each pit, so I didn’t worry about tethering and locking my gear, and I had no problems whatsoever. Of course, you have to access each situation and then decide how much you need to protect your gear so you’ll feel comfortable (there’s nothing I hate worse than shooting in one location and worry about my other gear in another, so I usually keep things locked up).
This is What I Was Talking About….
….when I said to get there early, because it takes a long time to get from your car, to the stadium gate, through the media checkpoint, through security, over to grab a quick bite, to the photo bit, and then get all your gear out and ready to shoot.

Above: Before game time, you’d better stake out your shooting space quick, or you’ll be fighting for air.
Where you can shoot
Because of the number of photographers shooting major sporting events, and for the safety of the photographers, they have to control where you’re allowed to shoot from. For American Style football games, there is a dotted line that surrounds the field (you probably haven’t even notice it before), but that is our “do not cross line!” Television crews can cross the line, but not photographers.
At NBA basketball games, there are sections at each end of the courts for photographers, and in some cases, on the sides as well. There’s a line in each section that you’re not allowed to cross (again, for your, and the player’s safety). For the Rays Game I was shooting, we had five places we could shoot from:
- A photo pit behind and to the left of home plate (one is seen above)
- A photo pit to the right of it
- At the end of the first-base dugout (sharing this spot with television cameras)
- At the end of the third-base dugout (TV cameras here, too)
- From up in the stands

Above: Your home when you’re shooting from the crowded 1st base dugout. That’s my friend and ace sports photographer Andy Gregory “chimping” in the back left. He was desperately trying to get at least one shot in focus (totally kidding—Andy’s an awesome sport shooter, and he shared some tips with me during the game, as this is his “home field”).

Above: Here’s a better shot of Andy. He’s smiling because one of the other photographers left his camera bag unlocked, and right before this photo was taken Andy shoved something in his front pocket. It looked like a 50mm f/1.4 but I’m not 100% certain. By the way, I’m totally kidding. It was a 10.5mm fisheye. Again, I kid. Andy didn’t steal anything but my shots (Come on, I’m on a roll, here!).
You’re allowed to change positions between innings and between half-innings only, because you actually have to walk on the playing field to get to the other photo pit locations. You’re sharing these photo pits with other photographers and often TV cameras, and in sports, television cameras are the priority, so you have to stay out of their way (just watch what happens if you don’t duck down and walk in front of a TV camera in the end zone during an NFL game).

Above: Ahhhh, the glamor of shooting Big League sports. This is your home when you shoot from the 3rd base dugout. You do you best not to cream your head into that camera mounted above you, or on the cameraman to your left.
Because you’re sharing this space, there are three things to keep in mind here:
- Get there early so you can stake out a good vantage point. The best spots get staked our early, and at the very least the photographer marks his spot with a camera, gear bag, or seat (if they allow it).
- Be friendly and courteous to the other photographers in the pit. You’re in close quarters, and everybody is trying to get the shot for their employer, so keeping a calm, friendly attitude is important.
- Be especially kind and friendly to the security in the photo pits. They can either cut you some slack, or throw the book at you if you mess up, or bump heads with another photographer. They’re usually pretty good guys, so let them know you’re a good guy, and that you’re going to play by the rules, and if they do wind up having to correct you, they’ll do it in a nice way. I’ve seen security and even police threaten to toss a troublesome or pushy photographer from a game more than once. Also, just stay out of the way of TV cameras, and be nice to the camera men. They can make your life tough if you don’t give them a wide berth (plus, they are friends with the security crew).

Above: Uploading from right within the photo pit. On more than one occasion I saw these guys playing World of Warcraft during the game (totally kidding—just a joke. It was Tetris). ;-)
Uploading Images
At this game, they allowed a few photographers to have their laptops right in the photo pit for uploading, but that’s not always the case. Normally, at halftime, or between innings, etc., you have to head to the photographer’s room to do your uploading. Same thing at the end of the game, when everybody is uploading from their laptops. Usually, this room is pretty near the field, but when you’re heading there, chances are you’re not alone, so be prepared for a very crowded room (I’ve been in these rooms where there are no tables, or no seats to be had—-you’re sitting on the floor with your laptop in your lap).
A lot of photographers pick their spot in this room early, put up their laptops, and then leave and go shoot the game. When I do this, I tether my laptop to the table itself with a Kensington steel cable lock designed to work with my MacBook Pro, so when I come back to that room at halftime or the end of the game, my MacBook Pro is actually still there. I am amazed at how few photographers do this, but I sure do.
In the media room (photographer’s room, etc.), they usually pass out stats from the game, with rosters, and lots of additional information that can be helpful with captioning (though I prepare my roster stuff before the game).

Above: the view from the third base dugout, before game time.
Packing Up and Heading Out
Once you’re finished uploading, you’ll need to turn in your photo vest (if you were issued one. Make sure you DO NOT leave with that photo vest. It was checked out in your name, and they get mighty cranked if you leave with it, and won’t issue you another credential—you get kind of blacklisted, so be sure to turn it in before you leave).
Here’s where the bad parking space catches up with you. After shooting a three hour event, and running all over the place, rushing every single moment, you’re beat—especially if it’s an outdoor game (luckily for me, this Rays game was in a domed stadium). Now you have to pack up all your gear, and often you have to haul it up at least one or more flights of stairs (because of the way stadiums are designed), and then haul it all to your car and load it up. This is where parking up close really pays off, and at that moment, you’d pay that $20 close parking fee twice just not to have to walk four more blocks to your car.

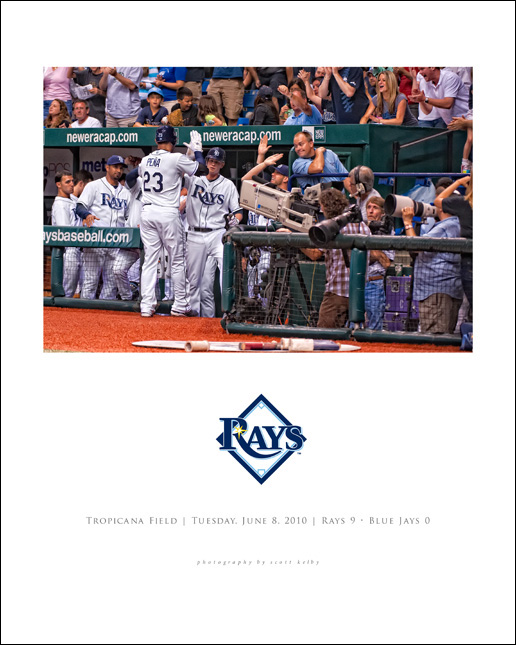
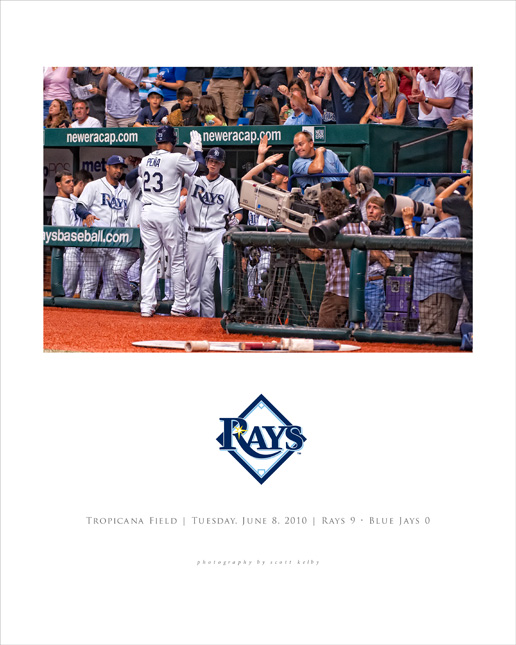
Above: Not an iPhone photo (for a change). By the way: the Rays trounced the Jays!
Behind the Scenes
Hope you guys enjoyed this behind-the-scenes look at shooting a major sporting event. I’ll try and answer any questions that I didn’t cover, so post any questions relating to this behind the scenes stuff and I’ll answer as many as I can as the day goes on.
Above: I made this poster for the Rays organization, commemorating the shut-out. The image is of Carlos Pena heading to the dugout after hitting a Grand Slam!!! I usually don’t throw effects on Sports photos, but the excited looks on the fans faces made me give it a try, and I liked how it came out, so I left it there. There’s a great view of the Photo Pit there, too!