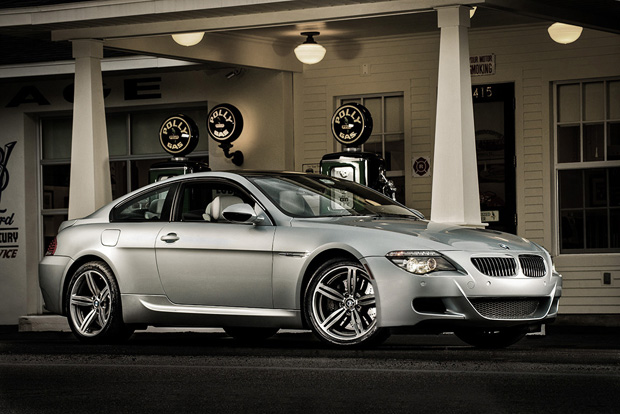
My first three-light car shoot (with lots of help from Tim Wallace’s online class)
I needed some shots for an upcoming project, and when my friends (and fellow photographers) Kathy Porupski and Jim Sykes heard that I needed a cool location for the shoot, they told me about a local advertising agency that had remodeled a 1950’s gas station for their new offices. They make a few calls and the next day I was there shooting. Here’s one of the shots from the shoot (above), my first with three lights for an automotive shoot.
Not only did I follow the tips from Tim Wallace’s Kelby Training online classes on car photography, I actually pulled out my laptop during the middle of the shoot to make sure I had the lights set up correctly (see below). I never would have tried this without having seen Tim’s class. In fact, it was Tim’s class that made me want to do it in the first place.
This is taken from the shooting position (photo by Brad Moore), and you can see the three lights and their position. Rob, our brave 2nd assistant on the shoot, had to dodge traffic like you can’t believe (you can’t tell what a busy road this was). Not having that third light (lighting the front wheel), on a light stand made this a lot more challenging because after every shot, the wheel light was in a different position, but because of all the traffic, we didn’t have a choice. Lucky he’s young, and can run fast. ;-)
Gear and Lighting Info
This was my first shoot with the Nikon D800 (more on this in a minute), and I used my go-to lens for my outdoor shots was my 70-200 f/2.8 VR II lens. I shot in Manual mode (since I was using strobes), and I used three lights: 2 Elinchrom Ranger Packs, and 1 Ranger Quadra (so three flashes total). One the light in the back of the car, I used a large Stripbank soft box (like 18″x50″ or something close to that). On the front of the car, I used a small Stripbank (like 12″ x 36″), and the third light was a bare strobe with a 20° metal grid.
For my close-up detail shots (shown further down this post), I used an old 70.0-180.0 mm f/4.5-5.6 Macro lens I bought from Moose Peterson a few years ago. Great lens by the way (thanks Moose).
(Above: Here’s a reverse view of the lighting set-up. Look how nervous Rob looks out there in the street).
The Nikon D800 — be careful what you wish for!
I was really looking forward to seeing all the extra detail I heard the D800 would bring (I had actually seen samples my buddy Matt Kloskowski had taken on a trip to Oregon with my D800, and it was just incredible), but this was my first shoot, and I couldn’t wait to see how it pulled detail. Well, you know that saying, “Be careful what you wish you?” Well, it smacked me in the head, because with all that added detail (and there is plenty), comes all that extra retouching to remove some unwanted detail my other cameras didn’t bring out (everything from fingerprints, to tiny spots, specs, reflections and other stuff that was usually soft enough it wasn’t worth messing with).
It reminded of when HTDV took off and all the TV news anchors had to use way more make-up because the HD brought out every little detail and flaw that nobody notice before. Same kinda thing here. Take a look at the sample’s below and you’ll see what I mean.
(Above: When you’re zoomed out, it pretty much looks like my old camera captured images. This is the out-of-camera shot as is).
(Above: But when you zoom-in to 100% full size, you realize your retouching work has just begun. However, I’m not complaining — I’ll take the amazing detail any time — it worth the extra retouching!)
(Above: Here’s a version that’s cleaned up a bit).
(Above: Here’s a production shot of the detail shot. Yes, we shot with all that ambient light and still got a solid black background. I learned that in Tim’s class, too!).
(Above: Here’s a detail shot of the owner’s blue ’32 Ford Roadster. I loved the wheels — classic!)
(Above: Here’s me, lying on the ground, to get the lighting and perspective I wanted for the shot you just saw of the tire and wheel. How did I know that was where the shot was? I didn’t. I just kept trying different angles — they all looks pretty lame, until one finally found this one that looked good. Tip: it’s usually the one with the most uncomfortable shooting position).
(Above: Here’s a close-up detail shot of the M6 taken right after we did the full body shots from across the street).
(Above: Just one light — a strip bank, and again, the previous shot was taken in daylight).
(Above: Another detail shot, this one taken from the back).
(Above: Here’s a production shot of the shot you just saw above).
(Above: I couldn’t resist shooting at least one HDR of the gas station once the shoot was over and the place was closed up).
While we had a great time, and wrapped the whole thing up in right around three hours, of course there are things I would do much differently next time (like watch Tim’s class again, and pay even closer attention, because I missed a couple of things that I could do a lot better lighting wise), but I sure learned a lot from Tim’s class.
He really makes everything so clear, and I just really enjoy his wonderful, laid-back, yet straight to the point teaching style. He doesn’t hold anything back, and that’s not only just the kind of guy I want training for me, apparently it’s just the kind of guy I want training me, too!
