My Photo and Computer Back-up Strategy
Friday’s post about backing up your computer really struck a chord with a lot of readers, and I got a number of comments, and emails, asking if I would share my back-up strategy (which drives I use, how and when I back-up, etc.), so….here we go!
1. Backing Up My Photos On-Location
You only have to have a memory card fail once to become a freak about backing up your photos on location, so I might sound a little overly cautious, but its only because I’ve been burned. Here’s what I do:
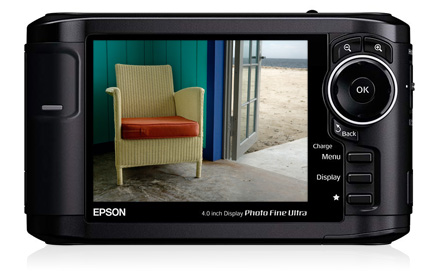

Once I fill a memory card (and by the way; I don’t shoot until every last shot is used because of card-corruption horror stories I’ve heard, so I stop one or two short of how many how camera says I have left), I pop the card out of my camera into an Epson P-5000 (link). This is a hard drive/photo viewer that works brilliantly, and has never once failed me, and it has a Compact Flash and Smart Card slots right on the top.
It’s not fast at backing up, but once backed up, you can see your photos on a HUGE 4″ crisp color screen. By the way, you can use an 80GB P-5000 (shown above), or the smaller 40GB P-3000; both work great. You can even use an older P-4000 or P-2000; they’re just much slower, but still do the main job, which is backing up your photos, and then displaying them on a nice big hand-held display.
After the card is copied onto the P-5000, I eject the card and put it back in my hard-shell memory card case, but I flip it over and put it in the case back back-side facing outward, so I know this card is full and has only been backed up once (I don’t feel comfortable erasing a memory card until I know it’s backed up at least twice).
2. Backing Up Once I Reach My Laptop
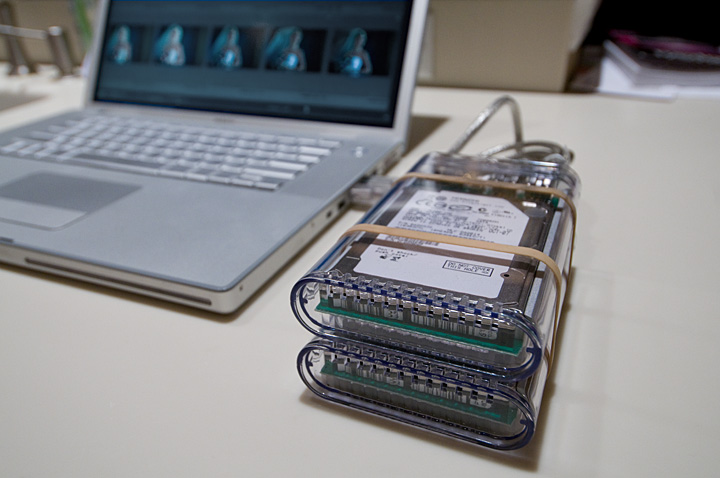
Once I get back to my laptop (which is sometimes in the car, or sometimes on a table in the studio, if I’m not already shooting tethered) rather than storing the images on my laptop (which has limited hard drive space) I now save my photos to two (2) OWC Mercury On-The-Go high-speed portable hard drives, which I stack one-on-top of the other, and rubberband together (see the crude snapshot below taken in my kitchen).
I connect one to my Laptop using a Firewire 800 cable, and the other using a Firewire 400 (IEEE 1394) cable, then I then eject the card from the camera and connect my memory card to my laptop (using USB 2.0) and then I import the photos into Lightroom, with the main photos going on one drive, and an automatic back-up going to the 2nd drive. (Here’s the link to those drives).
By the way; I switched to these OWC drives because everybody’s raving about their reliability, and since in the past year I’ve had two other drives die on me (one of which was unrecoverable, even by the amazing Paul Wilder, but luckily I had a backup of my backup), so I thought I’d better start looking for a more reliable solution. Once I’ve got copies on these two drives, I can reformat my memory card in my camera and start shooting with that card again, knowing I’ve got two backups.
3. At Home Backup
At home I have my main desktop computer which I use strictly for my photography (no email, no fonts, no Word documents—a totally clean machine!). I have a partitioned 1 Terabyte drive for my working photo collection, but every single photo gets backed up to my Drobo Robotic Backup drive, which I dearly love (here’s the link).
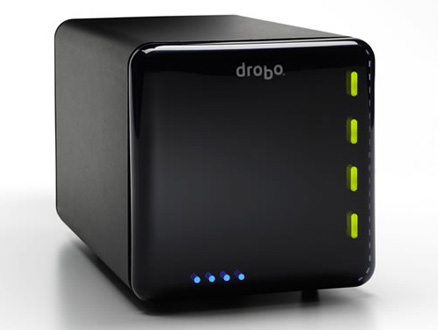

Knowing that Drobo is constantly monitoring the health of my hard drives is paramount to me, because I can’t tell you how many people I know have had to reach for a backup drive only to find out that their back-up is dead. My Drobo makes sure that doesn’t happen. Plus, last week I wanted to add more hard drive space, so I just ejected a 360 GB drive, and popped in a new 1 Terabyte drive, in 15 seconds, and Drobo managed all my data automatically. I just so dig it.
4. Off Site Backup
I got a second Drobo for my office, so my entire photo collection is backed up not just at home, but offsite at my office as well. This is handy for me, too because I can access my entire collection both at work and at home. I move photos between home and the office using the two OWC hard drives.
5. Backing Up My Laptop
I do most of my day-to-day work on an Apple MacBook Pro, and I keep my most recent photo work on there as well. When Apple introduced Mac OS X Leopard, I immediately started using the excellent Time Machine built-in back-up software, and it works really, really well, with no other input from you, except remembering to connect an external hard drive to your laptop. But that’s where my problem came in; I would go days without remembering to plug-in that darn external hard drive. One day a message came up that it had been 10-days since I backed up, and I thought, “What if I I had crashed during the week?”
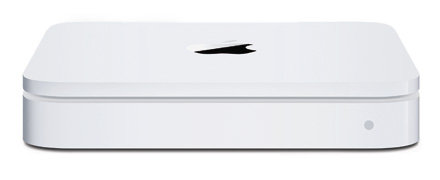

That’s when I ordered Apple’s Time Capsule, (shown above; photo courtesy of Apple), which does totally wireless backup, completely automatically, every time you’re on your laptop. It’s absolutely fan-friggin’ tastic! In fact, it’s backing up as I write this, and my latest backup is less than 1 hour old, so if my hard drive froze this instant, I would only lose my last hour’s work.
I have to say, this wireless back-up is absolutely, positively brilliant, and now I couldn’t get along without it. You don’t even know it’s happening, but you’re always, always backed up. Plus, it comes with it’s own built-in wireless network, so all you have to do is connect it to a high-speed modem, and it does the rest, all without you having to do anything. Ever! My hats off to Apple on this—it works just like you always hoped one day it would. (here’s the link)
Now, if you’re wondering, “Can’t I use that for backing up all my photos?” Well, I guess you could, but since it all moves over wireless (and you can get the 1 Terabyte Time Capsule for $499, including the built-in Airport Wireless unit) it’s pretty slow compared to even USB 2.0 (well, it would be slow for backing up 8GB from a shoot, plus it only backs up while your computer is awake, so when it goes to sleep, it stops backing up).
What I do like is; all the photos on my laptop are backed up, along with everything else (all my apps, email, documentsâ”everything!), which definitely helps me sleep at night. I have both my wife’s and my laptops backed up to it, and it’s the first time in years we both have a recent backup. I can’t recommend it enough, BUT for the long time archiving of photos, I would still recommend something like a Drobo.
That’s the scoop
Now, all that being said; it’s not as complicated a strategy as it sounds. My basic strategy is this:
- Never erase a memory card until you have two backups
- I backup in the field to an Epson P-5000; that way I have one backup on a hard drive, and the original photos still on my memory card, which I put back in my memory card case.
- When you import photos onto your laptop (like into Lightroom), make sure you have a backup of your photos on an external drive as well (or two drives in my case, because I don’t store all my photos on my laptop)
- Make sure your main photo library is backed up someplace that’s 100% safe and secure, because there is no replacing those original digital negatives (for me, that place is a Drobo).
- Don’t forget to have an offsite duplicate backup (in my case, it’s another Drobo, but it can also be just a large external drive sitting in your safe deposit box, or at work, but you have no way of knowing that, should you need that backup, it will work, which is why I have 2nd Drobo).
One last thing about Drobo; I’ve heard people ding Drobo for only having a USB 2.0 connection, and if Drobo were my main working drive, that might be an issue, but I think of the Drobo as an archival drive; a place to store my negatives (not my working files), that is constantly monitored to make sure it’s always 100% safe, and the Drobo does that for me, totally automated, without any input from me, quite brilliantly. If they add Firewire, it still won’t be my working drive, it’ll just back up a little faster. (Besides, I like singing, “Drobo-Arigato, Mr. Roboto–Drobo [Drobo]. Drobo [Drobo]”. Seriously, they should license that song for a TV spot. But I digress.
Well, there you have it. I hope this helps you in putting together a strategy for your own backups, but the most important thing isn’t the brand you use, or how many drives you use; it’s that you start doing it. Just read the horror stories my readers posted on last Friday post, and if that doesn’t scare you into backing up, then you’ll just have to wait until it happens to you.