My Sports Photography Workflow (so far)
I’ve had so many people ask me for so long to share my Sports Photography workflow, but honestly I’ve been so incredibly unhappy with my workflow, that I wouldn’t curse it on anyone. Of all the photographers in the photo work room, I was usually literally the last man to be able to leave at the end of the game (after uploading images to the wire service).
Luckily, it’s now finally (finally!) starting to come together to the point that I thought I’d at least share it, but I want to give you this important disclaimer up front: this workflow is a work in progress. It’s not “fully there” yet, but I was the third photographer to go home this week, and I’ve literally cut my processing/tagging time in half, but again — it’s far from perfect. My sincere hope is:
(a) This will help someone who was struggling along, like me,…
(b) Someone who really has their sports workflow down to a science will show me how to improve what I’m doing, which is very likely since I know mine isn’t fully baked yet.
So, with that said, here what I’m doing now:
Working on Assignment:
I’m shooting for a sports wire service, and the faster you get your images uploaded to them, the better (so they can get them out to potential news outlets for distribution). At hafltime, (actually, usually a minute or two of gametime beforehand) I head into the photo work room, download two memory cards; quickly pick six to eight good sharp images, add all the required metadata (there’s plenty), tweak the photos a bit (sharpen, contrast) and upload them live from the stadium and get back out before the third quarter starts. That has never actually happened. Halftime is only 15 minutes, and I’ve never finished the process in just 15 minutes, so I usually miss some of the start of the third quarter. Sometimes as much as half of the third quarter. Hey, it happens.
Speed is the main issue
I learned the hard way — you need very fast memory cards (I use Lexar 1000X cards), and a fast Lexar USB 3 card reader to get my images on to my computer as quickly as possible. I actually use two card readers so both cards can be downloading at once.
I don’t use Lightroom. Or the Bridge. Ever.
I’ve tried both. It’s a death-trap for pro sports photography. Every pro sports shooter at an NFL game (or otherwise) uses a program called Photo Mechanic (by a company called Camera Bits). If there are 40 photographers in the photo work room, you see 40 copies of Photo Mechanic open on their laptops.
It was created for photo journalists and it has some features that you absolutely positively need for this type of work. They are:
(1) Absolutely insanely fast drawing of full screen previews.
As soon as the thumbnails appear (which is really quick), you can instantly view the images at full-screen size. I’m talking lightning fast. I’m talking so fast that you had no idea any program could possibly load full-screen images at this speed, but somehow it just does. I know what you’re thinking: “Does Adobe know about this technology?” Absolutely. “Have you talked to them about adding this to Lightroom?” Many times. “Do you think we’ll ever have fast-loading thumbnails like that?” Nope.
(2) A very well-thought out and designed system for adding metadata to your images
Every photo you submit needs a full description of what’s happening in the photo, where the photo was taken and when, including each player fully identified by team name, player name, position on the team, and jersey number. You need this for every player in the shot. Three players, three full IDs.
(3) An automated process, using keyboard shortcuts, that lets you do all the stuff you have to do in #2 above really, really fast (with the help of a website I’ll mention in a moment).
Plus, you can FTP right from the program straight to the server of your local wire service.
So, step one is Buy Photo Mechanic
The program costs $150, and once I saw it in action, it was the fastest $150 I ever spent. Worth every penny. I’d have paid $250. Maybe more. But Photo Mechanic is just an image sorting and metadata application, albeit a great one, but it’s not Photoshop and doesn’t do Photoshop-like stuff, so you still need Photoshop.
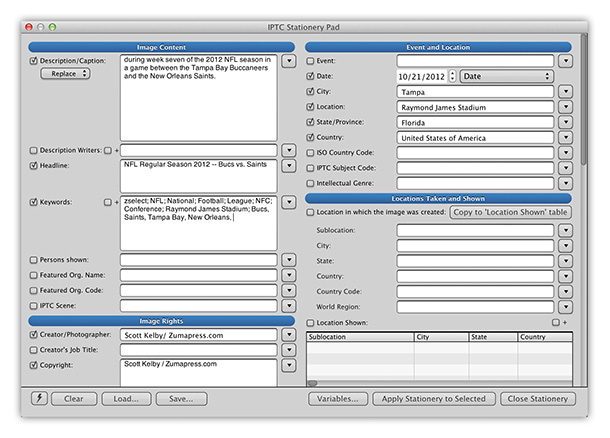
But before you start importing photos, you need to set up a Metadata template (they call it an “IPTC Stationary Pad”) like the one you see above. This includes a bit about the game and where it’s being played and such. (I do this before I even leave for the stadium).
Then, when I walk in from the first half, I open this Stationary Pad, add the score as it stands “The Bucs lead the Saints 21-14 at the half” to the end, and now when I import my photos, it automatically applies this metadata, including the date, stadium location, copyright info and such to every photo.

The greatest thing to happen to Metadata since….whenever the last good thing happened
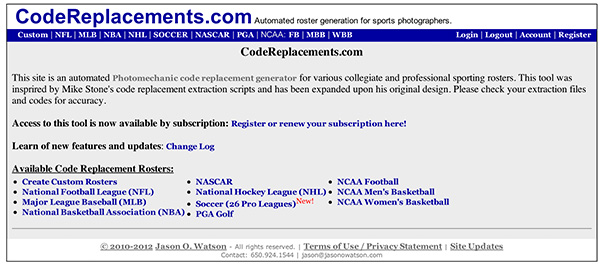
There is a website called “CodeReplacements.com” and you pay a small subscription fee and it generates a current roster of both teams for any pro sporting event, which itself is handy, but that’s not what makes it totally rock. You import this roster into Photo Mechanic (it’s then called a “Code Replacement”) and now all you have to do is look at the number on the player’s jersey, type a shortcut and that number, and it automatically fills in all the team info, player’s name, position, and number. For example, if the player plays for Tampa Bay, I just type a backslash, “t” for Tampa Bay, his jersey number, and another backslash, and it instantly types in this for me:
Tampa Bay Buccaneers free safety Ronde Barber (20)
Then I type in “breaks up a screen pass intended for” and I type the other guy’s jersey number like this \n16\ and it writes
New Orleans Saints wide receiver Lance Moore (16)
and then the rest of the metadata about what week it is, and what kind of game it is and where it’s played is already there because I added that to the IPTC Stationary Pad before the game (mentioned above). So, the whole thing reads like this is all of 20-seconds:
“Tampa Bay Buccaneers free safety Ronde Barber (20) breaks up a screen pass intended for New Orleans Saints wide receiver Lance Moore during week seven of the 2012 NFL season in a game between the Tampa Bay Buccaneers and the New Orleans Saints. The Bucs lead the Saints 21-14 at the half.”
Those code replacements rock, and my hats off the guy who came up with the service. May he earn a millions bucks!
Now, you’re ready to download your cards when you come in off the field at halftime
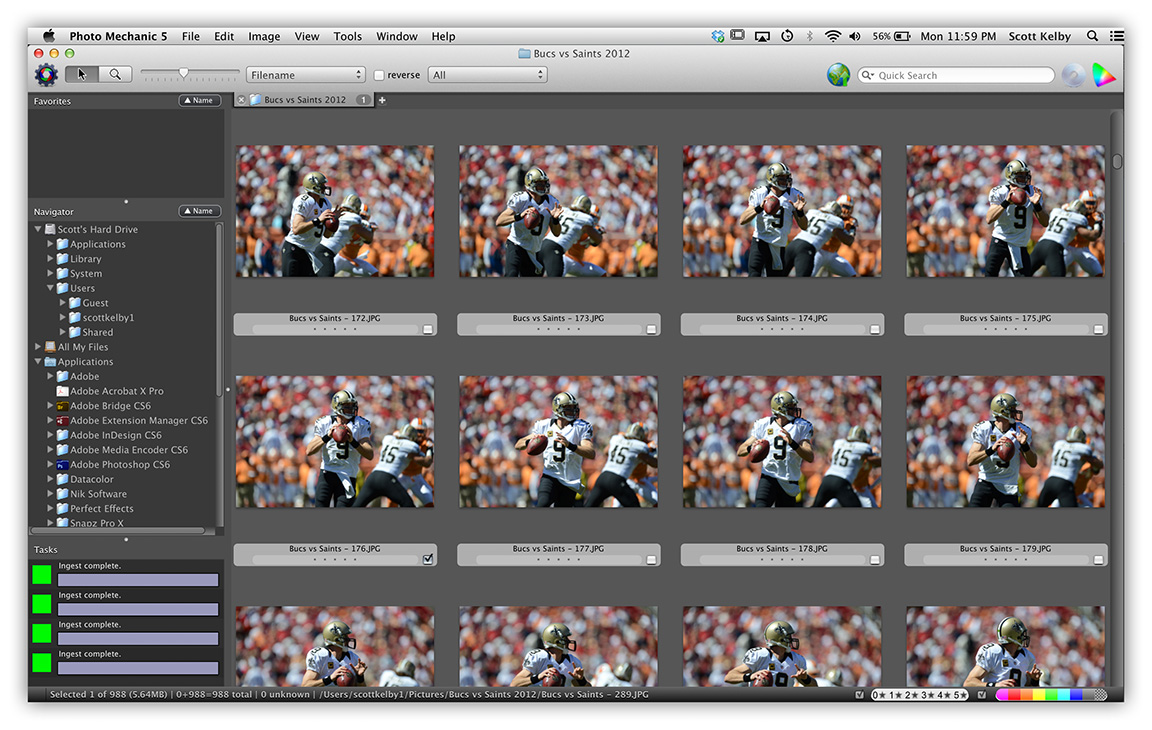
Photo Mechanic calls this process “Ingesting” and it’s pretty quick (and you can ingest multiple cards at once, and I do). It automatically names and numbers them, similar to what you’d do in Lightroom’s Import Window (ya know, if you had all freakin’ day to import your images — don’t get me started).
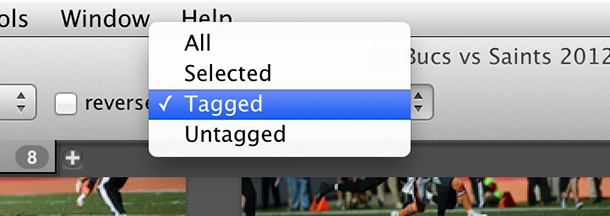
Once they’re in Photo Mechanic, you can either scan your thumbnails really quickly looking for key shots, or just go to full-screen size and zip through them lickity split using the right-arrow key on your keyboard. When you see a photo you might want to upload, you press the letter “T” to “Tag” it. When you’ve gone thru all your photos, you turn on a filter that only shows your Tagged images, which is seen above (I usually have about 10 to 15 tagged images at this point. Occasionally more, but I’m only going to have to time to process six or eight at best, so I have to whittle it down to the best six or eight of those).
Here’s where my first hurdle comes in
At this point, I look at the, say…15 tagged images at full screen size and when I see one I want to make my cut of just six or eight for uploading, I press the number 6 to label it with a blue label. In just a few seconds, I have six or blue-labeled shots. I select those images (we’ll say I chose six) and jump into the Metadata editing window, where I add the player info using those automated Code Replacements. This is a little tedious, especially if you can’t clearly read a player’s number of their jersey or helmet. Then you have to go back to your full shoot and figure it out by looking at shots before or after the one you want to upload. This kind of drives me nuts, but you’ve got to have the right number or the player’s name will be wrong.
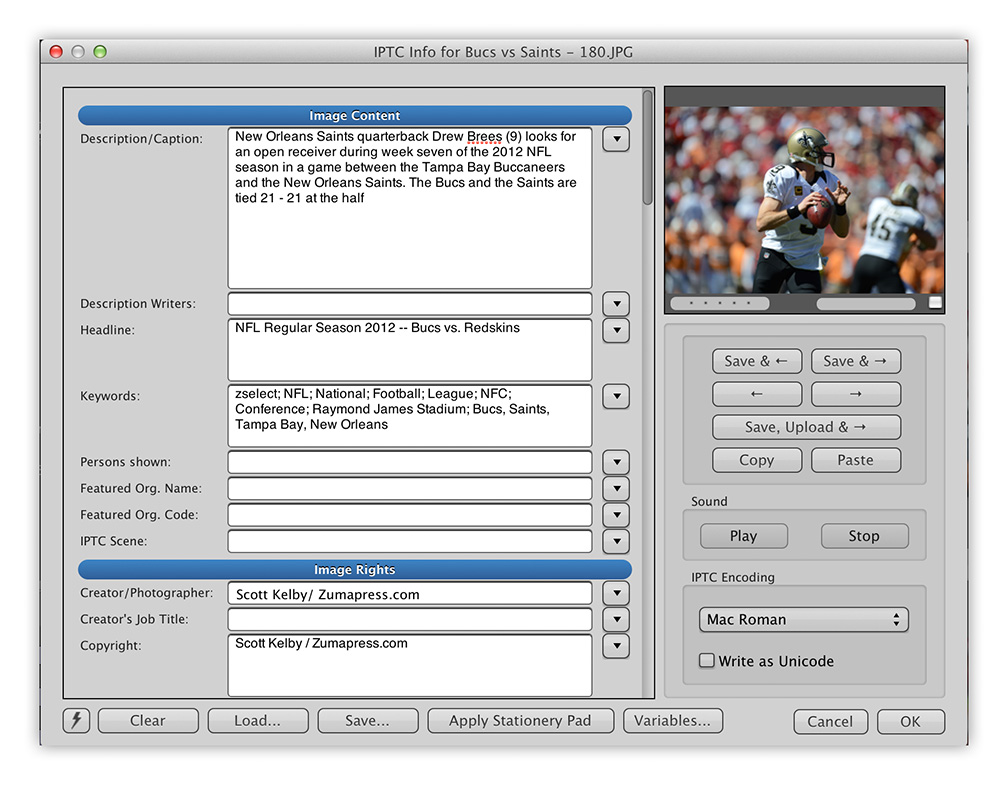
Metadata Done Right
Camera Bits did a kick-butt job on this part, as you can click on the thumbnail in the metadata entry window and see a huge-preview (helpful in reading jersey numbers), and you can copy and paste metadata from one similar image to another (big time-saver), and you can use code replacements for everything the ref’s to special codes that have to be added on a per-player basis (in another field, I have to enter a bracket, the player’s last name, first name, and a closed bracket (like this: [Barber, Ronde]) for each player, but there’s a Code Replacement shortcut that does that, too (thankfully —- another big time-saver in an already tedious process). This whole part is very well designed on Photo Mechanic’s part.
Now over to Adobe Camera Raw
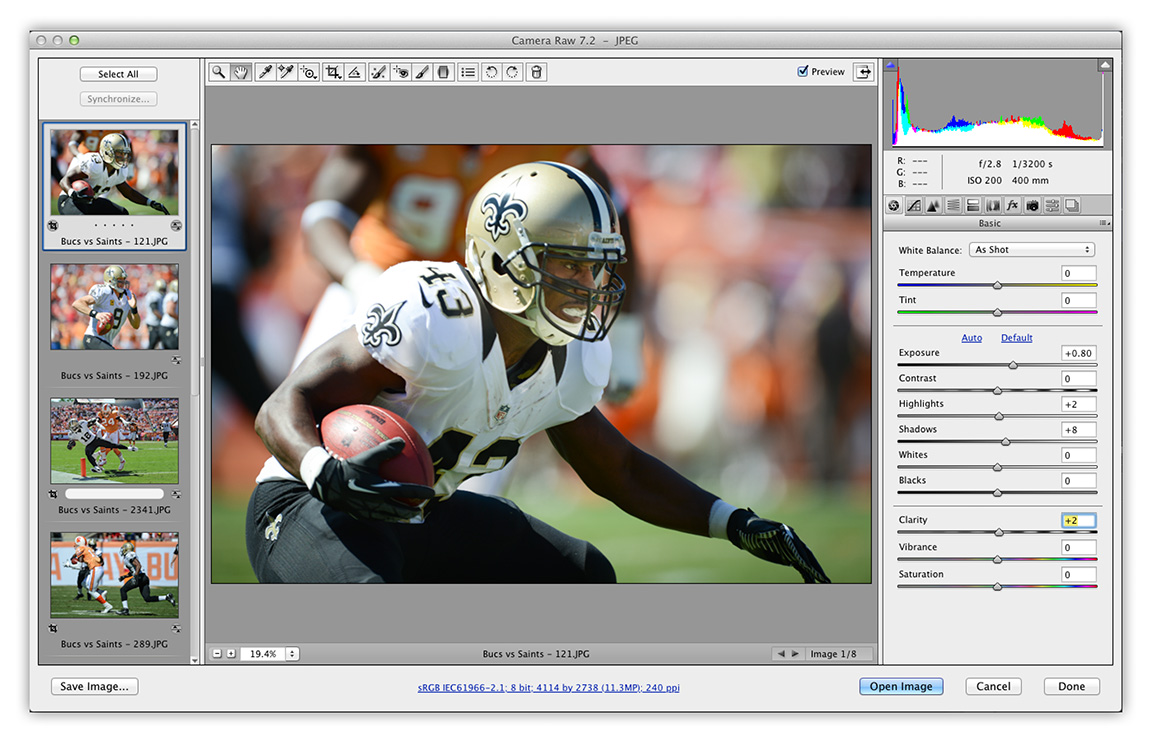
Once I click OK after adding all the metadata to those six photos, I press Command-E and open those six all up in a Camera Raw at once (they appear in a filmstrip along the left side of Camera Raw, as seen above). Now I take a quick moment to crop each photo tight (if necessary, and it often is), then I check the White Balance, add Contrast if necessary and any other very minor tweaks (This is reportage so you can do very little editing whatsoever to these images)
Sharpening and Saving as JPEGs
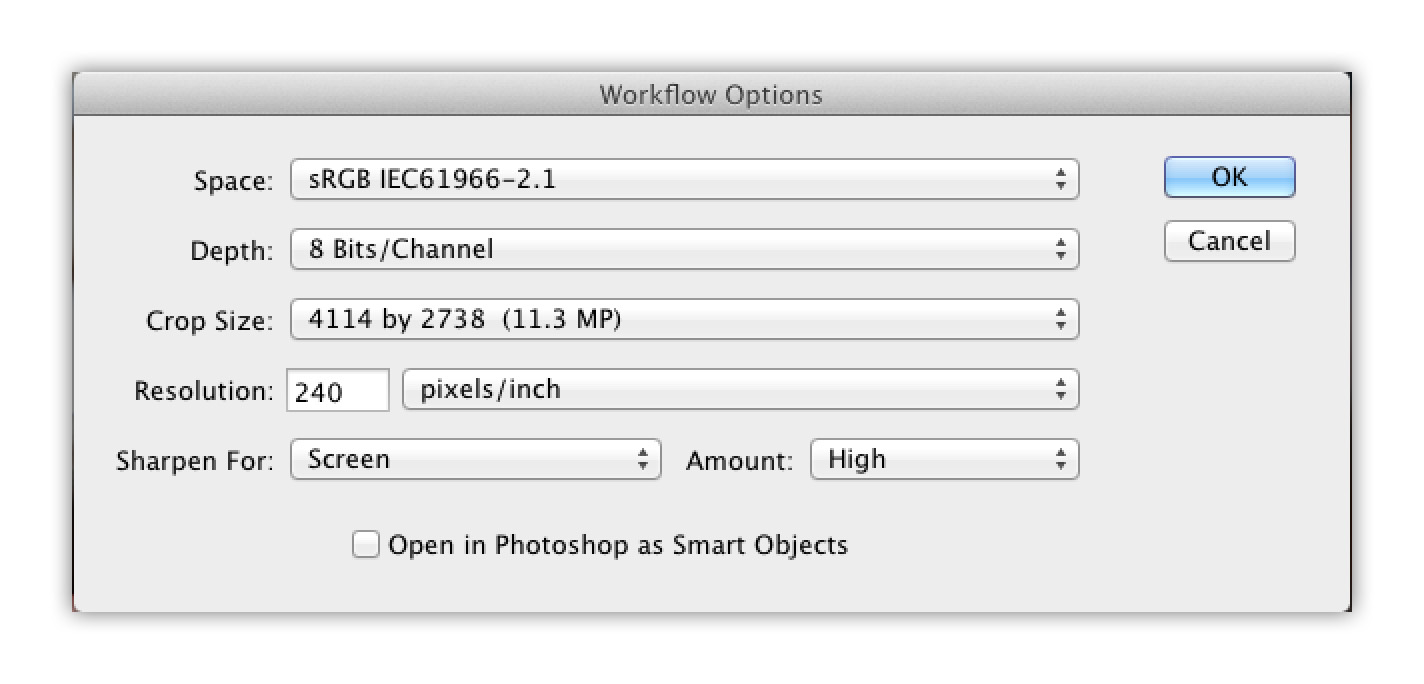
This is another place I’m not certain I’m totally nailing this workflow thing, but I then export the images out of Camera Raw as JPEGs and have Camera Raw apply sharpening (set to “For Screen” and amount “High” in Camera Raw’s Output Preferences) as they’re exported. This leaves them with a folder with six images in it, with all the metadata embedded, cropped, edited and sharpened ready for uploading, which takes all of 30-seconds (if that). I know some guys are running sharpening and resizing actions that do all that stuff in Photoshop, but I actually don’t go into Photoshop at all — just Camera Raw and save out to JPEGs with the sharpening applied at export, but again, I’m not sure that’s the best time-saving route (but that’s what I’m doing thus far).
The problem is: that takes longer than 15 minutes.
I think I probably spent too much time looking through my images trying to find the best ones to upload, and I may be over-thinking that part, but I haven’t found a way to speed the process. I have a hard time searching through tiny thumbnails — I like to see them big, and that definitely impacts my speed —- not because of Photo Mechanic — just because if you can judge by thumbnails you can breeze through hundreds really fast. I’ve tried it, and I feel like I miss too much that way, but maybe again I’m over-thinking it.
After the game, I do it all again…
But now I’m looking for 20 or so images to upload, and I’ve got the process down to about 45 minutes, but I’d like to see it down to 30 minutes, and if you see an area here where I’m doing double-the-work, or I’m making extra work for myself (I’m not an expert at Photo Mechanic) let me know because my goal is to cut time off this workflow, and anything that save time is a big win for me.
Quick Recap:
(1) Set-up IPTC Stationary Pad, and download CodeReplacments.com file at home before game
(2) Import two cards at once (one from each camera); Apply Stationary Pad on import and rename
(3) Quickly go through images and Tag 10 to 15 of the best ones
(4) Narrow that down to just six or eight (label those blue)
(5) Add detailed Metadata for those six or eight keepers
(6) Open all those images at once in Camera Raw for cropping & editing
(7) Export those as JPEGs with Sharpening Applied on Export
(8) Upload those to the wire service
So, there you have it
As you can tell from my comments, I’m not fully satisfied with this workflow, but at least it’s at the point that I feel like I can share it and hopefully some part of it will help you with your workflow. Just for the record: I’ve tried using Lightroom, and/or the Bridge and Camera Raw combo, but neither can come close to the Photo Mechanic workflow (ask any pro sports photographer), but I think if I have an achilles heel in my workflow, it’s what happens after I leave Photo Mechanic.
Hope that all makes sense, and I hope it helps. I’ll be in Washington DC this weekend for my seminar there next week, so I don’t think I’ll be shooting any games this weekend (rats!), but just know I do, when I pick up a timesaver, I’ll be sure to share it with you guys here. Cheers, -Scott