

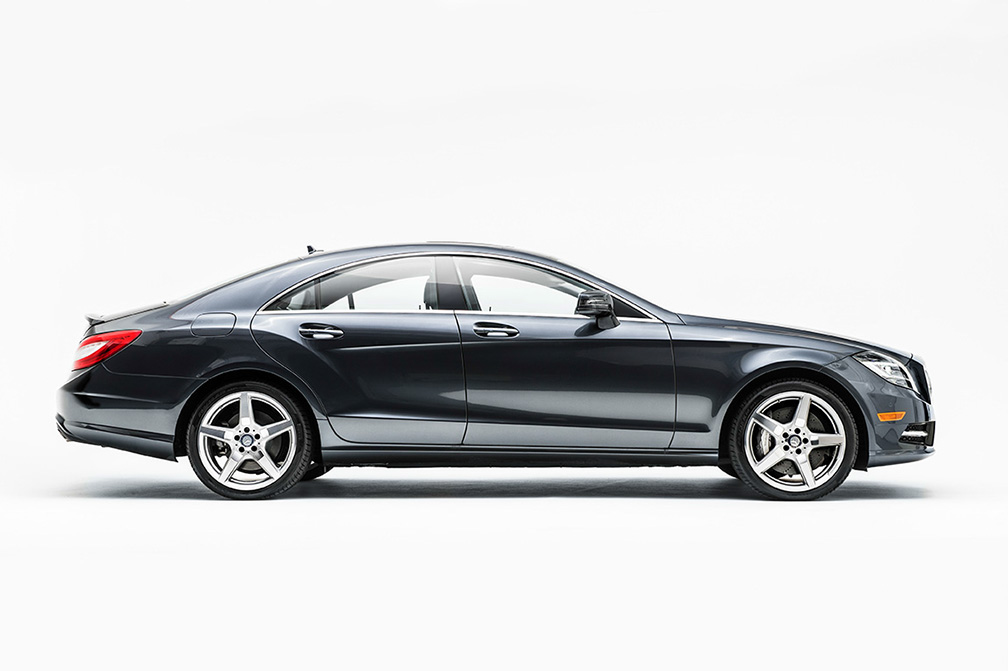
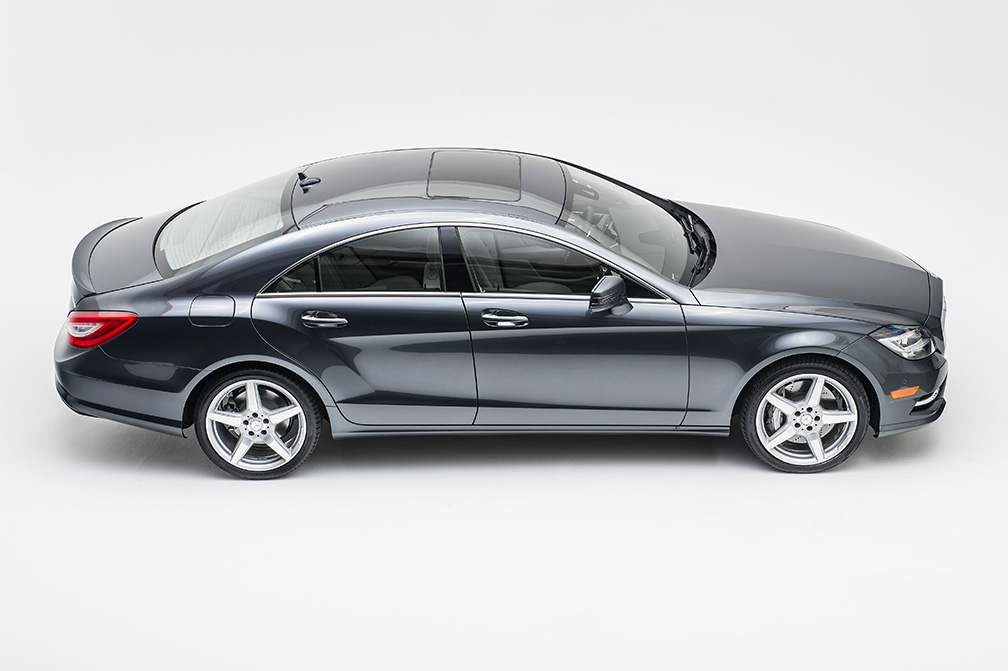
(Above: a 2014 Mercedes Benz CLS 550, in a dark grey with a hint of blue. Thanks to Tony Pinero for the car).
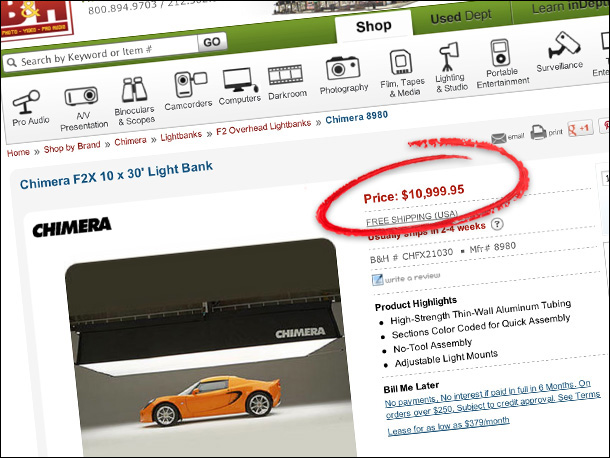
Ever since I started shooting cars, I’ve wanted to shoot one in a studio, but there have been a couple of obstacles. One being finding a studio with a really large white cove that’s big enough to drive a car into, but the really big obstacle is to find one that has a giant car-sized softbox overhead (like the 10-foot x 30-foot F2X from Chimera, but the price is……the price is…well….see below).
That gives you some idea of why, outside of Detroit, finding a studio with one of these with an affordable rental rate is pretty challenging. Well, it would be for a regular guy, but not for the amazing Brad Moore, who found Studio 75, a commercial rental studio set up for automotive photography, that’s only about 25-minutes from our offices. It’s affordable, the guy seemed really easy to work with, and although they didn’t have the Chimera, they did have a home-made rig that works, so we booked it.
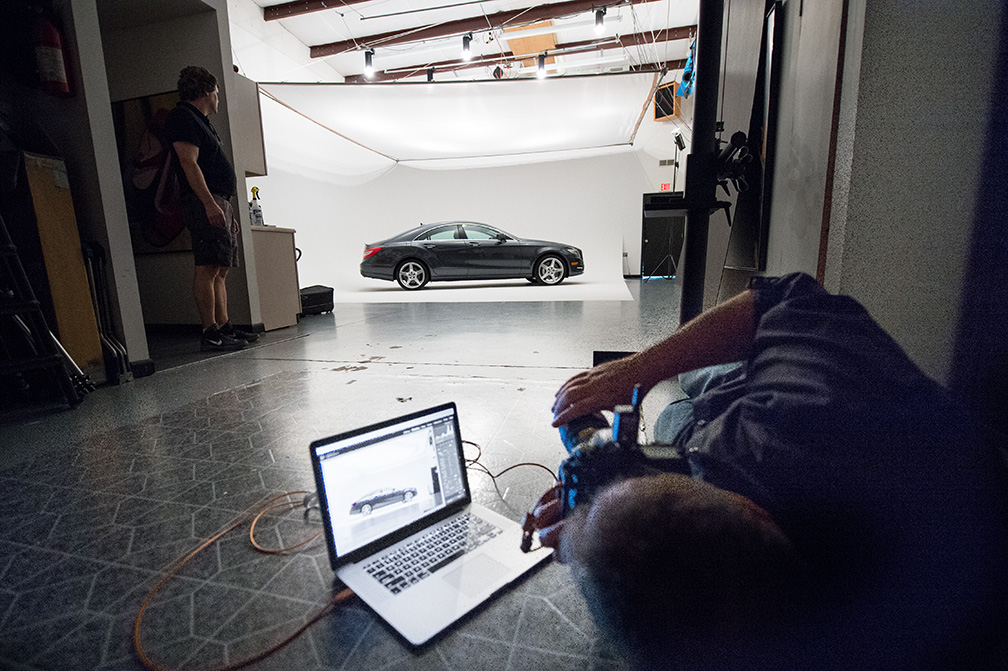
Above: In this behind-the-scenes shot, you can see the cost-effective lighting rig Dan created himself. It’s five 1,000 watt White Lightning strobe heads (bare bulbs), mounted on two long poles, hoisted up with a pulley-system, and then firing through a large 20’x20′ Matthews overhead silk diffusion panel (around $700) mounted to aluminum fence top-rail (you can buy a Matthews 20’x20′ collapsable frame for around $975, but the fence top-rail DIY route would be much cheaper at around $88 for the tubing (Eight 10′ x- 1-3/8″ round inter-connecting rails at Lowes for around $11 each. Then you’d need four 1-3/8″ corner connectors at around $4 or so each).
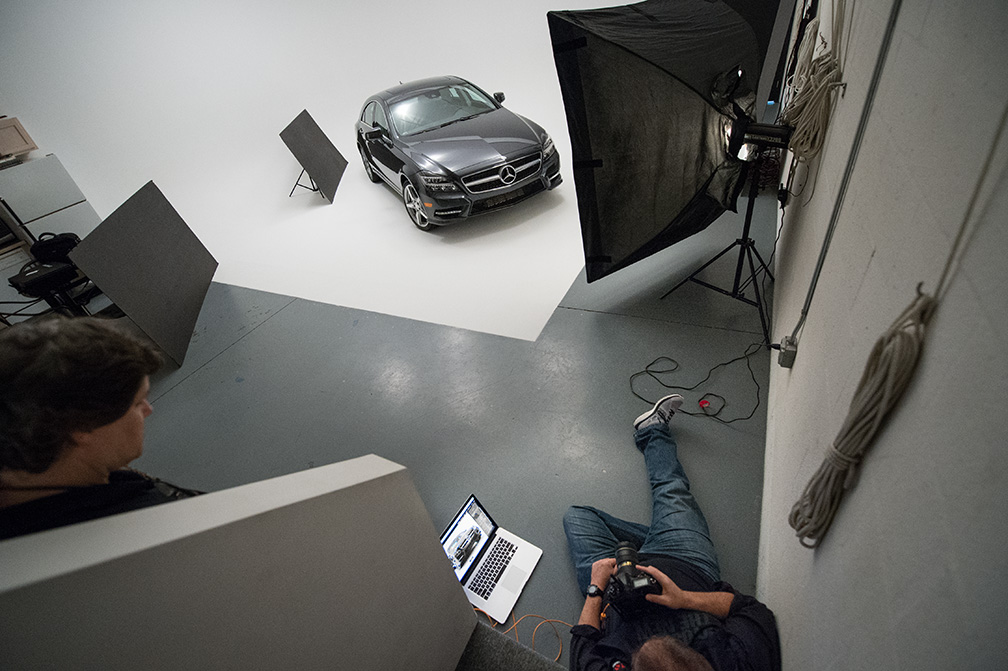
OK, back to the production still above: To get the right look, I’m nearly at the back of the studio. To get the perspective right, I’m laying down on the floor (not a big fan of that part), and I’m tethered directly into Lightroom so I can see the shots at a very large size as I’m taking them.
Once the lights are in place, you set them to full-power and adjust the f/stop until it looks right, so it’s a pretty straight ahead set-up from above.
Welcome to my World
While you could get a car in the studio without any trouble, maneuvering once inside is quite tricky, but luckily this particular car had a backup camera, which made things easier. However, having Brad Moore giving you directions in that back-up camera…well…just watch the video below (shot by Dan as I was backing the car) and you’ll see what I mean. Welcome to my world.
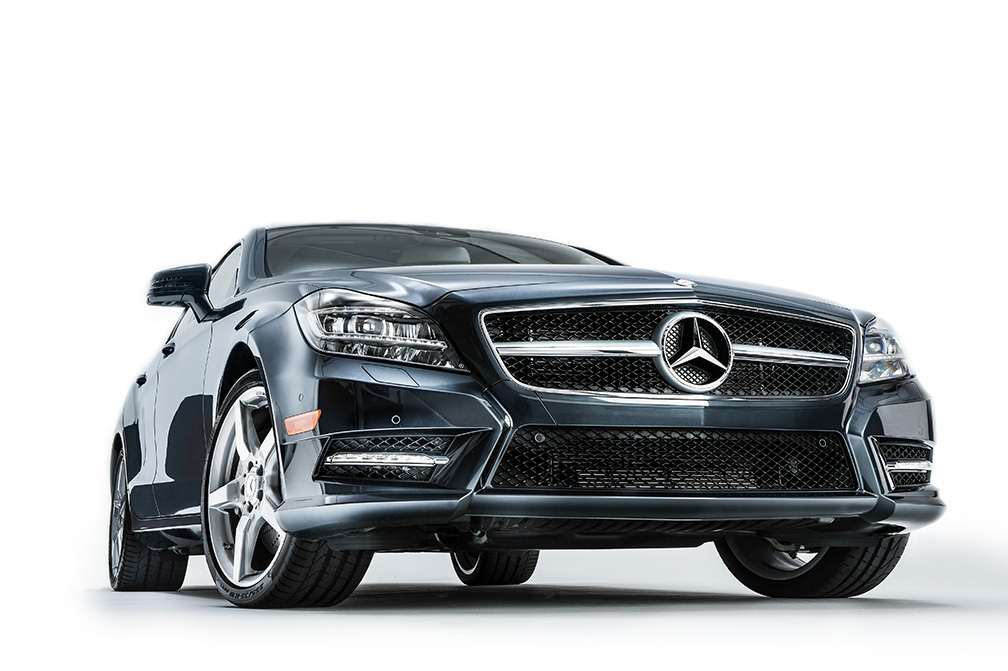
Above: For shots where the front of the car is visible (like the one you just saw), we used a large softbox to fill-in the shadows. We also used a large black bounce card to help create some shadow areas on the car (more on this in a moment). You can see my low shooting position here (production shots by Brad Moore). It was a bit more comfortable here — sitting on the floor and laying back on the first step of the stairs leading to the studio’s loft.
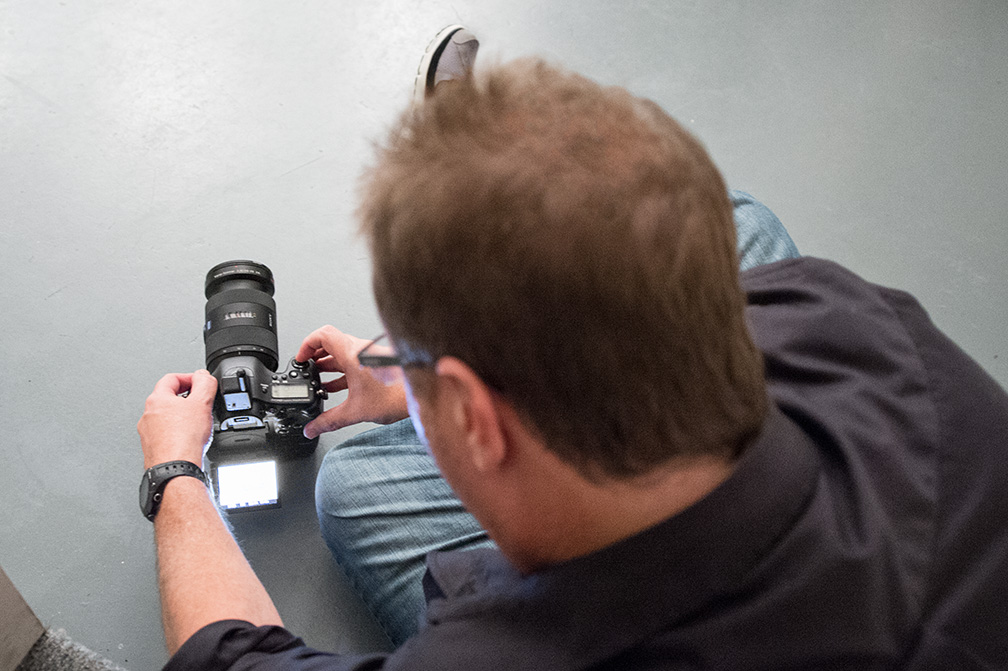
Above: Sony had loaned me some of their DSLR gear to try out, and I thought this would be a great opportunity since the Sony A99 had a swivel-out LCD monitor, so I could place the camera on the floor (for the lowest possible perspective —- one where the photo would clearly show the rear tire on the far side) and then I could just angle it up a bit and do all the composition using the tilt-up display. This sounds easy, but try it with a sneaker coming out of the front of your head (see above)
It worked even better than I thought (though the electronic viewfinder is kind of…well…kinda weird when you work in a studio environment. It has a special mode for it, and perhaps you would eventually get used to it, but seeing something on screen that looks so different from what you’re going to create really threw me. Maybe it’s just my inexperience with the Sony, so I don’t want to totally trash it, because I know a lot of folks love it, but it would definitely take some getting used to (for me, anyway). So, I shot both my Nikon D4 and the Sony A99 during the four-hour shoot in the studio.
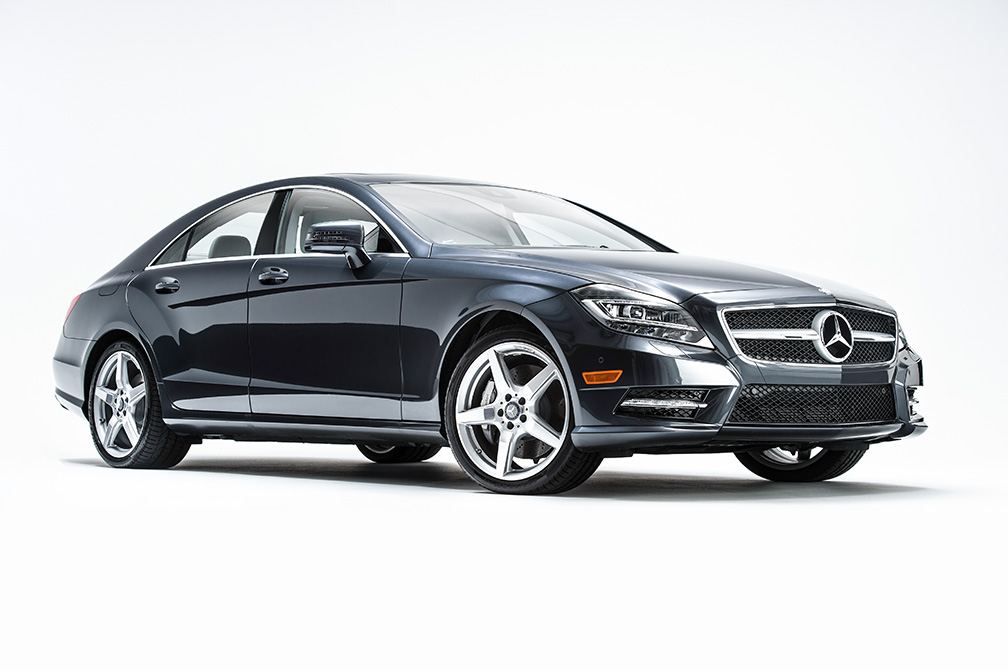
Above: Here’s a two-thirds view, where you can see the side the front. It was the first shot we tried that day. You can really see the black bounce card in the bottom half of the doors. That really made a huge difference.
Above: Here’s the production shot. I’m lying on the floor again, but I did mount the Nikon on my Gitzo tripod but we splayed the legs way out so I could get it just a few inches above the ground. I kind of leaned on my elbow to compose the shot, then I’d lock down the ballhead.
Above: When we were all done, I thought I’d take a shot from up above, from the loft (where the studio’s office is), and I kinda like the angle. Plus, it was a LOT easier because at this high angle, we didn’t have to deal with many reflections that appear on the car (which is what turned out to be the challenge of the day for the rest of the shots).
The Tip of the Day
Before we left the studio, the studio owner, commercial photographer Dan Gaye, told Brad to bring a circular polarizer, and man did that thing absolutely work wonders!!! The lighting part of this is actually pretty straightforward — it’s a bunch of lights aiming straight down from directly above through some material that softens and diffuses them. If you need a fill for one part or another, just add one more strobe with a soft box. That part was surprisingly easy. The real challenge is eliminating reflections in the car.
First, the Polarizer helps darken scene, but more importantly it helps you nearly eliminate the hot-spots and reflections from the strobes above in the windshield and side windows. Without that polarizer, you’d have a serious retouching nightmare. You just rotate the circular polarizer and you can literally see the reflections in the windows disappear. I told Brad — learning that was worth the studio rental right there!

Above: Of course, since I had the car there, I couldn’t help but do a few detail shots, using the standard set-up: a single large strip-bank (we turned the overhead lights off), and shooting at f/22 (hat tip to Tim Wallace), just like always.
It’s not the Lighting that’s hard. It’s managing the reflections
Dan said something that really stuck with me. He said “Cars are like giant mirrors. You see anything in front of it like you’re aiming at a mirror” and he wasn’t just-a-kiddin’. It was amazing to see this in person, because you could see everything from the kitchen in the studio, to Brad’s head, to a blue Kayak mounted up near the ceiling, to beams in the ceiling, light stands, me, paintings on the wall, cables on the floor — EVERYTHING!
I have to give Dan big credit and major love here, because he is a master of hiding all these things using black drop clothes, black seamless paper (we had to bring out a 15-foot wide roll), black 8-foot ball bounce cards, and more. You had to take a shot — zoom in tight and you can’t believe all the stuff you’d see — just like you were looking at a big mirror aiming back at the studio. It took 5 minutes to get the lighting right for the very first shot I posted at the top of the page, and about 50 minutes to minimize the reflections.
Now that I’ve seen the process of dealing with all these reflections, it really is just a trial-and-error case of being a “Reflection Detective” but I could not have pulled this off without Dan’s experience and help (and he was incredibly helpful throughout. Since it’s his studio, he knows every trick in the book).
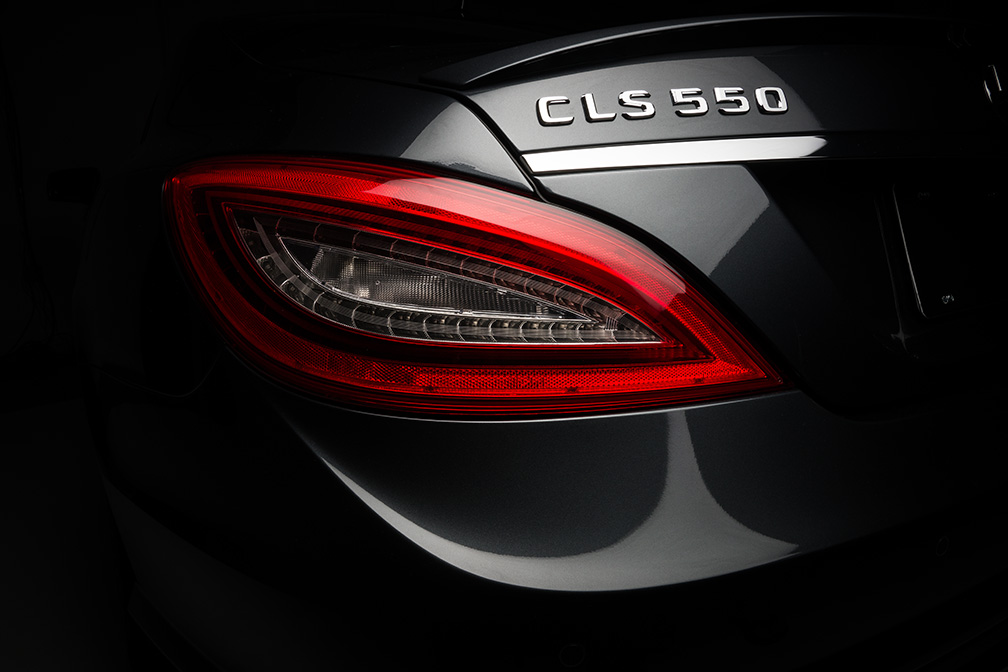
Above: Here’s another detail shot; this one of the rear of the car, with the name plate and tail light sections.

Above: Here’s the emblem on the trunk, lit with that same single strip bank, held diligently by Mr. Moore.
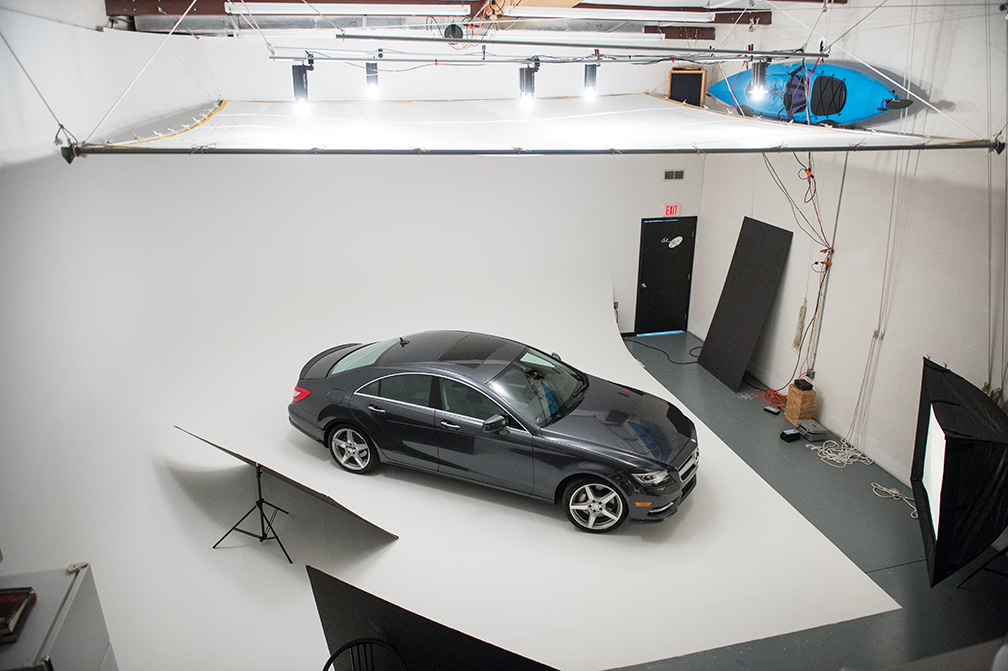
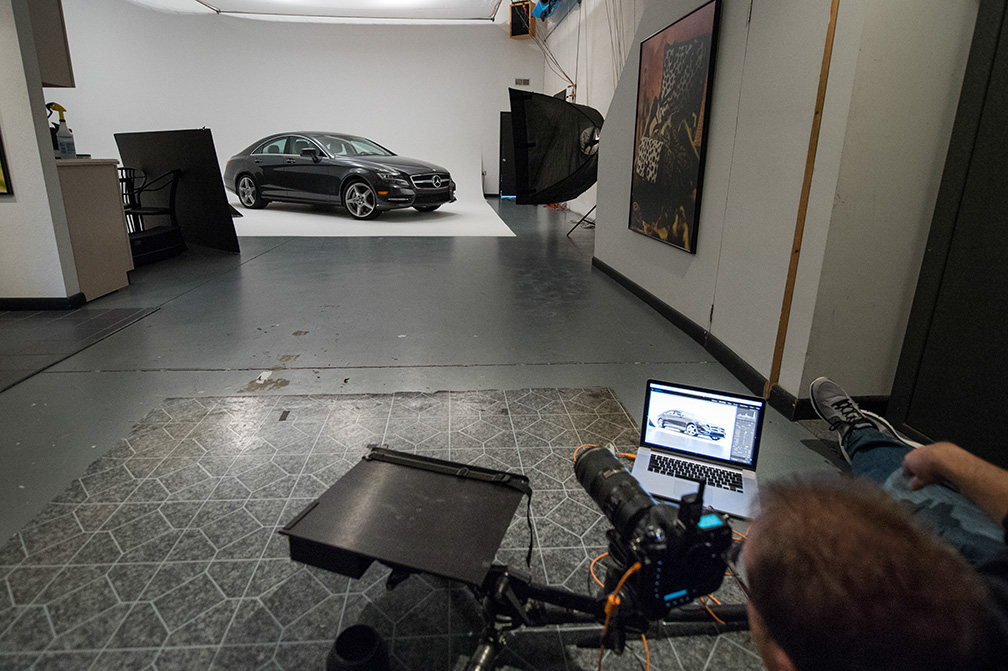
Above: Thought I’d give you one more look at the overall full-car lighting set-up (and the blue kayak which had to be cloned out of just aobut every shot). This one gives you a great view of the White Lighting strobes and the diffusion silk.
Above: I wanted to include a shot of studio owner and photographer Dan Gaye because he was just an incredible help all day. He designed this inexpensive overhead lighting rig back in 1995 and it still works really well to this day. His system of ropes and pulleys lets him raise/lower/angle the lights and diffusion panel pretty much however you want it.
He was super-helpful and really made me understand the challenges of minimizing reflections and the techniques to hide distracting stuff, which is somewhat of an art unto itself. Needless to say, I learned a lot. So, a big thanks and high-five to Dan, but also thanks to Brad for finding Dan and his studio, and for all his hard work that day, and for all the production stills. Way to go Braddo!
Of course, me being me, I see all sorts of stuff I’d do differently next time
That next time will hopefully be in just a few weeks from now, because I’ve already found another cool car that needs shootin’ and I surely need the practice, but I’m totally OK with that. It was just my first studio automative shoot, but hopefully it’s just the first of many, and you know what they say about practice. :)
Scott, we have a Chimera here if your ever in the area a need one! Great shots!
Are you kidding me Ken!!!!!! You are like a Swiss-Army knife!!!! :) When I come up that way, I’m calling you for sure!!! :)
Just got out of cataract surgery. Al went well.
Did you get to keep the car? :)
Of course. That’s the deal — any car I shoot, the owner has to give me the car when we’re done. ;-)
Just curious, but why not put the camera on a low angle tripod or beanbag, set the frame, then have your laptop on a taller stand or table and use the camera control setting in Lightroom to fire the camera? Brad could adjust the frame while you direct in Live View and then lock it down when perfect. Working from the floor seems like it would be very uncomfortable unless you have to (i.e. shooting a lot of variations). :-)
I didn’t think to bring a shorter tripod or beanbag (or Fplate), otherwise that could’ve been the way to go. Next time!
Thanks for the write up. Lots of insights gained!
Really enjoyed this walk through. Having never done this sort of thing, my initial thought was “nice, but how hard could it be”. After seeing the effort you went through to deal with reflections, I realised it must have been massively hard.
Nice tip on the polariser. I use one when doing travel work to remove reflections off shop displays, museum glass and food stalls. Would be next to impossible without one.
It was definitely a learning experience. The shooting part was easier than I thought, but the reflection part (which I wasn’t even thinking about beforehand) was the real challenge. Thankfully Dan had dealt with that enough that he pre-made black covers for a lot of things in his studio that he knew would reflect.
That second picture is a cracker of an image and CLS 550 close up. Thanks for the information as well.
When I’ve seen people use these large soft boxes/silks before they have had the light face much closer to the car. Was there are reason you had yours so high (reducing the softness) or was it simply because the lights where set to 1/1 and you can’t get to them to dial them down?
Though this does seem a much more reasonably priced alternative. I was told the ball park of how much Londons haymarket studios day rate was once. I nearly fainted.
Edit: If they do a lot of car shoots there then a set of go jacks might be worth looking into, then you can just roll the car into place.
I think it was something to do with the reflections on the car, but we did play with the height of the silk throughout the shoot. Where it is in these production shots wasn’t where it was the entire time.
Dan has the go jacks as well, but we were able to get the car where Scott wanted it pretty easily. Dan said that he did have to use them on another car shoot where the car was too long to make the turns it needed to make in his studio.
Just curious why you didn’t pull the kayak down off the wall instead of dealing with it in post on every shot.
It was the time it would take to pull it down vs the time it would take to deal with it in post. Scott decided the post time would be less than shoot time, so it stayed up. Especially since he’s not editing every single frame from the shoot, but just a few.
Photograph? Take the car for a drive….
The Petersen Auto Museum in LA is selling some of the vehicles. Here is your chance…..
That is an incredible museum. Went there years ago, but the lighting was sketchy and high ISO cameras weren’t available yet, so all I had were either very blurry or very noisy photos. Wild to hear they’re selling some of those car, though.
Good stuff guys. I’ve just started getting into product photography as a hobby. As you mentioned, the biggest challenge is managing the reflections. It’s great fun though if you have the patience.
I would “strongly” recommend you guys look into trying/buying the Manfrotto 410 Junior Gear Head. For this type of shooting (and landscapes) I’ve found it incredibly useful. No ballhead sag. Just pinpoint control over your composition. Once you learn how to use it, it’s actually quite quick to maneuver.
Hi Bill: I hadn’t head of that Junior Gear Head, but I’ll be surely checking it out. Thanks for the tip. :)
Hey Guys,
That is bad a$$. I love the shots and the way you explained everything.
See y’all soon,
Mike
Many thanks Mike. We’ll see you soon! :)
Exceptional work, congratulations
I love hearing about the struggles and learning curve and whatnot that someone as established as you has. It’s great motivation for me, someone who struggles with nearly every aspect of photography.
And YES!!! Cars have LOTS of reflections. I learned that a couple weeks ago shooting a car at a street fair. I was being careful to eliminate random background distractions (people, restaurants, etc), but didn’t even notice the reflections until post processing. YIKES!!!
Thought I’d throw in another shout out for Dan. We recently booked his studio for portrait shoot with a local personality. Found out late at night coincidently also 5 hours before our flight left for FL that our subject didn’t want to make the drive to the studio. Thankfully our producer was able to turn everything around, organize the shoot at the clients requested location and with the gracious help and assistance of Dan we were able to still pull of the shoot. If it wasn’t for him I would have been dead in the water. He’s been around the block a couple of times and has a wealth of knowledge, accompanied by his easy going and relaxed demeanor, if you ever get a chance to shoot with him you should jump at it :) maybe next time I’ll actually get to shoot at his rocking studio.
Next time Tony Corbell comes in ask him about the Porsche shoot he did with Dean Collins in the 80s. They had a small white reflection in the car and how they found the source was cool. You can watch the shoot in a video called “Heavenly Porsche”.
I really enjoyed your photos and the article, but the video of Brad was the cherry on the cake of my day.
I know, right?
Agree! =)
Will try all of this with my 79 Yugo in my garage.
I know as a general photographer rule you don’t show any shots that are not “5 star” , but can you share some that you scrapped and explain the reasoning behind scrapping them? As all of us aspiring photographers learn best from our mistakes, who better the learn mistakes from than one we all look up to. (Similar to your 2012 Google+ photographers conference Taj Mahal story).
Hi Scott: because they were take in a studio, and all from the pretty same angle, they all look pretty much the same. That’s usually not the case, but the only difference you would see would be more things reflecting in the car, but each shot looks just about the same, which makes it harder to pick which one is “the one”.
Very helpful article and BEAUTIFUL photos! Tnks! :D
Nice shots…however, why did you get so much grain on the close up of the Mercedes logo? 3rd one from bottom up. Was that purposely added in? or it was just the camera? The one right above doesn’t have as much, but it seems to show in the darker areas more.
It’s not grain, it’s the metal flake in the paint.
+1
Hmm, I’ve never seen that before.
Terrific shots and BTS’s info!
I think Brad’s video would be perfect if played with Pee Wee Herman’s “Tequila” dance song. hehe.
http://www.youtube.com/watch?v=UVKsd8z6scw
I always wanted to do such a car shoot with cool lighting, but I also do not have access to such a large lighting setup. So I got a 1:14 scale Ferrari FF and shot it at home: http://lumenatic.com/2013/07/15/shooting-a-ferrari-ff-in-the-studio/
I gotta tell ya — I am really impressed! If you hadn’t told me it was a model, I probably wouldn’t have know. Great job (and I have to share this link). :)
Very informative as always. You have a knack for documenting your shoots in a way no one else does. Kelby is King!
I had a similar experience eliminating reflections on a trip out East last year. 5 days, 5 of our glass vendors. I was shooting these wedge lenses that reflected at odd angles using speedlites and popup softboxes. It was fun going through images and finding random people in the reflections. I wish I would have thought to bring a circular polarizer, I’ll be using one for sure in the future.
Good to hear that you have started using circular polarizer-filters. It´s one of the best tools for car shoots, no doubt. It looks good with this setup, but i do recommend trying a studio with constant light if you come across one someday. That is even more cool to work with, it´s what you see is what you get.
It´s hard to beat that. :)
Take a look at an example of how it can look below.
Oops, that was me posting that. I dunno what happened. Here is the picture anyway. And do try a studio with constant light if you come across one. It´s heaven. :)
Awesome stuff. Dan is a a great guy. Really enjoyed his studio. I got to shoot a few Sweetbay spots there. Small but really well put together.
Some great images and info Scott, Thanks.
Just curious. Why f/22 on the detail shots? Was it just to get everything in focus since you shot at an angle (front MB emblem)?
Superb post Scott Kelby !
One of the coolest tricks I’ve ever seen, was from a studio shooter back in the 90s that my buddy Rich worked for. When they needed to fill a large expanse with light…they would use a regular sized softbox, and open the shutter on the camera…and drag it on a wheeled stand. This in turn makes for as LARGE a light as you could hope for. Its something that works perfectly in a situation such as this.
All room lights get killed ( after focus, camera and subject are all locked down of course) and using the modeling lights on the box they drag the softbox.. counting and making sure to move the box 1 foot per x amount of seconds ( determined by a test shot or two)
This is something they would do for not only reflective surfaces in which they wanted to capture a long white reflection, but more interesting the first time I’d noticed it, and inquired..
They had used the light as a sort of streak that moved through the entire frame.. they left one of the edges of the box IN the frame so it looked like a trail of giant light.. and it was colored.
Its a bit more involved.. but easily an excellent technique to have in ones toolbox.
Say hi to Mr Moore for me.
~j.j.
Dear scott thank you for the fine article and the important info .
i am working on the same business idea in sweden , establishing an automotive studio to prepare the media to sell it for the cars dealers to make a provisional ADS.
so from your point of view as an idea is that a good project ?
and thank you for the helpful info
Sorry to dredge up an older post but when I read Scott’s blog I felt compelled to comment. First the article contains some great information and Scott got some really nice shots. But I was curious where he got the information about studios…his comment about not being able to find large coved studios outside of Detroit is pretty much ‘Huh?’ LA is the place! Although there are many really nice studios in Detroit and surrounding areas, there are an over abundance of large cove studios in LA, and quite a few cater to car shooters.
Giant bounce tabs and huge car sized lightboxes can be found in quite a few studios around LA, and if they don’t have a lightbox, you can easily rent one. That coupled with the varied local locations and great weather make LA the car shooting capital of the world
Many Detroit and NYC based photographers routinely come to LA for car studio shoots, even for Detroit and East Coast based car companies.
BTW, Studio 75 looks like a really nice facility, but it would be considered small by LA standards…and we would never have a bright blue kayak hanging where it could get into the shot…as Dan said “…cars are like giant mirrors…” so look for blacked out ceilings, blacked out walls behind camera, even blacked out C-stands…makes the shoot go quicker and reduces the need for retouching!
Scott did get another thing spot on though…”for the price”.