Last week when I ran my “10 Things I wish I Could Tell New Lightroom Users” post (link), one of the 10 things I talked about was using Collections rather than Folders, and I had a number of follow-up questions on my collections workflow, so I thought I’d break it out a bit here. Here’s what I do:
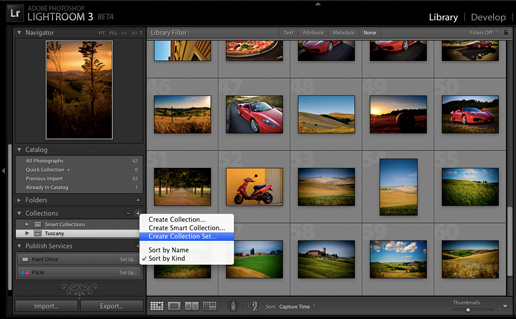
STEP ONE: Make a Collection Set
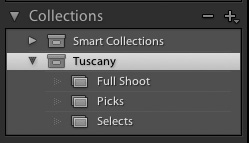
Immediately after importing my photos into Lightroom, I go to the Collections panel and from the pop-out menu I choose “New Collection Set”, as shown above (which is kind of like a big folder I can put other collections inside to stay organized. It’s empty at this point, just like when you create a new folder on your computer). I’ll name this Collection Set “Tuscany.”
STEP TWO: Deleting the obvious mistakes
Before I do anything else, I quickly scroll through the images I just imported and delete any images that are obviously mistakes (Ones that are totally out of focus, or solid black, or shots where I accidentally took a shot of my foot, or the ground, or anything that so bad that even as a small thumbnail I can tell—-this needs to be deleted now).
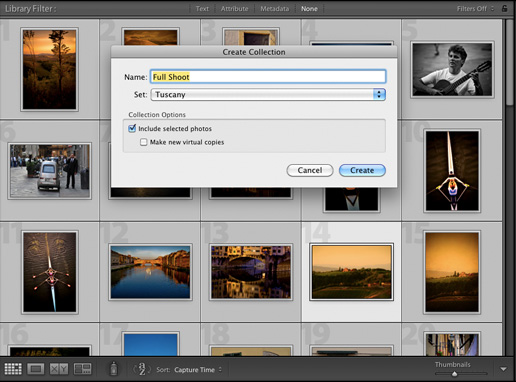
STEP THREE: Create a “Full Shoot” Collection
Now that the obviously bad ones have been deleted (from Lightroom, and from my hard disc), I Select All, then press Command-N (PC: Ctrl-N) to put all the photos into a new collection (as shown above). When the New Collection dialog appears, I make sure this new collection appears within the Collection Set I created in the previous step.
STEP FOUR: Find the Winners and Losers
I double-click on the first image (to enlarge the size), then I press Shift-Tab (to hide all the panels), then I press the letter “L” twice. This puts my photo center screen, with a black background around my photo, so all the distractions are out of the way. Now I use the right arrow keys to move through the images to mark just two things: (1) Which ones are so bad that they should be deleted [really bad ones I missed when just looking at small thumbnails), and (2) The really good shots from the shoot—-ones the client might actually see.
STEP FIVE: Separate the Best Shots
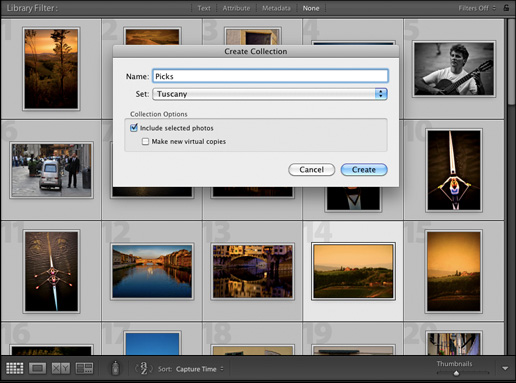
I turn on the filter so only the ones I marked as really good are showing. Now I do a “Select All” and put those in their own collection called “Picks.” At this point, inside my main Tuscany Collection Set I have two Collections:
(1) The Full Shoot (minus the really bad ones)
(2) Picks (the keepers—the ones that could possibly wind up being seen by the client)
STEP SIX: Narrow it down to just the very Best Shots
I don’t want to send my client 80 or 90 photos—–I’d rather do the photo editing and edit things down to the best of the best. Maybe 15 or 20 shots max (more likely, less). So, I go through the Picks collection and find the very best ones, and mark them as so.
STEP SEVEN: One Last Collection of “The best of the Best”
Then I turn the filter on again to just show those I marked as the best. I Select All and put them into a Collection, and name it “Selects.” These are the ones I email to the client, or post in a Web gallery for them to proof. Now I have three collections inside my Collection Set (as seen above).
How this works for me:
(1) If I want to see all the shots from this shoot, I’m one click away—I click “Full Shoot”
(2) If I want to see just the good shots—the keepers–I click “Picks”
(3) But most of the time, all I really care about in the future are the very best shots from that day—-so I click “Selects”
MORE COMPLEX SHOOTS
If I’m shooting an event, like a Wedding, or Sporting Event, I use the same basic idea, but I use more Collections inside my Collection Set (as shown below).
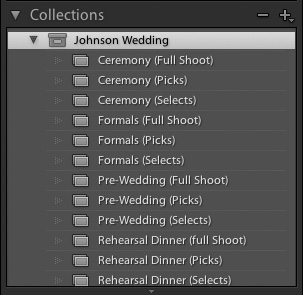
Now, you could actually break these groups of three info their own Collection Sets inside the Collection Set, which I sometimes do, but since they all appear together (thanks to the magic of alphabetizing), I don’t have to (but again, sometimes I still do. If things gets crazy [lots of collections] then I usually do).
Well, there you have it—a look at how I arrange my own Collections in Lightroom. This obviously won’t work for everybody, but I’ve tried a number of different options, and for me this way is quick, simple, and consistent. Also, using this method is much, much faster than it looks here in print—the whole process moves along really quickly, and gets you down to the ones you’ll actually show the client (or your friends) very quickly.
I hope that answers at least some of the questions from last week. :)
-Scott
P.S. I’m teaching my “Photoshop for Digital Photographers” tour today in Tampa, so I won’t be able to answer any questions until later this evening, but during the lunch break I will take at look at your comments.


Sorry I figured out what the problem was!
Scott: What I want Lightroom to do is look through my drive and search by criterion. It appears to do this as a smart collection so I can identify by file type, rating and about every thing imaginable except by resolution. How can I do that? Find file more than and less than1MB
Thanks
Fred
Hi Scott, I’ve been using your collection workflow for more than a year now and it’s perfect for me. My only concern is if I wanna use another Raw converter program such as Capture One. I will loose all my organisation, right?
I watched a Phlearn episode yesterday. Aaron was showing his workflow which seemed way more complicated than yours. But he only uses Library folders. It means he can change software when he wants and keep his organisation. Any solution?? Thanks :)
I love Aaron’s work and teaching but his LR workflow is bloated and way overcomplicated. I understand the reasoning, it’s because he needs to be able to use multiple platforms like you said but for LR alone it is pointless and multiplies the space needed by a factor of about three. All the copies of a file that doesn’t need to be copied is pointless. Like Scott says, the beauty of LR is the ability to make virtual copies and collections so that you’re just saving the alterations of files until export as a kind of “overlay” over the RAW file. It’s the reason it seems as though you’re using a web Java version of Photoshop. You get all the instructions in a seperate file overlayed over the enormous RAW file. Then when you export you only get the color/size you need and all the rest of the info gets removed and you get a 1-10MB Jpeg that looks gorgeous.
I’ve got to start working with Collections. I’ve been working mainly with folders. Thanks for sharing this. Also what are your ideas about online storage?
One great feature is it is great for sorting. you click the delete button and gone.
Fantastic as always Scott and now I have so much LR work to do! Thanks for this nice and simple workflow
Hello all!
How can I move COLLECTIONS from a catalogue to an existing one?
thanks, MBR
Fabio Castellani from Italy
You can import Smart Collection Settings from another catalog but you will have to “Export Smart Collection Settings” by Right-Clicking on the smart collection on the right click context menu in the original catalog first. As far as exporting collections you can export them as a catalog and then import the catalog into another catalog.
Scott, I’m just beginning with Lr 5, and have other folders on my computer’s hard drive that I’d like to import into Lr. When you first stated, “Immediately after importing my photos into Lightroom”, where did you first import these photos to? A folder, or somewhere different? Sorry that I can’t even get to your first step, let alone past it!! It’s the simplest things that I get hung up on! Thanks.
Wow, I wish I would have found this post a few years back when I first started using Lightroom. This is going to simplify the way I have been doing things. Thanks Scott!
Thank you very much.. as a new LR 5.5 user, this is very helpful!
When duplicating a Collection Set, why doesn’t LR duplicate the embedded Collection Set structure? Would like to create a Collection Set template structure to avoid re-entering the whole set structure. The duplicate functionsSeems pretty useless without this.
I so wish that lightroom had this facility as well…. how helpful would that be and how unhelpful is it that it isn’t there..
What do you do with the photos in a collection that you have edited and then wish to send out for printing? Do you have to export to a file folder so you have them on your HD?