

I’ve had so many people ask me for so long to share my Sports Photography workflow, but honestly I’ve been so incredibly unhappy with my workflow, that I wouldn’t curse it on anyone. Of all the photographers in the photo work room, I was usually literally the last man to be able to leave at the end of the game (after uploading images to the wire service).
Luckily, it’s now finally (finally!) starting to come together to the point that I thought I’d at least share it, but I want to give you this important disclaimer up front: this workflow is a work in progress. It’s not “fully there” yet, but I was the third photographer to go home this week, and I’ve literally cut my processing/tagging time in half, but again — it’s far from perfect. My sincere hope is:
(a) This will help someone who was struggling along, like me,…
(b) Someone who really has their sports workflow down to a science will show me how to improve what I’m doing, which is very likely since I know mine isn’t fully baked yet.
So, with that said, here what I’m doing now:
Working on Assignment:
I’m shooting for a sports wire service, and the faster you get your images uploaded to them, the better (so they can get them out to potential news outlets for distribution). At hafltime, (actually, usually a minute or two of gametime beforehand) I head into the photo work room, download two memory cards; quickly pick six to eight good sharp images, add all the required metadata (there’s plenty), tweak the photos a bit (sharpen, contrast) and upload them live from the stadium and get back out before the third quarter starts. That has never actually happened. Halftime is only 15 minutes, and I’ve never finished the process in just 15 minutes, so I usually miss some of the start of the third quarter. Sometimes as much as half of the third quarter. Hey, it happens.
Speed is the main issue
I learned the hard way — you need very fast memory cards (I use Lexar 1000X cards), and a fast Lexar USB 3 card reader to get my images on to my computer as quickly as possible. I actually use two card readers so both cards can be downloading at once.
I don’t use Lightroom. Or the Bridge. Ever.
I’ve tried both. It’s a death-trap for pro sports photography. Every pro sports shooter at an NFL game (or otherwise) uses a program called Photo Mechanic (by a company called Camera Bits). If there are 40 photographers in the photo work room, you see 40 copies of Photo Mechanic open on their laptops.
It was created for photo journalists and it has some features that you absolutely positively need for this type of work. They are:
(1) Absolutely insanely fast drawing of full screen previews.
As soon as the thumbnails appear (which is really quick), you can instantly view the images at full-screen size. I’m talking lightning fast. I’m talking so fast that you had no idea any program could possibly load full-screen images at this speed, but somehow it just does. I know what you’re thinking: “Does Adobe know about this technology?” Absolutely. “Have you talked to them about adding this to Lightroom?” Many times. “Do you think we’ll ever have fast-loading thumbnails like that?” Nope.
(2) A very well-thought out and designed system for adding metadata to your images
Every photo you submit needs a full description of what’s happening in the photo, where the photo was taken and when, including each player fully identified by team name, player name, position on the team, and jersey number. You need this for every player in the shot. Three players, three full IDs.
(3) An automated process, using keyboard shortcuts, that lets you do all the stuff you have to do in #2 above really, really fast (with the help of a website I’ll mention in a moment).
Plus, you can FTP right from the program straight to the server of your local wire service.
So, step one is Buy Photo Mechanic
The program costs $150, and once I saw it in action, it was the fastest $150 I ever spent. Worth every penny. I’d have paid $250. Maybe more. But Photo Mechanic is just an image sorting and metadata application, albeit a great one, but it’s not Photoshop and doesn’t do Photoshop-like stuff, so you still need Photoshop.
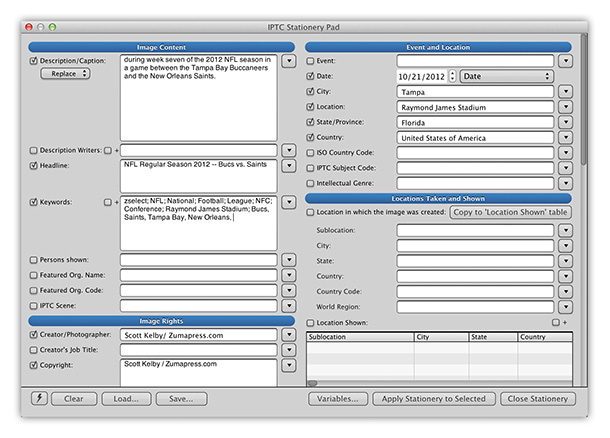
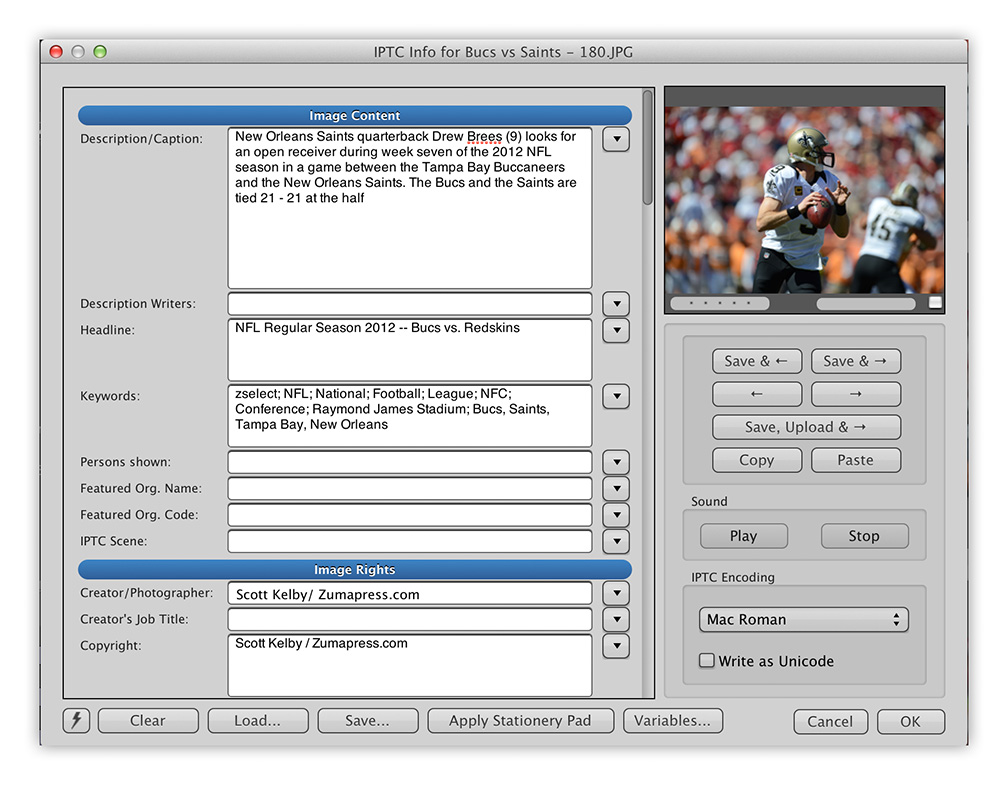
But before you start importing photos, you need to set up a Metadata template (they call it an “IPTC Stationary Pad”) like the one you see above. This includes a bit about the game and where it’s being played and such. (I do this before I even leave for the stadium).
Then, when I walk in from the first half, I open this Stationary Pad, add the score as it stands “The Bucs lead the Saints 21-14 at the half” to the end, and now when I import my photos, it automatically applies this metadata, including the date, stadium location, copyright info and such to every photo.
The greatest thing to happen to Metadata since….whenever the last good thing happened
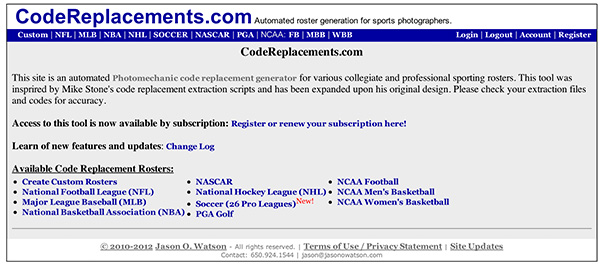
There is a website called “CodeReplacements.com” and you pay a small subscription fee and it generates a current roster of both teams for any pro sporting event, which itself is handy, but that’s not what makes it totally rock. You import this roster into Photo Mechanic (it’s then called a “Code Replacement”) and now all you have to do is look at the number on the player’s jersey, type a shortcut and that number, and it automatically fills in all the team info, player’s name, position, and number. For example, if the player plays for Tampa Bay, I just type a backslash, “t” for Tampa Bay, his jersey number, and another backslash, and it instantly types in this for me:
Tampa Bay Buccaneers free safety Ronde Barber (20)
Then I type in “breaks up a screen pass intended for” and I type the other guy’s jersey number like this \n16\ and it writes
New Orleans Saints wide receiver Lance Moore (16)
and then the rest of the metadata about what week it is, and what kind of game it is and where it’s played is already there because I added that to the IPTC Stationary Pad before the game (mentioned above). So, the whole thing reads like this is all of 20-seconds:
“Tampa Bay Buccaneers free safety Ronde Barber (20) breaks up a screen pass intended for New Orleans Saints wide receiver Lance Moore during week seven of the 2012 NFL season in a game between the Tampa Bay Buccaneers and the New Orleans Saints. The Bucs lead the Saints 21-14 at the half.”
Those code replacements rock, and my hats off the guy who came up with the service. May he earn a millions bucks!
Now, you’re ready to download your cards when you come in off the field at halftime
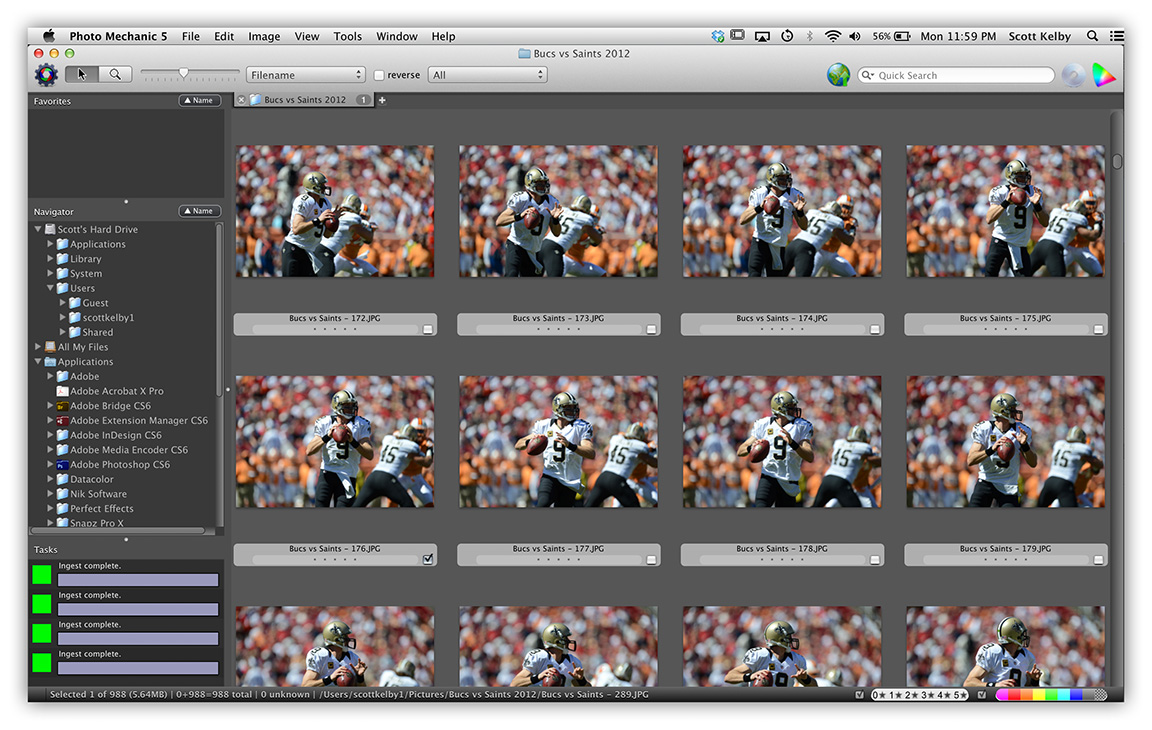
Photo Mechanic calls this process “Ingesting” and it’s pretty quick (and you can ingest multiple cards at once, and I do). It automatically names and numbers them, similar to what you’d do in Lightroom’s Import Window (ya know, if you had all freakin’ day to import your images — don’t get me started).
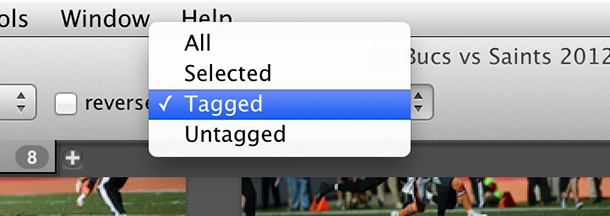
Once they’re in Photo Mechanic, you can either scan your thumbnails really quickly looking for key shots, or just go to full-screen size and zip through them lickity split using the right-arrow key on your keyboard. When you see a photo you might want to upload, you press the letter “T” to “Tag” it. When you’ve gone thru all your photos, you turn on a filter that only shows your Tagged images, which is seen above (I usually have about 10 to 15 tagged images at this point. Occasionally more, but I’m only going to have to time to process six or eight at best, so I have to whittle it down to the best six or eight of those).
Here’s where my first hurdle comes in
At this point, I look at the, say…15 tagged images at full screen size and when I see one I want to make my cut of just six or eight for uploading, I press the number 6 to label it with a blue label. In just a few seconds, I have six or blue-labeled shots. I select those images (we’ll say I chose six) and jump into the Metadata editing window, where I add the player info using those automated Code Replacements. This is a little tedious, especially if you can’t clearly read a player’s number of their jersey or helmet. Then you have to go back to your full shoot and figure it out by looking at shots before or after the one you want to upload. This kind of drives me nuts, but you’ve got to have the right number or the player’s name will be wrong.
Metadata Done Right
Camera Bits did a kick-butt job on this part, as you can click on the thumbnail in the metadata entry window and see a huge-preview (helpful in reading jersey numbers), and you can copy and paste metadata from one similar image to another (big time-saver), and you can use code replacements for everything the ref’s to special codes that have to be added on a per-player basis (in another field, I have to enter a bracket, the player’s last name, first name, and a closed bracket (like this: [Barber, Ronde]) for each player, but there’s a Code Replacement shortcut that does that, too (thankfully —- another big time-saver in an already tedious process). This whole part is very well designed on Photo Mechanic’s part.
Now over to Adobe Camera Raw
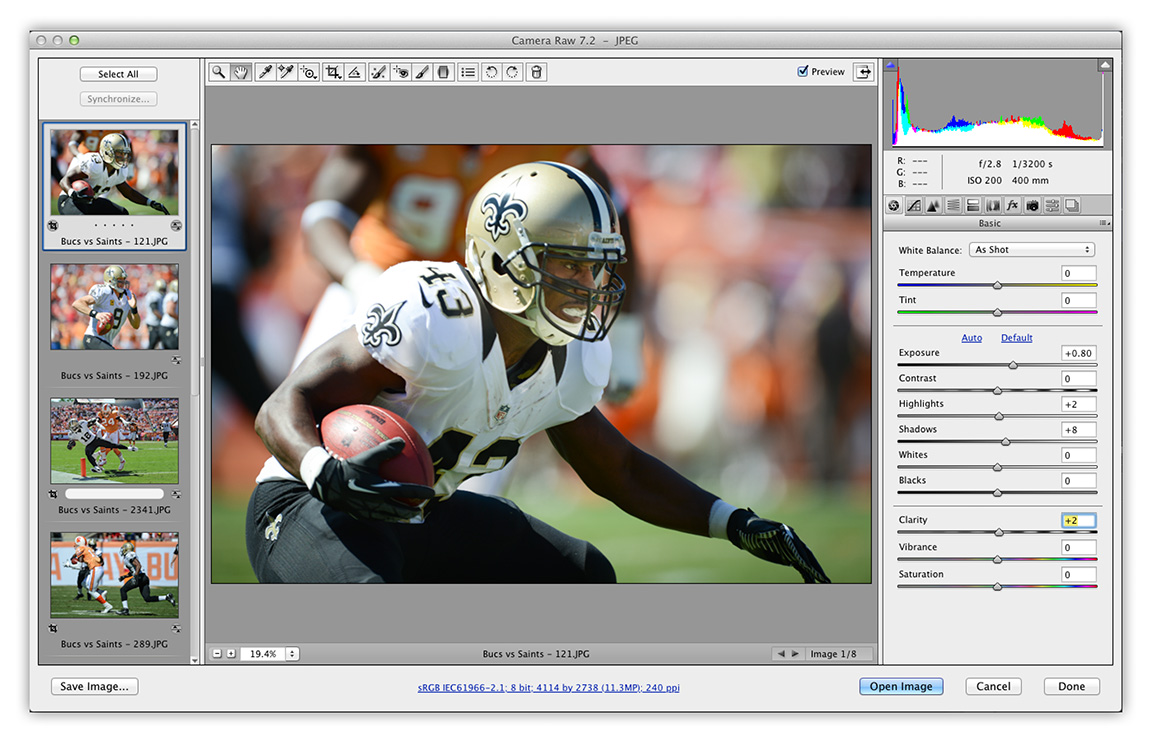
Once I click OK after adding all the metadata to those six photos, I press Command-E and open those six all up in a Camera Raw at once (they appear in a filmstrip along the left side of Camera Raw, as seen above). Now I take a quick moment to crop each photo tight (if necessary, and it often is), then I check the White Balance, add Contrast if necessary and any other very minor tweaks (This is reportage so you can do very little editing whatsoever to these images)
 .
.
Sharpening and Saving as JPEGs
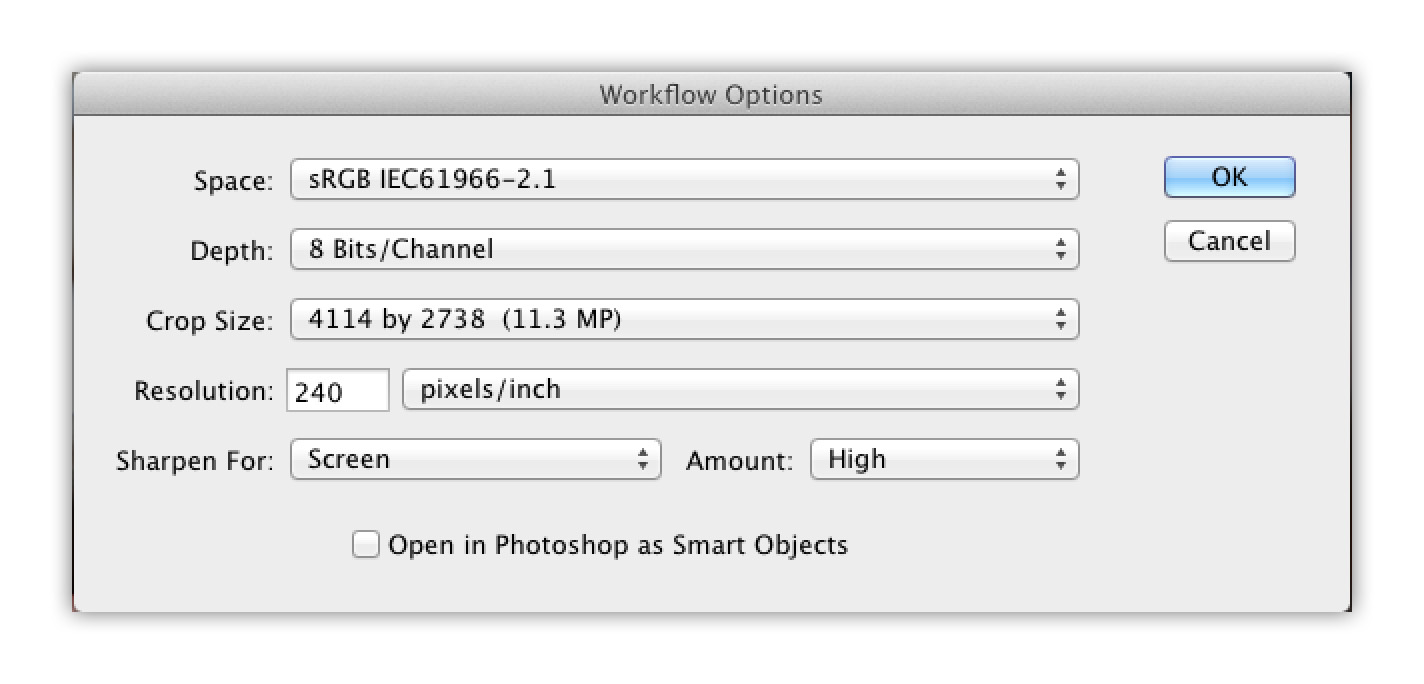
This is another place I’m not certain I’m totally nailing this workflow thing, but I then export the images out of Camera Raw as JPEGs and have Camera Raw apply sharpening (set to “For Screen” and amount “High” in Camera Raw’s Output Preferences) as they’re exported. This leaves them with a folder with six images in it, with all the metadata embedded, cropped, edited and sharpened ready for uploading, which takes all of 30-seconds (if that). I know some guys are running sharpening and resizing actions that do all that stuff in Photoshop, but I actually don’t go into Photoshop at all — just Camera Raw and save out to JPEGs with the sharpening applied at export, but again, I’m not sure that’s the best time-saving route (but that’s what I’m doing thus far).
The problem is: that takes longer than 15 minutes.
I think I probably spent too much time looking through my images trying to find the best ones to upload, and I may be over-thinking that part, but I haven’t found a way to speed the process. I have a hard time searching through tiny thumbnails — I like to see them big, and that definitely impacts my speed —- not because of Photo Mechanic — just because if you can judge by thumbnails you can breeze through hundreds really fast. I’ve tried it, and I feel like I miss too much that way, but maybe again I’m over-thinking it.
After the game, I do it all again…
But now I’m looking for 20 or so images to upload, and I’ve got the process down to about 45 minutes, but I’d like to see it down to 30 minutes, and if you see an area here where I’m doing double-the-work, or I’m making extra work for myself (I’m not an expert at Photo Mechanic) let me know because my goal is to cut time off this workflow, and anything that save time is a big win for me.
Quick Recap:
(1) Set-up IPTC Stationary Pad, and download CodeReplacments.com file at home before game
(2) Import two cards at once (one from each camera); Apply Stationary Pad on import and rename
(3) Quickly go through images and Tag 10 to 15 of the best ones
(4) Narrow that down to just six or eight (label those blue)
(5) Add detailed Metadata for those six or eight keepers
(6) Open all those images at once in Camera Raw for cropping & editing
(7) Export those as JPEGs with Sharpening Applied on Export
(8) Upload those to the wire service
So, there you have it
As you can tell from my comments, I’m not fully satisfied with this workflow, but at least it’s at the point that I feel like I can share it and hopefully some part of it will help you with your workflow. Just for the record: I’ve tried using Lightroom, and/or the Bridge and Camera Raw combo, but neither can come close to the Photo Mechanic workflow (ask any pro sports photographer), but I think if I have an achilles heel in my workflow, it’s what happens after I leave Photo Mechanic.
Hope that all makes sense, and I hope it helps. I’ll be in Washington DC this weekend for my seminar there next week, so I don’t think I’ll be shooting any games this weekend (rats!), but just know I do, when I pick up a timesaver, I’ll be sure to share it with you guys here. Cheers, -Scott
Wow…I’m glad the community paper I shoot for is a weekly!
Funny. I just started using PM and figured that was where your post was going after the first few lines. It really is an unbelievable program. I shoot youth sports and part of my Lightroom workflow was to ensure all sharp objects, ballistics and ropes were safely tucked away before I started. I love LR but the engineers need to focus on efficiency and resource utilization. PM is ridiculously fast and I’ve learned some crazy auto metadata concepts using Variables. From there to ACR just like you said. Lightroom is still in the mix but only at the end when I import only my tagged and edited DNG’s.
Using a WiFi connection to upload your images as you shoot might shave a few minutes off of the process but I know you’re looking to streamline the processing more than the acquisition.
Hi Kevin. I can see this a standard feature for Pro DSLR’s in the future, it will just take Canon or Nikon to make the jump and the others will follow. It would make things so much easier
Scott, thanks so much for this post. I already knew much of this, but I definitely picked up some great tips that I didn’t know about. Your post is timed perfectly for me as I recently got accepted by a wire service, so I’ll certainly need to put this to good use soon. You rock.
Scott, I shoot for the same wire service. One of the tricks that speeds me up at halftime is to tag images in camera as the first half progresses by locking (or protecting) them in camera. I do these selects during timeouts and breaks in the action. Then on import into Photo Mechanic, I have it import only those “selected” in-camera. I save the others to download after the game for later review. This speeds up the process quite a bit. I also crop in Photo Mechanic to save the extra export to another program and save some more time.
The rest is pretty much the same as I do. If I need a quick edit for contrast, etc., I round-trip it to photoshop from Photo Mechanic.
Maybe we’ll end up shooting the same game sometime. I’ve got OSU at Penn State this weekend.
Yup totally agree. Photogoofer you stole my thunder!! This will save a boat load of time. I have done it both ways and believe me just ingesting the tagged images is a big time saver. If you tagged 20 images before the half it is a lot easier choosing from 20 than 200. And Kudos to Jason O Watson who runs the Code Replacement website. Totally worth the small subscription fee. Scott gives this a shot you will never go back to the old way!
Those are two killer tips that I’ll have to try: in-camera “tags” and cropping first in PM.
Eliminate #3 – go direct to #4 – and determine if your colleagues are doing #6 or leaving that for the newsroom. I think the newsroom editor’s eye will come to you; it’s just that you have to be brutally frank in your selects – you have to skim them like someone skims a newspaper or a news website. What gets you to pause on that page? That’s the image you want to focus on. And remember that the guys who have been doing this since the day of film didn’t have 1,500 images at the end of a game. I know that’s 150 – 200 shots with an eight- to 10-shot burst of each, but… Talk to Joe about when to shoot.
I do the same thing as @photogoofer. Do a quick edit on the back of the camera and lock the photos that you might like. At halftime only injest the tagged ones to save time. Everything else you do is pretty much the same as my workflow. Tagging the photos in the camera will save a lot of time on deadline.
1) As both a big fan and an admirer of Scott Kelby (the person and his unbeatable books) I feel the web-site is dedicating too much attention to football photography. 2) I would love if Scott could teach us in one of his book or in this blog how to use the ipad mini as a wireless viewfinder. Hugs
I kind of agree with point #1, though I think this is what he’s into these days and he’s just sharing his journey and what he is learning with us.
This is Scott’s personal blog. Some days, it will appeal to you and some days it won’t. I appreciate that he shares what he’s doing and how he’s doing it – both the good and the bad. There are many take-aways from his football posts that can be applied elsewhere…………the details of his workflow today, for example, provide food for thought for many situations where you just have to get images out the door. Football is ancillary here – look past it.
1) Scott generously shares what he is currently doing with his followers – if he walks in Paris, he shares that, if he does a studio shoot and feels like it could benefit his followers, he shares that, if he’s out on tour or writes a new book, he shares that, and if he shoots sports, he shares that. I for one, as someone also into sports photography, appreciate this post as I am interested in a Photo Mechanic workflow.
2) Kinda hard for him to do that at this point when the product hasn’t been released yet.
Hugs
Scott this is one thing I was hoping to discuss with you during your Paris photo walk as I shoot football in the UK, you’ll know this sport as soccer 😉.
I still use Lightroom although have trialled PM and def see the benefits with the code replacements but I don’t have to add as much metadata as you do so it wouldn’t save me as much time. We also tend not to head to wire rooms but just work pitch side with our laptops (great fun in our winter!), could that save you anytime or do you get the benefit of fast uploads by heading to wire rooms? I tend to upload during the game using 3G unless wireless is available in the stadium. I also process images during games, so as soon as a goal is scored, memory card is swapped and I start uploading and editing images to get them wired asap. That’s where you need an extra set of eyes to watch your screen and the game at the same time!
It’s definitely hard work and not the easiest way to earn a few bucks but I don’t think you’re doing too bad 😉, keep up the great posts, love reading about your sports shoots.
Scott, I think one of your biggest problems is using the Stationary Pad. That thing isn’t going anywhere and is obviously slowing you down. Try switching to the Stationery Pad. That might speed things up a little! ;-)
I don’t want to sound flippant, but listening to Dave Black and Moose, shorter burts and better anticipation will reduce the number of images to view, tag etc.
Johan: Did I ever said that I don’t anticipate well or that I’m taking too long a bursts? I don’t generally shoot long bursts. I’ve been told that I’m only shooting about 50% as many shots per game as I should (so I’m undershooting by more than 1,000 shots per game). By the way, when you start a comment with, “I don’t want to sound flippant….” but then you go on to do just that, you could just leave the “I don’t want…” part out and save us both the trouble.
How many are you shooting in a football game, and how many in basketball – and what kind of keeper ratio are you feeling ? nice post btw.
Apologies Scott – not meant like it came across – point well taken. Keep up the good work – I enjoy the Grid and your blogs
Photo mechanic would be one of the best program for any photographer. I hardly shoot sports, but it’s perfect for quick previews, rating systems and even the drag-to- LR or PS is simply superb. The best part is the ratings still remain after the photographs are exported and later imported to Lr
Also, this helps Lr from being super heavy.
Huge time saver as you mentioned.
“The best part is the ratings still remain after the photographs are exported and later imported to Lr”
Agreed. Note that tags in PM, however, do not translate to Picks/Flags in LR (unless there’s a setting that allows otherwise). You need to stick to star ratings or color coding (and the latter only for the first 5 or whatever it is) to line up in LR.
I am Uk based. For anyone who is unfamiliar with PM, I feel it’s useful to say you don’t HAVE to use a code replacement download service, and in any case one may not be available for the teams or groups of people you photograph. You can just type up your own tab delineated team list saved in plain text (sounds an awful lot more complicated than it actually is) for the teams you shoot.
I live in Lightroom but tagging is a pain. Can Lightroom read the metadata from PM?
Absolutely. :)
Scott, maybe you can create a post, where you show how. I know a couple of people using PM, but I have never made the jump and used the program.
Im taking basketball pictures for a local danish team, and also need a fast workflow, to put some pictures only in the half time :)
LR can read the metadata, But not the Picks and color tags.
Kelby Training class on PM sounds yummy. I’m getting it tontrybtoday!
That’s “try today” :)
Scott, great post, we’re all really feeling your pain here. Already some interesting techniques to try have been suggested. I picked up a fantastic technique from Jarad Platt that has cut my editting time 80%. Is there a way in PM to quickly select 6 images and view the thumbs larger than the postage stamps that the full grid view provides? If so, this technique will speed things up for you. The postage stamp thumbs are too small, but bigger thumbs of 4-6 images are big enough you can see what’s going on. Our brains can then immediately see between the multiple images if ones a keeper or not. If so, tag it. Then grab the next four. Rinse and repeat. The key here is that instead of evaluating each image individually, you are simultaneously evaluating it against a small number of others. Solves the problem of “this is a great image but is the next one or the previous one better?”.
I was going to say the same thing. I think Scott uses a laptop to edit these, so doing 2-3 at a time might be a little better
Isn’t there in your camera a method to tag your favorite pictures. So instead of looking thru all of your pictures, you only go thru like 50-75 pictures.
On my new Canon 5D m3 I can rate my pictures, which I think is awsome, because the rating can be seen in Lightroom :)
Its alot easier to view them on a 15 inch laptop vs a 3 inch camera back. Plus on the sidelines, you dont really chimp, or else you might miss something.
Thats true, you can’t see the sharpness, but you can see if it is a good composition, and then you just select the pictures you think have some potential.
I have never tried American football, but in basketball I got quit some time to chimp the pictures :)
I can think of one reason that Adobe may add fast preview from the embedded JPEG in a future release of Lightroom. First it was Photo Mechanic that had that feature, and now Aperture included it in a recent release.
Tom Hogarty mentioned that Adobe pays attention to the competition in the industry and this is a feature that the competition is using. Perhaps that, along with the cries of Lightroom users for this feature, will help motivate Adobe to include fast previews.
Photo mechanic was not the first program to do this. In fact, almost every photo viewing program available does this. Adobe is late to the party with lightroom, but they did show up when they created the import module. In the import module you can view the embedded jpg, tag and zoom to 100% fairly quickly. And that is the rub – fairly quickly does not cut it. The caching algorithm adobe uses is pretty clunky and clearly not optimized for speed. Not a good thing in an application designed for workflow.
Hey Scott,
Instead of Tagging my images after a game, I’ll just 1 star them because it’s easier and feels better not having to move your arm every time to hit the one that the T or have it resting over your laptop. I know i’m only starring the good ones so it’s just like tagging, you just have to think a little differently. Then I’ll 2 star the next best ones if I need to whittle it down even more. If you really needed tagging you could always tag all the pictures at once after the game when you have them all picked out.
Wow Scott, never knew this is such a stressful process. I think a lot of training, practice, experience and intuition is needed throughout the whole process. I appreciate your post. Can lightroom import two cards at the same time or is it just Photo Mechanic? I have never thought about that before.
No LR can not import 2 cards at once I wish it could. I have had this conversation with adobe.
LR can import Multiple cards at once. Under the Devices is Files and the cards are listed under there, If you have 2 or 3 Cards in the machine select each one and you can import them all a once. There are a number of better explanations on the web
Scott, I love your website and all your help. However, I think most of us will never get a chance to take photos for professional sports. I realize in your case, time is money. I most of our cases, LR (even though it is a slug) is more than adequate. I can do most of my editing in LR and when necessary, go to PS. I wish I had your problem!!
Awesome post! I too struggle with this process.
I saw the title of this and got excited. After I read it, you pretty much nailed it on the head. PM is the perfect program for all of us that have to have our photos out in the shortest amount of time. Even without the metadata stuff, the fact that you can go through and look at your photos and tag the ones that you want to use in a fraction of the time of LR is a huge selling point for those that might not work on a dead line. You can go into PM, pick your favorites, then open them up in LR and they will be there for you to do whatever you need to them.
This is my first season using PM. I started using it in late July and I cant believe I waited this long to get it. Very well worth it.
Another great post Scott. Have you tried using Voice Memos to help you narrow down the first half shots to ones you think will be good or are from key points in the game? I remember seeing that on Dave Black’s HS Football class.
From someone just starting sports photography, THANK YOU!!!
Bloody excellent!
I have the solution. Scott, you need to bring aspiring sports photographers with you to run the upload while you are back to shooting. You could spend the halftime sipping a latte and telling them what to do. Then they do the upload and you stroll to the bathroom and are back on the sidelines in plenty of time to catch all the action. You could run a contest for each city you’ll be in and people will line up to help out. It’s a win-win-win.
Great Post! It’s too bad the LR can’t render Images as fast as PM I could never figure out why. And some day LR will get Metadata right.
There is a good reason that PM is the news standard.
Scott,
Is there a way to get the metadata from PM to LR to SmugMug?
As was noted in an earlier comment, ‘Locking’ an image in the camera while chimping does save time since it comes in to PM already tagged. And, no wonder you’re having time issues, the NFL cut halftime down to 12 minutes many years ago. :)
A great article that just reminds me I really need to take advantage of more of the options PM has to offer.
Scott,
One trick that I learned from a great photographer here in St. Louis is pretty simple. We all are obviously chimping as we shoot. So if you notice you nailed a shot that you might want to upload, quickly shoot the scoreboard, or even your hand in front of the lens. With the large CF card capacity, these images don’t take up a ton of space, but it does provide a very obvious break in the action shots allowing you to quickly scan through the thumbnails. Find the shot of your hand and know that a potentially great images is only 2 or 3 frames back.
Scott, you mentioned searching though several frames to find the numbers of the players. When I shot sports for the local paper, if I thought I had a useable shot, I would grab and extra frame or two of the players numbers as they walked away after the play occurred. I got in this habit and knew I could then just move to the last frames of the series for the player ID’s. You may be already doing this, … or it may be harder to do during a pro game since there is more action on the field. Just a thought.
Scott you’re doing good, but my question to you, don’t you have to adjust the exposure and shadow and highlights in your photos also? Are you that good that you’re getting right in camera? If you are.. I love to know your settings as far as contrast and sharpening and so on in your camera settings. I’m always adjusting for shadows and highlights and white balance and not every photo is the same even though I’m shooting in the same light. If yoh have any US Presswire photographers working the same games. Pick their brain because they have a workflow that they get 40 photos uploaded in about an hour after the game… This also would be a great video since workflow for a lot of photographers is a big roadblock and we would all like to get our pictures out ASAP. Do you use the cropping in PM as well. Keep up the good work…As always your info is very informative…
I have tried Photo Mechanic but i guess i didn´t give it to much of a chance. I like LR4 because it´s the only programme i need in 98-99% of my time when i´m out in the field working.
It´s a shame that LR4 isn´t as speedy as PM rendering the previews, time is of the essence when you need to deliver fast.
I have a few friends and colleagues that use PM and they love it, mostly because it´s so blazing fast.
Everything just keeps going faster and faster, it´s not that easy to keep up all the time. :)
“The problem is that it takes more than 15 minutes.”
PM keyboard shortcuts are your friends. You fingers will fly through the images if you stop using a trackpad or mouse. Seriously. Really. Spend 30 minutes next saturday learning the important ones, and by Sunday, you will have saved 15 minutes, and by next Sunday, you will reach ROI.
Where can we we get a full list of shortcuts?
http://wiki.camerabits.com/en/index.php?title=Keyboard_Shortcuts
I have been using Photo Mechanic for years. When I shoot for the wire services at shows, we will have to download, select and transmit the images between performers and many times thats about 15 minutes. The only thing that has sped up my workflow is the Firewire 800 CF card reader. Now my Macbook Pro is a late 2011 so it does not have USB 3 so the fastest card reader is a firewire 800 reader that I have from SanDisk. Then, I don’t sort with full screen, I just slide the thumbnail size slider in Photo Mechanic to make bigger thumbnails and start the sorting process as I import.
I cover all the steps as to how I actually rate and then deal with the images in my concert class at Photoshop World and I am always amazed at how many people have never heard of Photo Mechanic. It is a very important part of my workflow.
I’m an amateur photog, but a professional process improvement guy. Here are my thoughts.
1) Halftime is 12 minutes, not 15. You just lost 3 minutes, sorry. :)
2) You really only have about 10 minutes to complete your 8 step process because it’s likely to take you 2 minutes round-trip (guessing) to and from the field at halftime. Another (better?) way to look at this is that you have 90 seconds per photo, if you average 6 final photos.
3) If your REALLY serious about shrinking your process times, do a dry run with someone (an intern, your wife, etc) timing each of the 8 steps (at home or in the office) to see which takes the longest. Start with the longest step, eliminate wasted motion/time, and work backwards.
4) Keyboard shortcuts are your friend. They will save you tons of time.
5) Follow your own advice that you’ve given us in the past about “marking” good shots… take a photo of your fingers afterwards to draw your eye more quickly to the thumbnails of better shots.
6) Is there a way to directly flag photos as your chimping and then only import the flagged ones? Maybe lock any shot that might be ok, and then delete everything not locked as your walking (sprinting?) off the field. Either way, this would improve your times in steps 2 and 3.
7) Make sure you have everything on your computer closed except PM, Camera Raw and a browser. Anything eating memory is slowing down your process.
seems like the common loss of language when you mix up words.
your:
one’s (used to indicate that one belonging to oneself or to any person):
you’re:
contraction of you are:
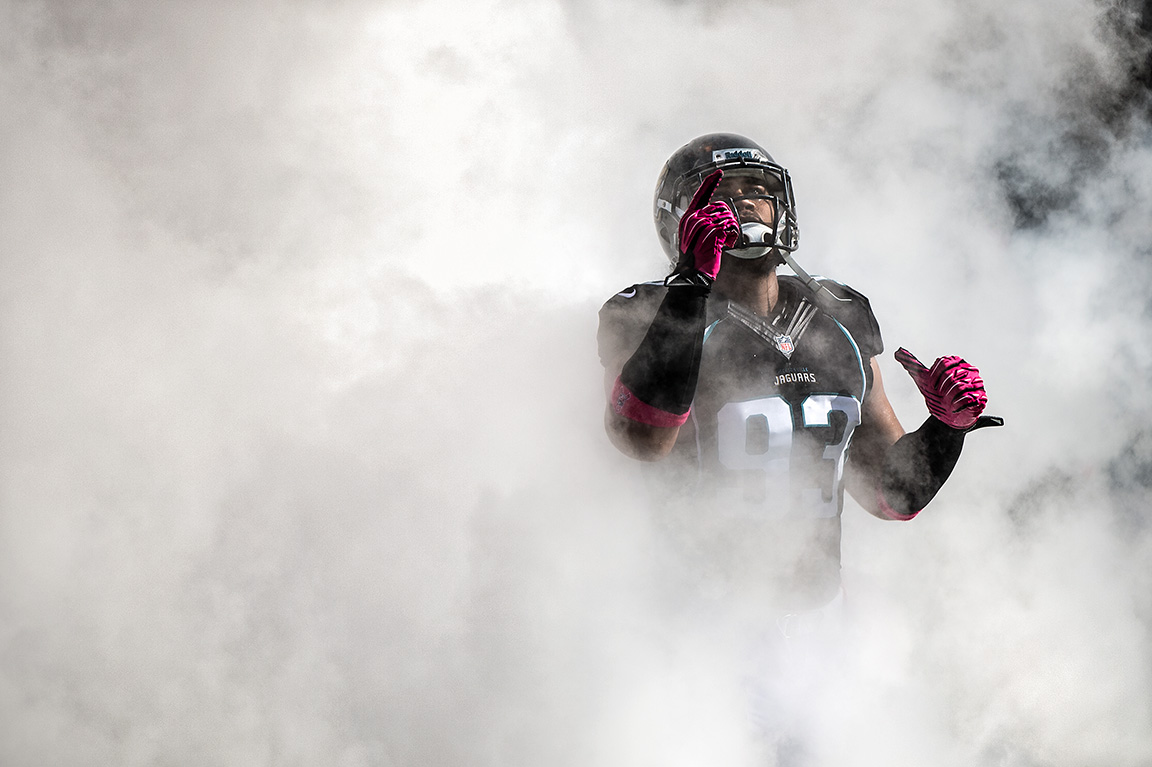
Can I just say WOW WOW WOW for that first shot ?
Nothing more, just WOW.
That’s something I would hang on my wall.
Hi there, my workflow is pretty much the same.
1) I tag the photo’s in camera during the game and let PM read my card. (no instant ingest) You can tell PM to open a sheet when you insert a card in the cardreader.
2) Then I preview only the tagged photo’s and press the #1 button to the one I like.
3) After this I go to File/select color class/(the color I chose)
4) Than File/copy and choose a destination. I already made a destination path before the game started. While copying, the Stationary Pad (filled in before the game like you did) will be applied to the photo’s.
5) After this I open this path as a new sheet by double clicking it and there you have the previews of the 5, 6 photo’s you chose.
6) CMD+A to select all and then CMD+E to open in Photoshop for the tweeking.
7) After Photoshop work I do the remaining captioning. For code replacement I use a program called Typinator (it’s for Mac only) this program also works with LR and basically in every program where you can type things down.
8) after the match I repeat my steps, but then press #2 to the picked photo’s.
9) when all the work is done I copy all the files from the card to my harddrive.
Writing this down took more time I guess. Or is this because I’m Dutch?
Correction for #3: it’s Edit/select color class instead of file/select color class
I also shoot NFL football and use Photo Mechanic. I’ve found that the best way is to tag my pictures on the camera in between plays on the field. Then when I look at all the photos in Photo Mechanic I sort by “tagged” and this will bring up all the images I had tagged while on the field. Then choose from those. This should cut down on some time for you.
I notice your “copyright” metadata has “Scott Kelby / Zumapress.com”. You still own the copyright to those photos correct? and if so are there restrictions to what you can do with the photos regarding publishing, selling prints, etc? I also know the NFL has there own restrictions with everything.
Thanks for the tips. Severall friends use P.Mec. but aren’t doing sports for deadline. I have more time, 4 or so hours, for my local paper, but may try this when I can afford some more photo goodies.
Last week I shot the Ironman World Championships for the official contestant phototeam and it was a 19 hour day. First shot around 5:30 am, Last shot was about 12:15 midnight. But by 10 am the following day, they had 30-40,000 images from 12 shooters into the +-1865 contestant folders ready to sell thumb drives. Now THAT is a feat. We turn in CF cards every 2-3 hours and there is absolutely NO POST PROCESSING… all jpegs have to be good right off the card. Speaking of feet, I am in AWE of the triathletes. A real humbling experience. (and I thought I was tired_) jock Goodman catch the NBC 2 hour recap this Sat at 4pm EST, or if you are shooting a game, record it. our team had yellow vests more here if you wanthttp://www.facebook.com/photo.php?fbid=128234977325564&set=a.105071719641890.11257.100004171865094&type=1&theater
You just described my Sundays to a T. The built in FTP software is also a nice benefit in Photo Mechanic. Command U, and you can transmit while you edit your next batch of images.
I don’t think my post went the first time.
thanks for the tips. and come good comments from viewers. Some friends use P Mec but not for sports. I personally have enough time after an event, not working the wires.
Here’s some interesting facts. I just shot the Ironman World Championships in Kona for the photo team that shoots FOR the athletes for the 4th time. 19 hours (with breaks) all day and until 12:15 midnight. About 12 shooters. we turn in our CF cards every 2-4 hours and they are uploaded from the office (2 guys). By 10 AM the following day there are 30-40,000 images all placed into each athletes folder (about 1865 or so). We have to try to get their bib number, arm tattoo, or bike number for ID. Then for $99 each contestant can have his/her folder burned to a thumb drive and catch a plane back to ?France, Australia etc. Is that magic? To be honest, there are quite a few numbers misfiled and unreadable, but for the most part, runner no. 1256 will have average 20-30 pics of the swim, bike, run, awards Ironman. I thought I was tired when done but I am in AWE of these athletes, some with no legs, some 82 years old, some collapse at end, some walk it off.
NBC will run a 2 hour version on Saturday around 4 PM EST. Our team wore yellow vests and each assignment is to get 2, maybe 3 shots of EACH racer, all jpeg, NO POST PROCESSING so all pics have to be good IN CAMERA, straight horizon, framed well, proper exposure (some fill flash) and sharp. When a cluster of 6-10 comes by it is HECTIC. No continuous mode allowed either,,,,,just too many pics as it is. And no fancy panning blurs, just clean, sharp shots.
I know I’m late for this post but how about a USB 3.0 or Thunderbolt card reader. That’ll help with moving data off your cards.
He stated in the blog post that he uses 2 USB 3.0 readers simultaneously.
Would you route your sports workflow through photo mechanic in a non-time pressure situation at home, or go straight into lightroom in that case? I find lightroom a bit clunky when I’m just trying to thin down to keepers.
I use PM as a front-end for Capture One (“C1,” similar to Lightroom). I could just ‘ingest’ into C1, but choose PM instead due to its preview speed and ease of adding IPTC and XMP data. Basically, even though I am not under the same amount of time pressure as Scott for what I’m doing, after a shoot I may typically have 2000-3000 frames. Anything that helps me speed up my post-processing is basically “saved money” for me. And while I ingest _everything_ to my primary and backup stores, I cull my photographs in PM so as to only move the ones that are worthwhile post-processing into C1 – I use ‘tagging’ and star-ratings to accomplish that.
In the past, using LR mainly, it would take me hours (many hours!) to complete that process; with PM, I was able to cut the time spent on ingesting and culling by **over half**!
Most of my editing is done in C1 (non-destructively), and when the photo is ready, I ‘process’ it into a full-res TIFF, which goes then automagically into my ‘portfolio’ in Lightroom. Only if there’s heavy lifting to be done (e.g. healing or content aware fill stuff, text, etc) do I take the TIFF into Photoshop before putting it into Lightroom… From there, I can upload to my Web site as a client gallery, update my online portfolio, post to social media, etc. Especially since LR added all the mobile capabilities (in conjunction with a tablet or smartphone), it has really become a great “portfolio” or “sales/marketing” tool.
The reason I use C1 instead of LR (or PS/ACR) is because I like its capabilities, and I especially like its raw conversion – just like PM with its ingest and preview speed, C1 is just a way more accurate raw converter, and produces much more pleasing results than ACR (For more on that, check out Frank Doorhof’s post from a while back: http://www.frankdoorhof.com/site/2014/06/which-raw-software-dxo-vs-capture-one-vs-lr/)
About “Here’s where my first hurdle comes in”
Scott wrote “This is a little tedious, especially if you can’t clearly read a player’s number of their jersey or helmet. Then you have to go back to your full shoot and figure it out by” but if You on the contact sheet double click a picture to view it in Preview mode and then press the I-button to bring upp the IPTC-ifo pad. In this view You can edit the IPTC info and have a big preview under the dialog, just move the dialog a bit if you ned to see detail like player numbers on the picture. Then when You press “Save & >” both the ITPC-pad and the preview will advance to the next picture. By doing it this way You don’t have to close the ITPC-pad to bring up a picture-priview to see details.
Really interesting post and comments on a common problem suffered by sports photographers on a deadline.
I shoot football and rugby in England and use Lightroom exclusively. After working with a guy called John Kirkpartrick (http://www.tilebarn.com/lightroom/index.php) I now have the ability to import only locked/tagged images from the camera as soon as a card is inserted, to apply caption templates on import, and to execute code/text replacement of player names (e.g. mu10 reads “Wayne Rooney of Manchester United”) in the caption field.
I can therefore do all my workflow within LR – no need to go out to Photoshop at all or switch between Photo Mechanic and Photoshop.
More info here:http://slikimages.com/2012/04/techniques/locked-image-copy-and-code-replacements/
Great blog Scott!
You are 100% in the same place as me! I’ve recently started shooting football (the real English type lol) and at my first major match LR was pathetic and ridiculously ssslllloooowwww.
I was still at the pitch side editing and trying to FTP my images after the match and while the groundsmen were sorting the pitch. I was taking that long!!!
The next match I improved my workflow by setting up PM’s ingest and LR’s auto import to automatically add IPTC data etc, re-name & eject the card then load in to LR with a develop preset sharpening and adding contrast to my images. My problem is/was I was sorting and deleting my bad images. Now I only select the good ones saving my loads of time. I was still importing ALL my images in to LR and when doing further editing my MBP needed think about everything which again was VERY frustrating.
I’ve been advised to use CS5 and have set actions to re-size the images with a function key. This is obviously lightning fast but I don’t have enough PS knowledge so don’t know if there are short cuts in ACR to do crops and to sharpen etc? Eventually I need to export my images from PM via the FTP section after adding extra keyword/code.
I hope to speed up my workflow and will keep an eye of your blog.
I’d be grateful if anyone can help me with my work flow just to ease the pain a little?
I shoot football and need to FTP my images which I have as a preset
for. All my images need to be JPEGS, 3500 pixels on the longest length
at 300 dpi, Adobe RGB, Quality of 80 in Lightroom or 10 in Photoshop.
As Scott quite rightly said, LR is a waste of time for fast editing and sorting. This is sad because I love the way it works, the interface and the import/export options.
This is my (kind of disjointed) workflow at the moment…
1. Ingress images from my card to my MBP’s SSD. During ingress the images are re-named, IPTC is added and the card ejected when completed. I select the option only to add new images as I don’t generally delete images until the match is completed.
2. I will quickly browse images and either click T or colour code a selection of useable images.
3. Selected images are now being edited in ACR. I select all and add a Preset that sharpens the images and adds lens correction. This take precious time compared to LR as I had a ‘Basic import preset that would do all this and add a touch of contrast during import. I’m not sure if this can be done in ACR? The controls in ACR are also more fiddly to use than LR’s. I find the crop tool particularly annoying!
4. All edited images are then opened in to CS5 and I’ve created an Action to resize the images to the required size etc and this then saves the images in to a folder on my desktop ready for titling using the Code Replacements.
5. Once all are done I select all and FTP them out.
I sure there MUST be a faster and slicker workflow? If only LR’s editing section could replace ACR’s interface and be much faster. It would make my life a lot easier.
Can you help a stressed photographer please? I’d much rather be using LR with PM but it’s just too slow. It looks like it needs to be Photoshop time….
Thanks
JIKA ANDA BUTUH ANGKA RITUAL 2D 3D 4D DI JAMIN 100% JEBOL BILAH BERMINAT
HUB KI ANGEN JALLO DI NMR (_0_8_5_2_8_3_7_9_0_4_4_4_) JIKA INGIN
MENGUBAH NASIB THA,SK ROO,MX SOBAT
JIKA ANDA BUTUH ANGKA RITUAL 2D 3D 4D DI JAMIN 100% JEBOL BILAH BERMINAT
HUB KI ANGEN JALLO DI NMR (_0_8_5_2_8_3_7_9_0_4_4_4_) JIKA INGIN
MENGUBAH NASIB THA,SK ROO,MX SOBAT……….
Hi Scott – will you please share your default sharpening details for ACR? As a Nikon D3 shooter, I am interested in applying your ACR sharpening to my NEF images. Your stuff is tack-sharp whereas mine isn’t. If you don’t mind, post an xmp file or graphic of your sharpening panel settings, including noise reduction.
ditto on the thanks for sharing. I suggest you look at a preference setting that makes PM autoadvance when you Tag/rate/color code it. You can save a few seconds there. Sorry, I dont remember the window it is found at.
Leav
Hi Scott,
Love your work and Kelby Training!
I’ve been
playing with a relatively new iPad programme called PicturePro which
seems to do all you want but I’ve not figured it all out by any means.
For ‘ingesting’, I’ve used Shuttersnitch and imported from camera roll
after saving there from camera card and tried Photosmith which is quite
good but PicturePro seems to offer a lot more functionality – metadata,
presaves etc. You might want to cast your expert eye over it?
Dilip Joshi a message…
Have you amended your workflow over the preceding months, Scott? And if so, how? An update would be very welcome
Scott .. I keep coming back to your workflow – top job. A question though that is frustrating the unmentionables out of me … When I colour code the images I want to export it automatically adds a tag (text) to that that seems (??) to be unavoidable. This means I either have some weird tag in amongst the actual ones … my short term work around was to put a tag in that was representative of the – sadly there are only a few words which make sense for every game – like 2014 … the issue then is that if I put the same word into the colour coding I can only choose 1 colour … which during multiple passes over the images makes it difficult to see which shots I’ve already worked on …. Simple question – how to turn off the text tags associated with the colour coding ..
cheers,
Nigel
This is a great video from Dan Carr who has some tweaks in PM and Lr that should help….
https://www.youtube.com/watch?v=iO07PIIiRHM
sorry, cannot condone the use of code replacements… too many geniuses out there try using words like “and” as a code and never understand why they captions come back as “Nick Nolte Pamela Anderson Eddie Murphy attend This Event in Hollywood…”
Excellent photos. I’m a huge football photography fan myself. At present i use the Nikon J1 which, although not expensive, this is a fantastic camera. I’ve had it now for about 3 years and it’s helped to produce almost all of the photos on my website http://www.footballphotos.co.uk – I’m actually looking to replace this camera now but it’ll take a lot to fill the void.
I was wondering if you’d take a look at my site and send me any feedback you may have. No matter how critical.
Keep up the good work!
I made the move to PM as well. Once the demo version was loaded, it took all of about 12 seconds using it to realize $150 is just absolutely nothing to pay for it.