


When it comes to portrait retouching, there's no shortage of tools, techniques, tutorials and most notably, results. Retouching is both a blessing and a curse as I've seen it turn good photos into a great ones but also decent ones into a complete disasters. During my time teaching retouching I've noticed a common set of mistakes that people make that ultimately keep them from reaching a polished yet natural result. My goal in this article is to give everyone from beginner to intermediate retouchers and photographers a roadmap for creating beautiful images and change your mindset towards various concepts you may already be familiar with.
Your Starting Point is Critical
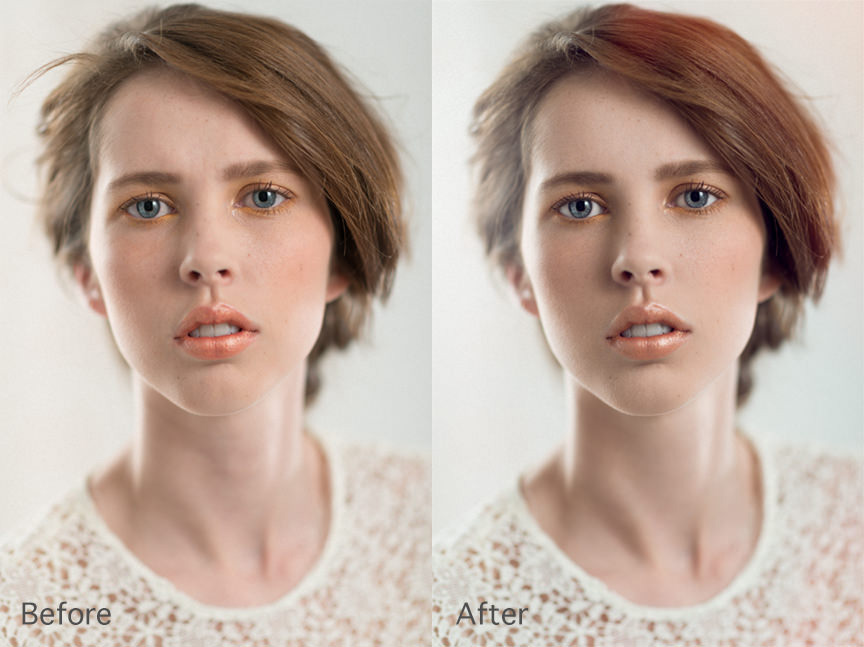
I'm sure you've heard this many times before but I would like to reiterate the importance of working from a high quality source file. Retouching isn't a contest to see how well you can turn a bad photo into an acceptable one. It's about enhancing the beauty of the original image and minimizing the elements that may be deemed undesirable by the specific target audience or client. My photo below demonstrates just how little change needs to be made, and how even a few subtle enhancements can lead to a much more pleasing result. Given that I shoot the majority of the photos that I retouch, the starting point is entirely within my control. If however you're a retoucher only, you may not always be provided with a great source file. Poor quality raw files are to be expected, but it's important for you to manage expectations for both yourself and your client. There are a myriad of things to look for in a good source file but let's touch on some of the most important ones.
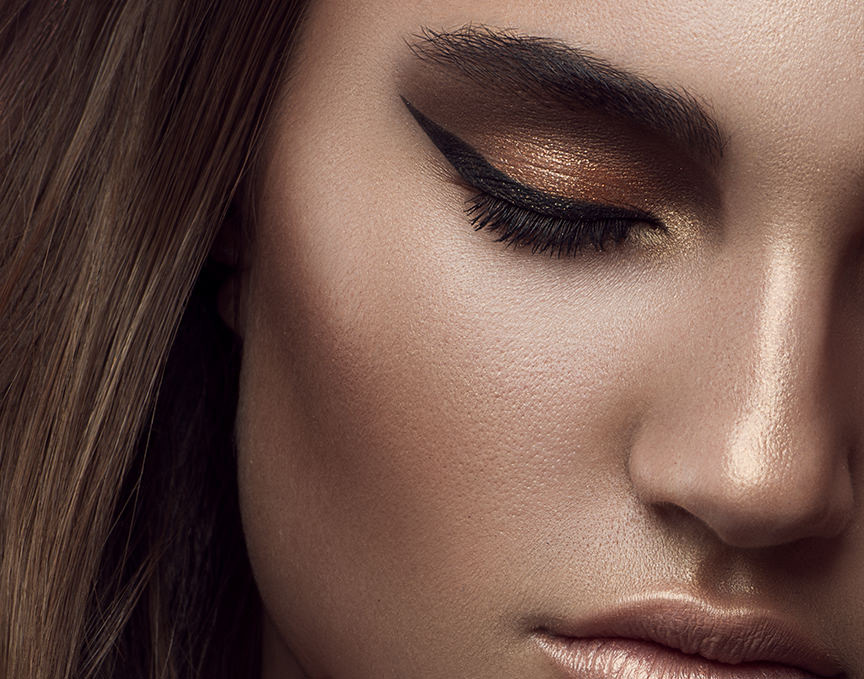
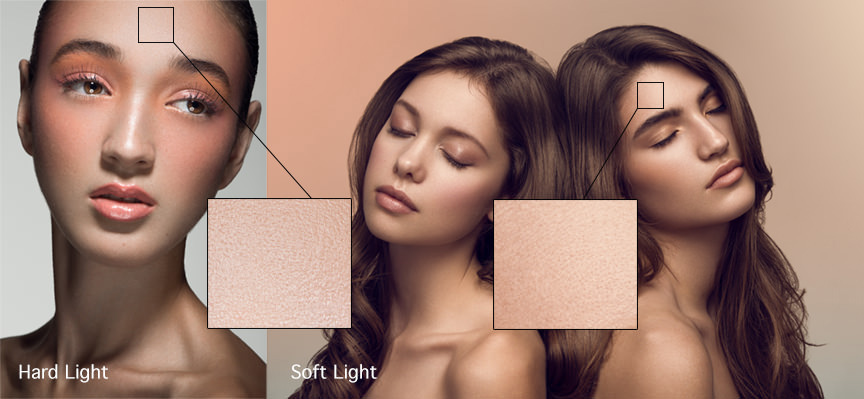
Skin Texture – One of the key ingredients to a great looking portrait is clearly visible and pleasing skin texture. I'm often asked "how do you create the skin texture in your images?", and the simple answer is – I don't. The skin texture that's in my final image is the skin texture that I started with. While I may repair some of the texture that's there, I never create it from scratch. Although skin texture brushes exist, the result is never natural since texture varies across the subject based on a number of factors. The area under the eyes has different texture from what is on the forehead, cheeks and nose (see close-up below). Similarly, texture on one side of the face can differ from the other side due to lighting factors. A soft light source makes texture look more subdued compared to those areas lit with a hard light source. Areas of shadow, midtone and highlight also render texture differently, as does the direction of light and depth of field. With such a wide array of factors, it's nearly impossible to reproduce convincing texture from scratch.
To achieve good texture in camera you'll need three key elements: model, makeup and light. The state of your model’s skin is of course the basis for everything. If the pores are overly large or harsh, or there is a lot of scarring or acne, no amount of makeup or flattering light will produce great out-of-camera texture. Assuming the model has reasonably good skin to begin with, the foundation and other products used by your makeup artist is the second most important factor. Be sure to use an experienced makeup artist and good quality products. As mentioned previously, texture renders differently depending on the light source used. If you're shooting natural light on a cloudy day, the multi-directional and diffused light will leave you with rather muted texture. If on the other hand you shoot with a hard light source such as a beauty dish or gridded reflector at an indirect angle, the texture will be much more aggressive. Remember that texture is simply contrast created by the interaction of light and shadow at a near pixel level.
Dynamic Range – Today's professional cameras can capture a staggering amount of information and detail but even they have their limits. If an image is over or under lit to the point where areas of skin are completely blown out or in absolute darkness, little can be done. Be sure to use reflectors to fill in shadows and use the clipping warning (blinkies) on your camera to spot blown out highlights. We'll talk a bit more about getting the most out of your raw files once we get into our discussion of workflow.
Quality of Light – Altering the interplay of light and shadow across the subject’s face is one of the most difficult tasks for any retoucher and borders more towards digital painting than retouching. Given this challenge, it's much easier to light your photo properly from the start so that the light and shadows need only be enhanced rather than replaced. The difficulty of your retouch increases with the hardness of your light source due to the rather unforgiving nature of hard light. Most retouchers prefer to start with a less contrasty image and add contrast gradually as opposed to the other way around. This isn't to say that you should avoid hard light sources, but simply that you need to factor this into your decision and balance it with your skill as a retoucher.
The Little Details – While things like stray hairs, crossing hairs, or unpressed clothing aren't deal breakers and can be fixed in post processing, they become a huge waste of time so nip them in the bud before they show up in your camera.
Recognize that Retouching is More Art than Science
The majority of people starting out in retouching look for those magic tools or techniques that will help them to create beautiful images in a snap. The belief is that professional retouchers know some closely guarded magic tricks that give them that flawless finish. The reality of the situation is that the more advanced you become in retouching, the more you rely on the basic tools and adjustment layers and less on shortcuts. Don't get me wrong, these techniques and tools aren't a bad thing, nor are they useless. The problem is rarely with the technique itself, but rather the application. This gap exists for two reasons.
The first is that beginners often search for solutions to specific problems as they work through various images and apply the techniques naively without understanding the mechanics behind them. By ignoring the details you're doing yourself a disservice as these solutions can often be extended across multiple use cases. The second and most common problem is simply a lack of vision. Without a clear vision of what makes a good photo or retouch, it's impossible to apply tools appropriately. Although the majority of retouching is localized changes, these localized changes need to ultimately produce a complete image, and it is your vision as an artist that brings it all together.
The lesson to draw from this is two fold. First off, spend some time understanding each tool and technique as opposed to applying them on a problem by problem basis. The second is to move from a local to a global mind-frame. Study the interaction of light with objects, read make-up tutorials about contouring and face shapes, and study colors. Most importantly, find images that you love and figure out what makes them great. Learn to identify the gaps between your work and theirs and gradually reduce them with each new photo. This may seem like a lot of work – and it is – but I assure you that once you're able to visualize the end result, the path to getting there is that much easier.
Find the Right Balance
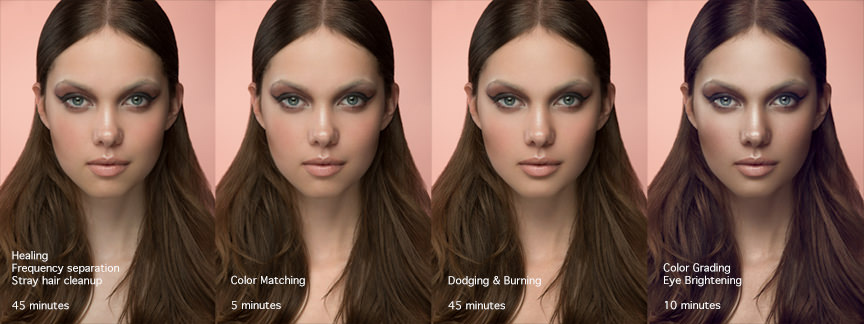
Regardless of how many plug-ins or action packs you have, trying to reproduce a magazine quality retouch in 10 minutes is simply impossible. That's not to say that every photo demands three hours of retouching to make it acceptable. It's about setting realistic expectations for yourself and developing a workflow that balances time and quality to produce the best image you can for your specific style and target audience. Skin smoothing plug-ins like Imagenomic Portraiture or Portrait Professional are a good example of this. They will never produce the same level of quality as a skilled retoucher but they also cut the time required down dramatically. It's not a sin to incorporate these into your workflow but be aware of the trade-off you're making and come to a happy medium. The below image demonstrates a more beauty oriented retouch and the time various steps took. Notice how interestingly, the color grading step makes the most dramatic impact with relatively little time.
I always tell my students that retouching is a game of diminishing returns. The greatest impact can be made in a relatively short period of time under each technique. For example, with Dodging and Burning – which is the process of lightening and darkening local areas – it's conceivable to spend an hour or more to achieve a flawless result. You can however get to 80% of the result that most viewers will be able to see in the first 10 minutes. Perfection isn't always necessary so focus on targeting the most important areas and budget your time. Also keep in mind the intended use of your image. If you have a 36 megapixel file that you only plan on displaying at web resolution, leave the small issues and focus on the most noticeable ones. The best way to do this is to set a zoom threshold for yourself. Keeping your zoom fairly wide will give you a better idea of what your viewer will see and prevent you from spending unnecessary time on minute details.
In addition to balancing time and quality, you'll also have to balance polish and reality. Contrary to popular belief that retouching is about creating unrealistic standards of beauty and turning humans into porcelain dolls, a proper retouch is as much about what you leave in as what you take out. The subtle contours around the mouth, the nasolabial folds, shadowing under the eye, lines under the eyes, all these elements should remain in a portrait retouch and merely be toned down to a flattering level. Too often these small areas are identified as flaws when in reality they are important parts of the human anatomy. Learn to distinguish the bad from the necessary and exercise restraint.
Learn to Break Apart Your Image
Each image is composed of several elements. At the basic level we have light and color. Light is simply the level of brightness, while color is the combination of hue and saturation. A black and white image is composed of lightness (or luminosity) only. While this may seem like an obvious point, too many people ignore the implications of this concept. When retouching a photo, we're ultimately making changes to one or more of these elements and a good result requires a harmonious balance between them. Below you'll see an image broken down into the respective elements. Note that the hue and saturation blocks are overlayed on top of a red background to make them visible.
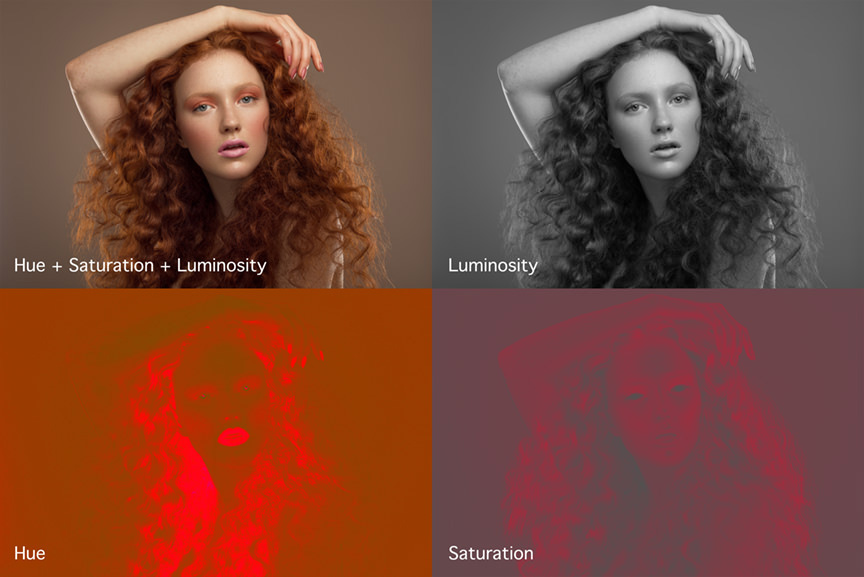
The reason this matters is because knowing how to identify and manipulate these three elements allows you to fix the majority of issues using only a curves and or hue/saturation adjustment. While these two tools may not always be the most efficient solution, it demonstrates just how basic the process can be. A practical example of this workflow is using dodging and burning for evening out light and dark transitions across the face and then using selective hue/saturation or curves adjustments to correct any remaining color issues. For more information on HSL corrections, visit this article from my friend Lulie Talmor.
One of the best tools to flush out color based issues is none other than the simple color picker. By opening the color picker and sampling colors across a variety of areas, we're quickly able to visualize any shifts in luminosity, hue or saturation and develop a game plan for fixing them. For example, the below image demonstrates that we have a color shift going from the top to bottom in the dress.
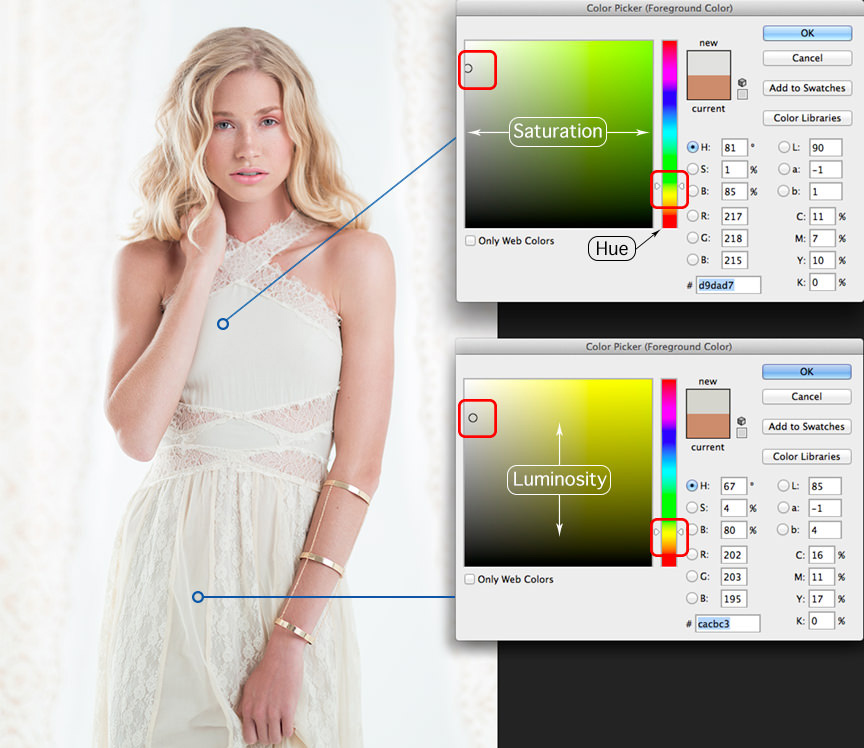
Sampling two areas using the color picker, we can see that the top has much more green than yellow as indicated on the hue bar on the right. Similarly, the square block shows us that the top portion of the dress is less saturated and also lighter. Having this insight, we know now that all we need to do is mask in a hue/saturation adjustment on the bottom portion of the dress and offset the shift by pushing the hue slider towards green and turning up saturation and brightness. While I generally recommend using curves or levels to fix luminosity based issues, I've corrected all three using one HSL adjustment as shown below for ease of demonstration.

Once again, this concept can be extended well beyond clothing and will apply equally to correcting patches in the skin, or mismatched skin tones across the subject. You're also not constrained to the HSL adjustment. Having a strong understanding of colors, you could make the same correction using curves or levels, albeit not as intuitively.
An alternative view is to look at your image from the standpoint of high and low frequencies, or simply tone and texture. The below image demonstrates this idea with all the detail separated onto one layer and the color information on another. Notice that areas that are naturally blurred by the shallow DOF have no information in the texture layer.
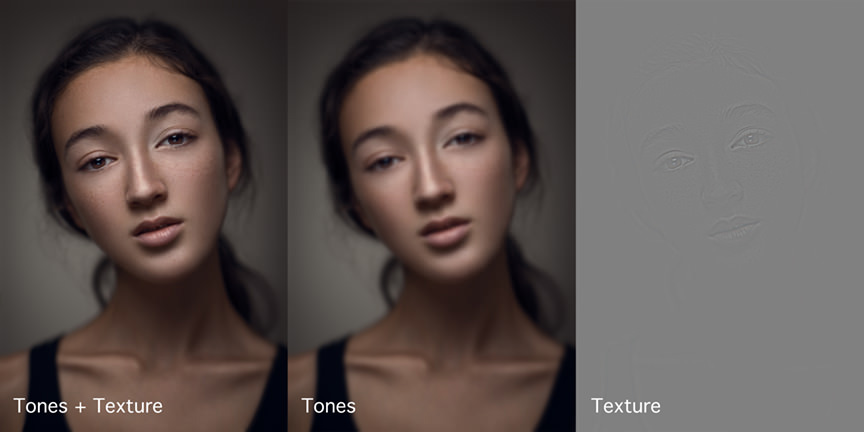
While manipulating these two individually typically falls into the realm of advanced concepts and tools like frequency separation (more on this below) and high pass filters, it's still important to understand the implications behind it. If we have an area of discoloration and attempt to fix it with something like the clone-stamp tool, we'll be replacing both the tone and texture in whatever area we paint. From what we learned above, a curves or hue saturation adjustment over that area would correct the discoloration while leaving the texture intact. By understanding whether we're dealing with a tone or texture based issue you'll better be able to select the appropriate tool to tackle it. From a practical standpoint, this is how many skin smoothing tools work. They separate the skin tone areas into high and low frequencies, operate on them separately and then assemble them back together.
These two views may seem both logical and overly theoretical, but they form the basis for all of retouching. If you learn how to visualize and manipulate them, you can tackle just about any issue thrown at you without relying on Google to guide the way.
Your Roadmap to Retouching Greatness
Let's face it, you're not going to produce an amazing looking image in your first attempt. Getting it wrong many times is all part of the process. What we want to avoid is getting it so wrong that we get completely discouraged and not try at all. A lot of people fail by getting in over their head with all the tools and techniques that exist. They jump into advanced concepts and end up with an image that looks nothing like the original. For this reason it's important to start with the basics and leave the advanced tools for later study. Here is a guide to the various techniques and steps you'll want to master in order to become a proficient retoucher.
Build a base – Remember that each step in the retouching processing builds on the last, so each one has to be done carefully and masterfully. Nothing is more important than getting the most out of your raw files since this forms the basis for all the corrections still to come. Although more commonly seen in landscape or architecture images, you can also process multiple raw files to extend the dynamic range of your portraits. You can open up shadows and recover highlights by blending multiple raw conversions together using either simple painting masks or more advanced tools like Luminosity Masks. Your highlights should still be highlights and shadows should still be shadows, but you should have visible detail to work with in the areas that are important. Be sure to balance shadow noise issues during this process and avoid muddying up highlights. Your raw file is also where you'll want to correct any white balance issues so get it to a pleasing point before diving into Photoshop.
Create balance – Use the HSL tools we talked about above to fix any larger discoloration issues. It's not uncommon for a model’s face to have a different tone from her chest, arm or hands, so learn to identify these inconsistencies and correct them. Nothing gives away an inexperienced retouch more than having mismatched skin tones in your image. In addition to the curves and hue/sat adjustments we discussed above, you can also use the Subtracted Average Color Adjustment technique I developed to help take the guesswork out of it.
Heal – The healing brush is one of the best tools for fixing minor blemishes. Use it carefully to remove any smaller scars, acne or stray hairs. Avoid using tools like clone-stamp on skin – unless the healing brush fails – as it can gradually destroy texture. When using the healing brush, sample areas close to your problem area so that the source texture is similar to the destination area. After completing these three steps, you should have a clean image that looks nearly identical to the original but with more polish. When toggling your layers on and off, you shouldn't notice any changes in face shape.
Fall in love adjustment layers and blend modes – Before going any further, you should become comfortable with critical adjustment layers such as Curves, Levels, Hue/Saturation, Selective Color and Black and White. Experiment with each of these using common blend modes such as Luminosity, Color, Overlay, Soft Light, Lighten, Darken, Screen and Multiply. Here is a video I recorded about blend modes to give you a better understanding of these. These five adjustments and eight blend-modes comprise the most common ones you'll use and put a ton of power into your hands. Once you've become comfortable with them, try to apply blend-if adjustments to your layers. The combination of adjustment layer, blend mode and blend-if will allow you make targeted adjustments to specific colors and luminosities and make color grading and correction a breeze.
Make small corrections with dodging and burning – The majority of blotchiness found in the skin is a result of luminance shifts so Dodging and Burning can be a great way to eliminate them. Knowing what we know about diminishing returns in retouching, focus on just the most glaring problems and lighten or darken them gradually until they blend with their surroundings. This may still leave minor color based issues but that's a problem you'll tackle as you develop your skills.

Build contrast with dodging and burning – Dodging and burning is without a doubt the most important skill that any retoucher can master. It's not something you'll become good at overnight, so take baby steps. What makes a portrait really pop is building depth and dimension through contouring. Contouring is essentially selectively brightening highlights and deepening shadows to create a more three dimensional feel as well as enhancing facial features. To ensure that you don't make the subject look like someone else, start by simply building on the light and shadow that exists in the image already. Don't overdo this process. Build up the effect gradually through soft and low opacity brush settings. Study make-up artist contouring theory to understand what areas of the face should be dodged or burned for specific face shapes. Toggle your adjustments on and off constantly to ensure that the subject’s features are in-tact and that you've enhanced rather than altered. Also note that for B&W portraiture, D&B contouring can be pushed much further than in color images without looking overdone and helps to enhance the sense of drama.
Add refinement – After applying dodging and burning you'll likely be left with some existing discolorations. These are often too minor to be noticed by the majority of viewers but should be fixed nonetheless. Using visualization tools called check layers (as shown in the HSL breakdown above) you'll be able to spot areas of changing hue or inconsistent saturation and correct them using the appropriate adjustment layer and masking. As you become more skilled, dive into complex topics like frequency separation which can help to expedite this process. Frequency separation will allow you to operate on the tones and texture as we discussed above, but also makes it easy to completely destroy an image due to the lack of safeguards. Use this technique sparingly and responsibly. It can be very powerful, and hence tempting to beginner retouchers, but should be avoided until your vision is properly developed. Remember that advanced techniques are advanced for a reason.
As you work through the above list, be sure to constantly flood your eyes with images. Find inspiring photographers and retouchers and learn to identify what makes their work great. Have patience, practice constantly, and seek advice and feedback to measure your progress objectively. Everyone has a different style and goal in mind so find a workflow that balances time and result for your situation. Above all else, when starting out, always apply a degree of conservatism to your work and err on the side of under-retouched to over-retouched.
You can see more of Michael’s work at VibrantShot.com, and follow him on Facebook and Twitter.
Wow! Amazing, thoughtful and well explained! I particularly enjoyed the concept of learning to step back and see the direction, or vision, of the retouch before the picture had been taken. I am one of those who are guilty of trying to learn a new tool just to “quickly” fix a problem rather than start with the basics of portrait retouching and learn the tool when I have a grasp of the methods that build up to it. Thank you for sharing such a detailed intro to retouching!
Thank you for the kind words Justin! Glad you found it helpful.
Excellent post! Thanks! Sharing it everywhere I can…wish I owned a billboard on 275! and one on Veterans, I-4 and I-95! LOL
Thanks for reading Alexandra
You’re welcome! Loved it!
Great post Michael; way to go!
All the very best to you,
Glyn
Really appreciate you checking it out Glyn. Glad you enjoyed it!
It was a done deal mate; seeing your name it was clearly going to be a quality post!
You’re too kind Glyn! Cheers
Two of my favourite photographers/retouchers :)
Phenomenal and informative post, thank you SO much for sharing. Love the focus on craft and investing time as opposed to looking for a magic bullet. “Advanced techniques are advanced for a reason” :)
Thanks so much @stephenvosloo:disqus :)
Wow, awesome post! Thanks for sharing all of this.
Very informative Post, I will have to apply some of these techniques. Thanks!
This is a very informative blog, I love Michaels style of photography.
Great article Michael!
Thanks, love the technique suggestions!!
Thank you for this! Its all about art. Cheers from Brazil.
A well of knowledge, and a very well structured one, too. Thanks a lot for this article, Michael.
Thanks for reading Ponte, cheers
Wow, this is I think the longest blog I ever read and I am glad I did, thanks a lot Micheal for the wealth of information and the detail explanation and the road map to the proper retouching of the image, you gave some key points here that I have yet to look at like the “makeup artist contouring theory” which will help me recognize things I have been struggling with. Do you use the same approch to your architectual images, or that is for the next blog ?? :D
Really great in depth post!
Would love to see more specific about the color-grading parts!
Thanks Heine. It’s definitely a topic that could span many blog posts :)
One of the best articles I’ve come across for retouching. Michael is indeed Retouching Jesus!
Haahaa, thanks a lot Pratik. I’ll have to trademark Retouching Jesus
Michael, super useful and educational awesomeness from you as usual, learning something new every time I read something you’ve written! Should be a master retoucher in no time :D Thanks so much for the time you put into sharing your skills with us :)
Thanks for the kind words Victoria. I have no doubt that you’ll master it in no time. Your work is great already.
Fantastic article, as always :) thank you for being so willing to share your knowledge in such detail.
Thanks very much for reading Renee!
Michael, thank you for sharing this valuable insight in retouching.
You mentioned “study makeup theory, And lighting theory.
Do you have any books or links as a starting point, so I could pick up from there?
Again, thanks for this great post.
Hi Michael, for lighting there are certainly lots of videos on Kelby One and the Joe McNally books are fantastic. For makeup, there are lots of books out there but Making Faces by Kevyn Aucoin has lots of info in it. If you Google Makeup contouring you should get lots of good results as well. Cheers
thanks so much michael, amazing post
This was a great read. Thank you for the advice!
Michael, as usual, very illuminating, educative and informative. Can’t wait to hang out with you for our next another online session. You ROCK man…
:o interesting like ledlampen
Thanks very much for a detailed and clear post. i like the way you´re writing. So even i as a german living in sweden understand each meaning and can follow all your steps. Like to read more of you. will set your name under my “havetofollow” colum =). Greetings from sweden
//Frank
Adding a reflection shadow, creates the impression that the product featured to an image is not simply an intangible picture but it has depth. Too much reflection, even if it is natural can make an image poor looking. The designers at DGTouch know the best way to proceed when it comes to high quality finishing. They work closely with our clients to understand how an image is being used as per exact requirement of our valued clients , can create an elegant, natural looking reflection shadow even the image captured without any reflection.
Great article. Also a good reminder for those more advanced as well!
Michael, great article and I really appreciate all your interviews. You are able to summarise and explain the main issues and make people aware of advantages and drawbacks of all methods. It is as always extremelly educative and I am honoured to be able to learn from artist as you are!
Hey Michael,
I´m doing retouch for a living since 6 years now (over here in germany) and EVERY single point I read from you today made me like “naaaa would i only have know that years ago”. Every word you say is true and I`m sure folks will love this! This has more value then a $$$$ Workshop or anything else. you`re writing from the heart about our business and those insights are gold! thx so much!
HI, Good to see an article on , PhotoEditing Services it will surely be
a learning for those who need to understand the basics of Editing
techniques.
Thank you for sharing this wonderful information. Good explanation in detail that helps people.