

This is the written tutorial of something I did in my course on using Westcott Speedlight Modifiers over on KelbyOne, and the trick is a very effective, location lighting technique for a formal portrait of the bride, and part of the technique is done in camera, and then the other part in Photoshop, and the good news is — both parts are really easy (but the final result is really sweet!).
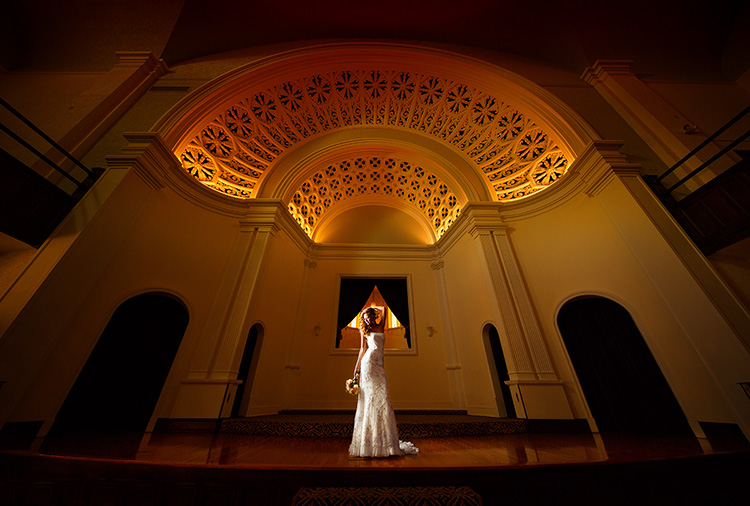
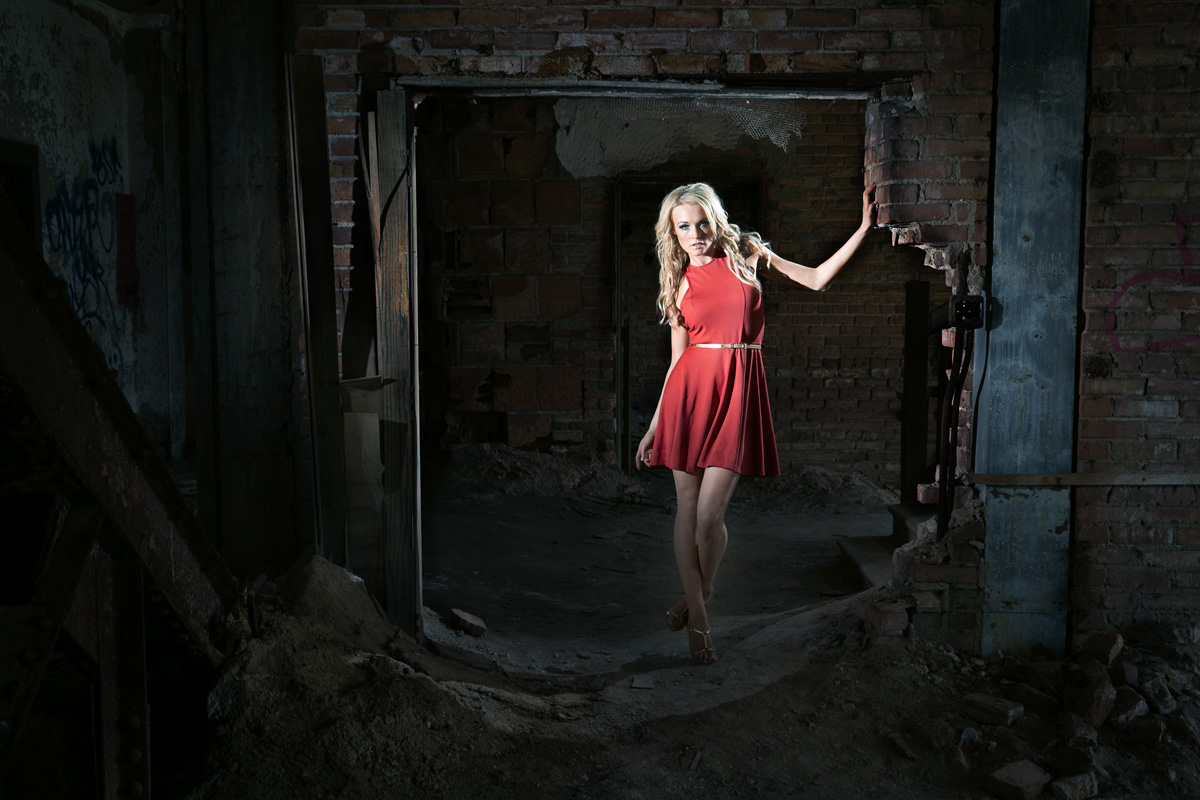
Above: Here’s the final image with the light hidden
The Lighting Set-up
We’re only going to use one simple hot-shoe flash for this technique. Lately I’ve been using the Phottix Odin hot shoe flashes, and I’m super-digging ’em as their just released new Phottix Odin II TTL Flash Trigger is hands down the easiest hot shoe flash transmitter I’ve ever used (it even has hard buttons for each group, which makes it incredibly easy to change groups, turn on/off flash, change the power [using a simple dial], etc.. Very smartly designed, and the price is right, at around $209).
Then, we’re going to use a collapsible softbox made for hot shoe flash — it’s the 50-inch Recessed Mega JS Apollo from Westcott (around $169 street price) Note: anyone who has been to my “Shoot Like a Pro: Reloaded” seminar would recognize this bad boy!
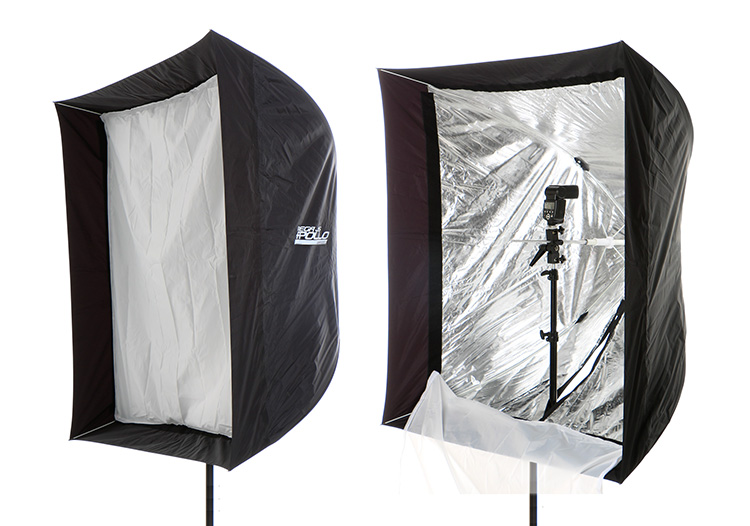
Above: The flash is mounted inside the softbox on a light stand, and then it aims inward at the back of the softbox, and the light returns back out toward the subject, giving you softer lighter without a bright hot-spot right in the center like usual.
There are five really nice things about this softbox:
(1) It’s pretty huge, and the bigger the softbox the softer the light, so when I have a choice, I go “big” like this.
(2) It’s collapsible like an umbrella, so despite it’s large size, it’s super-portable, lightweight, and sets-up fast.
(3) The flash aims backward — toward the back of the softbox, not directly at your subject, so the light reflects and bounces back toward your subject, which avoids a hot-spot in the center and creates even softer more wrapping light all the way around.
(4) Since it’s so large, you can light groups with it
(5) For a softbox this large, $169 is really a bargain.
Camera Settings
When I’m shooting with flash, especially indoors like we are here at a very popular venue for weddings and wedding receptions, I’m setting my ISO at the lowest, cleanest native setting for my camera, which for my Canon 5D Mark III is 100 ISO. Since I’m using flash, I’m always shooting Manual mode so I can get my shutter speed at what I would say is a very safe, kind of “default no worries” shutter speed for flash, which is 1/125 of a second. Lastly, my f/stop is usually around f/5.6 if I want the background a little soft but in this case I went with f/4 (I probably accidentally hit the dial on the back of my camera at some point and it moved my f/stop).
The lens I’m using for this particular shot is in vast contrast to the price of all the lighting gear, because it’s a high-end lens — Canon’s new 11-24mm ultra wide-angle lens shot at 11mm (which is just insanely great). Of course, you don’t have to use this lens (but man is it sa-weet!) — any nice wide angle will do the trick (like the 16-35mm).
You’re going to take Two Shots. Shoot this one first.
First you’re going to position the light right near your subject, in this case I’m positioning it right next to our bride and as you can see from the production shot here, the lighting isn’t aimed directly at her — it’s kind of aimed a bit past her so the light is just skimming her a bit. That way, the light is more subtle and softer because the light that’s hitting her is from the edges of the softbox, instead of from the center (you’ve heard this technique referred to as “feathering” the light). You can also see my photo assistant Brad “The Beard” Moore standing by as I take the shot. This is important (more on why in just a moment).
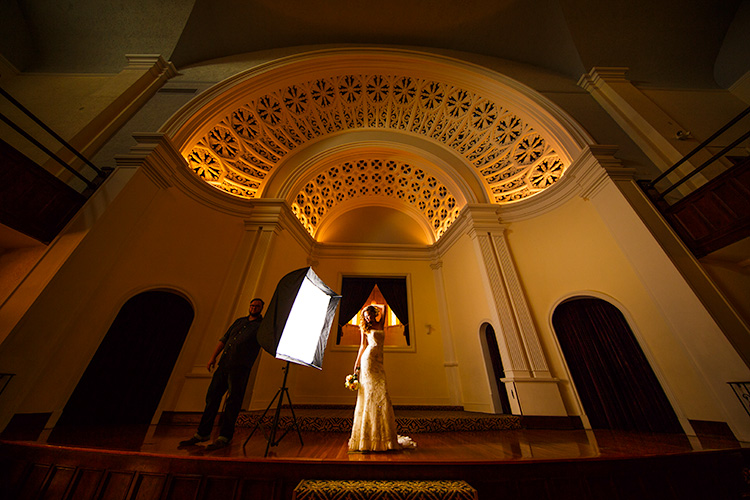
Above: Here’s the shot with the softbox fully visible in the image. That’s OK – you’re supposed to see it in a wide angle shot like this, but it won’t be there for long.
Then comes the 2nd shot
Once you take that shot, where you can clearly see the softbox, ask your assistant (or friend, or friend of the bride) to pick up the light (it’s not heavy) and move it far away so you don’t see the light at all in the scene, and take your second shot. You want to keep your camera up to your eye the entire time, so minimize your movement between frames. Of course, if you’re shooting on a tripod, it doesn’t matter — you can theoretically take all the time you want, but you need to tell your subject (the bride in this case) to please hold her pose until you’ve taken both shots, so you don’t want to take too long between shots.
So, the process is this:
> Get your light in place
> Take the first shot, and keep the camera up to your eye.
> Have someone move the light out of the scene quickly and take the 2nd shot. Pretty easy stuff.
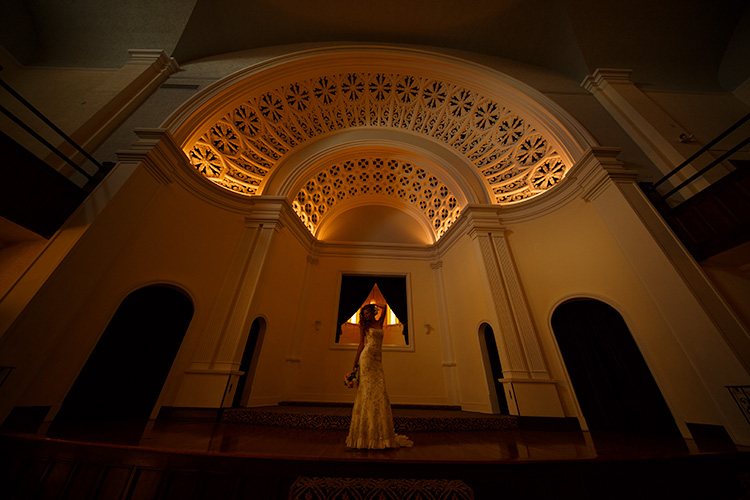
Above: Here’s the second shot, once the light has been removed. All you’re getting is the ambient light in the reception hall and no light from the flash.
The post processing part is easy
Now open both images in Photoshop. Go to the image that has the bride lit by the flash; select all and copy that entire image into memory.
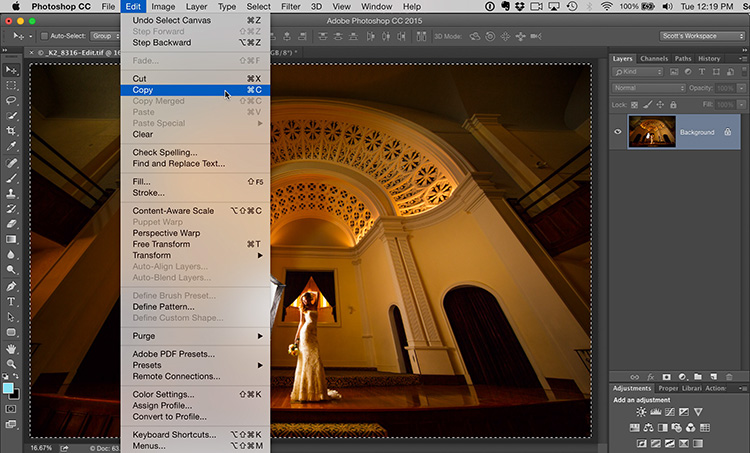
Above: Open both images in Photoshop; copy the shot with the flash in it into memory.
Now go to the image with no flash (the ambient light image) and paste that image with the lighting visible right on top. If you used a tripod, you can skip this step and go on to #8, but if you handheld the shot (like I did), you’ll need to have Photoshop automatically Align the two images so they were perfectly aligned with one another.
You do this by going to the Layers panel; selecting both layers, and then go under the Edit menu and choose “Auto Align Layers” as seen below. When the Auto Align dialog appears, use the default setting of “Auto” and click and in just a few moments your two images will be perfectly aligned. Note: you’ll need to slightly crop the image to hide the white edges created by the alignment, but we’ll do that later.
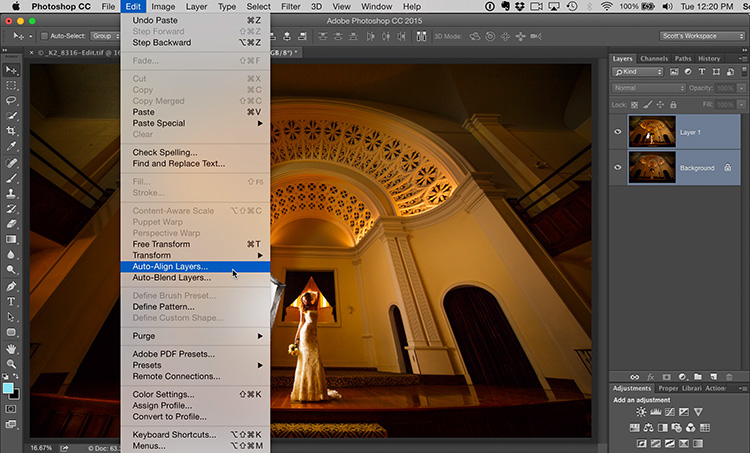
Above: Paste the lighting shot onto the unlit shot, then select both layers and use Auto Align Layers to perfectly align them.
Go to the Layers panel and click on the top layer (the layer with the lighting). Next, hold the Option key on Mac (the Alt key on a Windows PC) and click the Layer Mask icon at the bottom of the Layers panel (it’s the third button from the left). This adds a black layer mask over your entire layer, so the lit layer is now hidden behind that black mask, which is exactly what we want. Now, get the Brush tool and choose a small soft-edged brush from the Brush Picker up in the Options Bar at the top of the screen. Make sure you Foreground color is set to white. Now take the brush tool and simply paint over the bride and now she appears “lit” as you’re revealing just that one part of the lit image layer that was hidden behind that black mask (this is similar to the trick we used last issue for creating a cityscape at dusk).
As long as your bride isn’t close to the background in the shot, you won’t have any trouble painting her in — it’ll take all of five seconds. If she’s close to the background, then you have the worry of spilling light onto the background as you reveal the lit version of her. You can still do it, you just have to be more careful, take more take, and use a smaller brush.
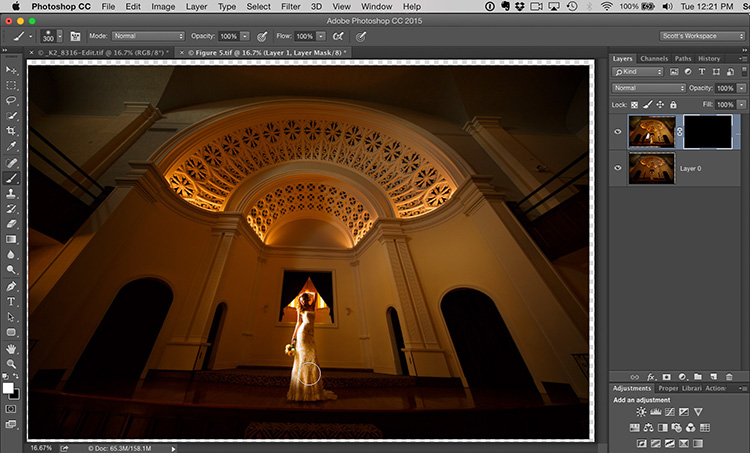
Above: Add an inverted Layer Mask (hold the Option key on Mac, or the Alt key on Windows, then click the Layer Mask icon) to the lit layer; take a brush and paint over the bride in white to reveal the lit version of her in just that area. No spill on the ground, or the walls, or anything.
The last step is to use the Crop tool to crop away those white edges created by the Auto Align move. Lastly, I hate to say just “Add contrast” but — add some contrast in Camera Raw; sharpen the image, and you’re done.
There ya go: Some camera work, some Photoshop work, and a beautifully lit final image without spending a bunch of money.
Hope you found that helpful, and if you’re a KelbyOne member and want to see the full video on it, here’s the link.
Best,
-Scott
P.S. Next week, I’m coming to New York City with Part 2 of my “Shoot Like a Pro: Reloaded” seminar. Hope you can join me.
Speaking of the 11-24,,,would I be a dumb*#% to consider purchasing one when there is so much push for mirrorless this and that? This is my hobby only and equipment purchases are saved up for before buying and used for a LONG time. I am afraid of investing in an expensive lens and finding 3-5 years from now I’m one of the relics hauling my dslr equipment. Insight?
Btw-my last purchase was the BH40 Really Right Stuff ball head. It was like the heavens opened up to me ???? I couldn’t believe how much difference not struggling with attaching my camera, repositioning it, retightening it constantly made in my shooting happiness. (Need to replace my Adorama brand tripod next. 3-legged thing or Gitzo?) So while I know it’s not all about the equipment-it sure changes the experience and level of satisfaction.
Hopeful and excited to continue enjoying and improving my photography with the help of Kelbyone. Thanks Scott.
$.02 ? Get the lens and use it. It’ll still work then, and all the time between here and whenever the mirrorless revolution comes. You only get so much time in life, and you can always find a buyer for it later…
I totally agree with callmebob’s comment – that is right on the money! :)
Thanks Scott
Lyle
Scott
Couldn’t you have Brad move the light and ask the bride to step out as well? I would think then there would be no ghosting if she moved a little.
WHy does the bride need to be in the second unlit shot?
I use this all the time, although slightly different. I take a well exposed shot of the back ground first, then get my model / bride to stand in with the light take that shot. Drop them into PS / align / invert the layer mask and paint the light out. The bride / model doesn’t need to hold a pose then for more than one shot.