If I had a cool technique to show you, but it has a lot of steps, would you do it if:
(a) You kew up front that it’s super easy to do. Anyone can do this.
(b) You’ll learn some really helpful stuff, and shortcuts, just by doing it even once.
OK, are you in?
Remember â” it’s not hard at all. It’s simple. It just takes a bunch of steps, but I promise you’ll enjoy it (and it’ll be worth it).
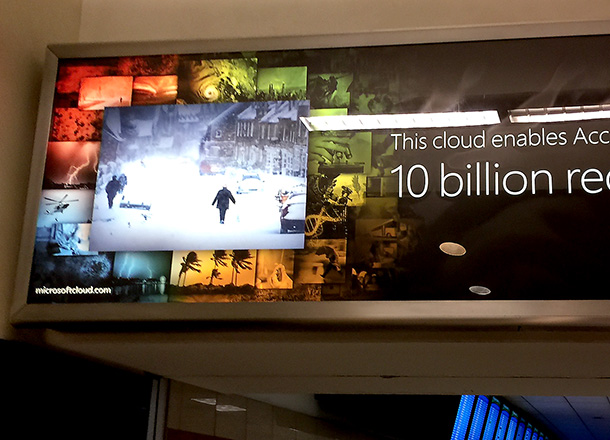
OK, so I’m in the Atlanta airport a few weeks ago and I keep seeing this ad campaign for Microsoft Cloud, so I snapped this pic of it (above). While my photo of it is kinda lame (snapped at the last minute on a moving escalator with my cell phone), I think the effect is pretty cool, and it’s pretty simple to do in Photoshop. It does take a few steps, but they’re all super-easy, so I thought today I’d make it my “Photoshop Down & Dirty Trick” to inspire you into the weekend (and to inspire the thousands of folks heading out to the Photoshop World Conference & Expo in Vegas next week). Here goes:
STEP ONE:
If you look at the airport sign image at the top, you see it’s one large main image surrounded by around 20 or so smaller images, so the first step is to gather 20 or so images (here I’ve grabbed 20 random shots from a trip a few years ago), and then them in a folder. Then create a new blank document at the size you want for your effect (I made mine 14″x10″ at 300ppi but you can choose any size you’d like). 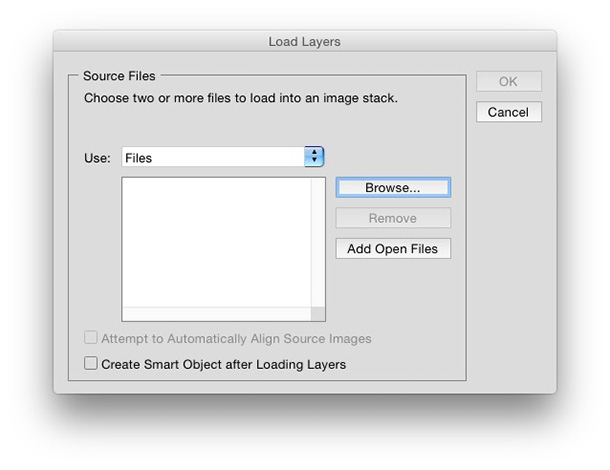
STEP TWO:
Now, go under the File menu, under Scripts and choose “Load Files into Stack.” This will let you choose all 20 images, and it will automatically bring them into your document, each on its own separate layer. When you choose “Load Files into Stack” it asks you which files you want to load; choose that folder of 20 or so images; select all 20 photos inside it, and click OK.
STEP THREE:
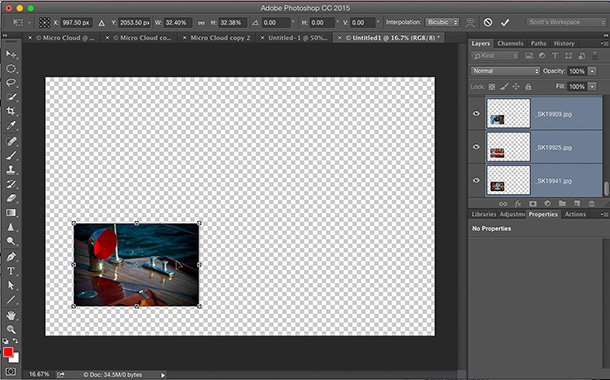
Now all your images will appear as layers in your document, but chances are they’ll be pretty large (in my case, they filled the entire screen). So, to get them much smaller in size (and to have them all the same small size), go to Layers panel; hold the Command-key (PC: Ctrl-key) and select all the layers. Now press Command-T (PC: Ctrl-T) to bring up the Free Transform control handles. Hold the Shift key (so it scales down in size proportionally); then grab a corner and drag inward to scale all 20 layers down at the same time, as if they were one unit (and as seen here). When it’s down to a similar size to what you see above, press the Return key (PC: Enter key) to lock in your transformation.
STEP FOUR:
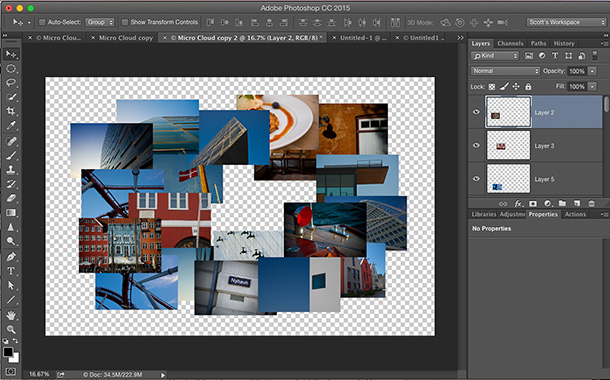
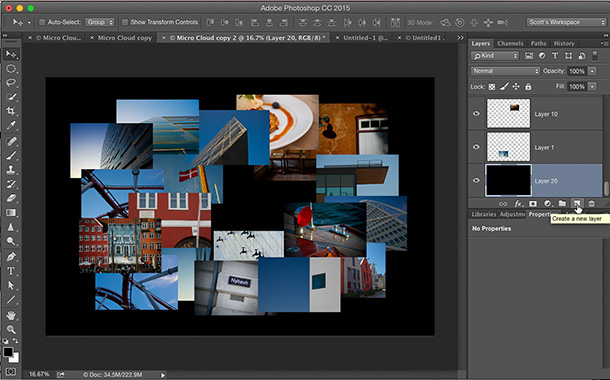
Now we’re going to arrange our 20 layers into kind of an oval shape (like you see above). You do this by getting the Move tool (press the letter “v”) holding the Command-key (PC: Ctrl-key), and then clicking on the image you see on screen. By holding the Command-key like this, it automatically selects that layer. Now just drag it into position around your imaginary oval. Then do the same thing to the next image down in the bottom left corner. It selects that layer, and then drag it into position. It’ll only take you about minute to do all 20 layers using this “point and click on the image to make its layer active” technique. When you’re done, it should pretty much look like what you see above.
STEP FIVE:
In the Layers panel, scroll down to the bottom layer in your layer stack and click on the bottom layer to select it. Now hold the Command-key (PC: Ctrl-key), and click on the New Layer icon at the bottom of the Layers panel (as shown here), and it creates a new blank layer directly beneath your current layer (that’s what holding the Command-key does â” otherwise it would have created a new layer above your current layer). Now press the letter “d” on your keyboard to set your Foreground color to black. Now, to fill this new layer with black, press Option-Delete (PC: Alt-Backspace), so your image should look like it does here, with a black layer on the bottom, and all 20 image layers above. OK, it’s taken a few steps to get there, but this is easy stuff, right? Right!
STEP SIX:
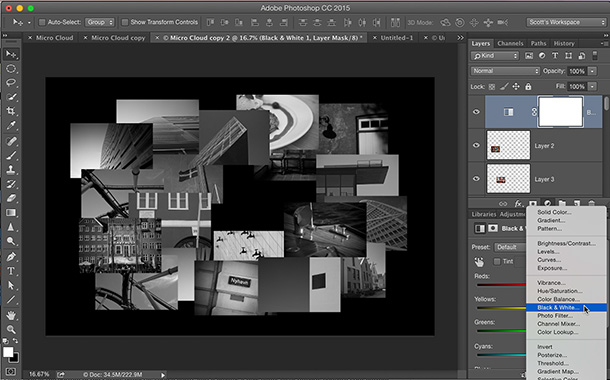
We’re going to make all that 20 layers black and white, all at once. First, in the Layers panel scroll to the top of the Layers stack and click on the top layer. Then go to the Adjustment Layer menu at the bottom of the Layers panel (it’s the fourth icon from the left â” it’s icon looks like half white/half gray circle), and choose Black & White. When you do this, it adds a Black & White Adjustment layer on top, and all the layers below it instantly turn black and white (as seen here).
STEP SEVEN:
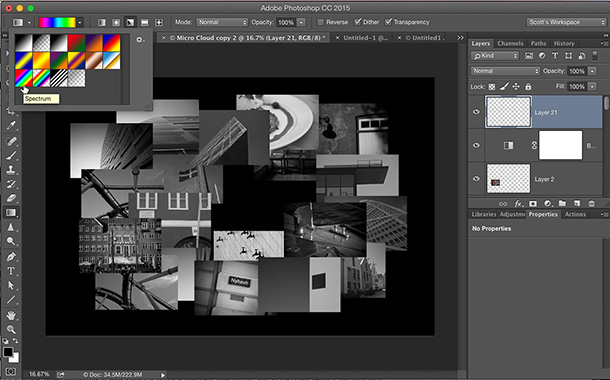
Finally, we get to the fun stuff! Add a new blank layer at the top of the Layers stack (as seen above), and then switch to the Gradient Tool. When you have the Gradient tool, go up to the Options bar across the top and click on the tiny down-facing arrow to the right of the current gradient preview (near the top left of the bar). This brings up the Gradient Picker (seen here). Click on the Gradient that looks like a rainbow with red on either end (it’s called “Spectrum” as seen above).
STEP EIGHT:
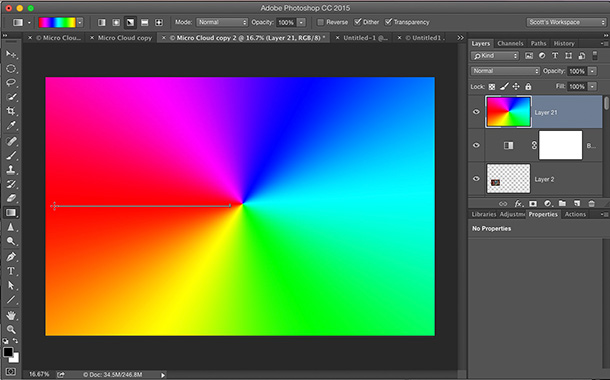
Up in the Options Bar there are five gradient types. Click on the center one of the five (it’s called the “Angle Gradient); then click it in the center of your oval circle of photos and drag over to the left of your screen (as seen here) to add a spectrum gradient to your layer.
STEP NINE:
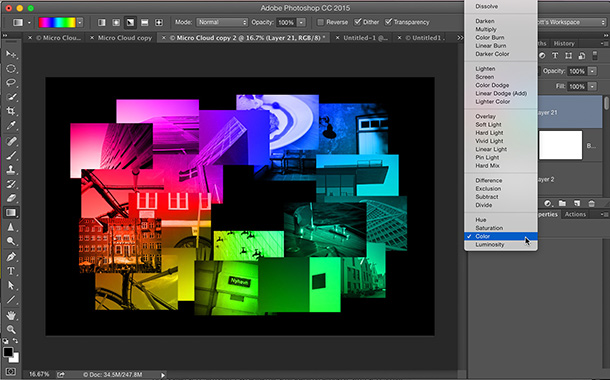
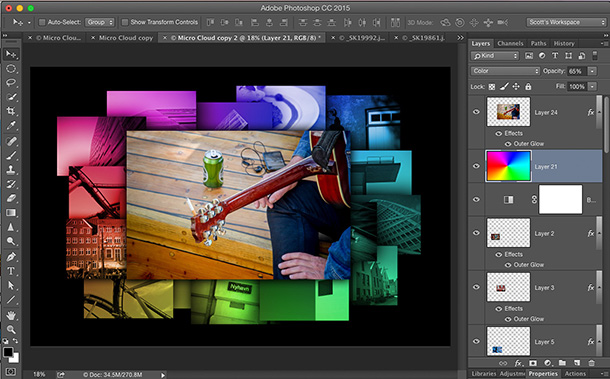
Now, at the top left of the Layers panel, change the Layer Blend mode from “Normal” to “Color” (as seen above), and now the color spectrum appears over your black & white images, but not the solid fill. That’s what I love about color mode â” you get all the color, but none of the fill. See you learned something handy to know right there.
STEP 10:
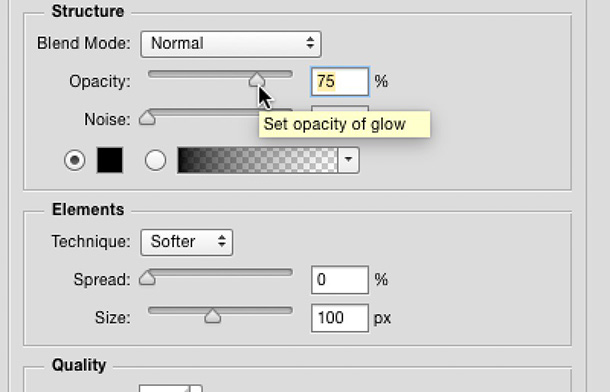
We’re getting close but something’s still something missing â” the shadows around each photo. This is quick and easy. Go to the fx menu at the bottom of the Layers panel (it’s the 2nd icon from the left), and from the list of Layers styles that appears, choose Outer Glow. When the Outer Glow window appears (a close-up is shown above), just change these settings: (1) Change the Blend mode to Normal. Set the Opacity of the glow to 75%. Click on the color swatch and choose Black as your glow color. Lastly, increase the size to around 100 pixels, and you’re done.
Above: see those building on the left. I applied the black outer glow to that photo. It looks like a drop shadow, but it’s on all sides, instead of just down and to the right like a standard drop shadow.
STEP 11:
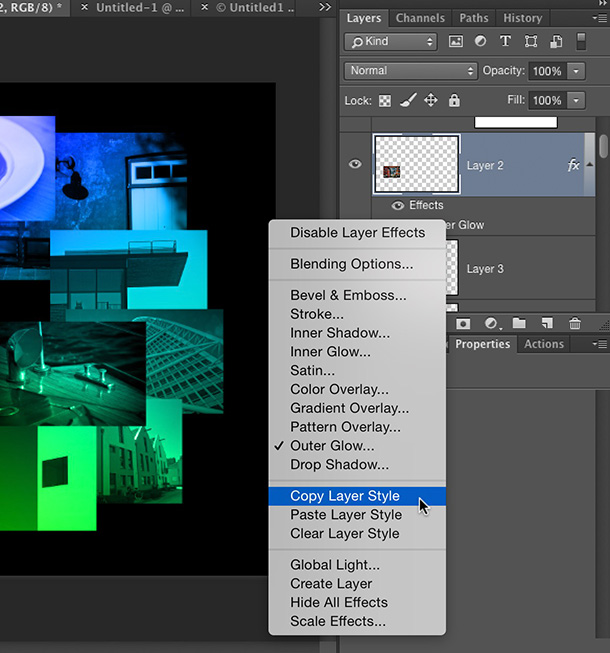
Now we’re going to copy that Outer Glow Layer Style from that layer, with those exact settings, and paste it onto all the other layers at once. Here’s how: start by right-clicking directly on the words “Outer Glow” that now appear just below your layers name, and the pop-up menu you see above appears. Choose Copy Layer Style (as shown here). Next, in the Layers panel; hold the Command-key (PC: Ctrl-key) and click on all the other layers to select them. Now right-click on any layer and from the pop-up menu that appears, choose “Paste Layer Style” to paste that Outer Glow effect to all 19 of your selected layers, all at once.
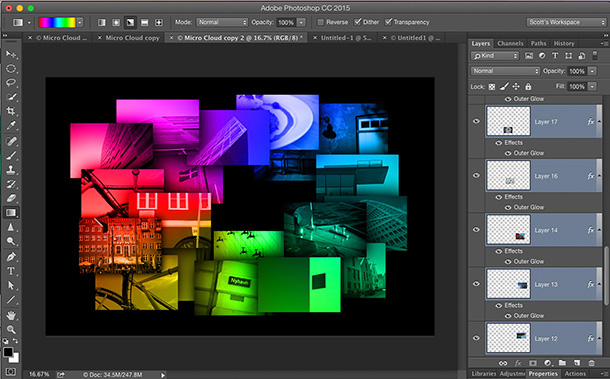
Above: Here’s what it should look like once you paste that Outer Glow Layer Style to all the other layers. OK, now we’re really close!
STEP 12:
The final step is to open the image you want as your image image in the center (in this case, it’s a guitarist with a cigarette tucked into the headstock of his guitar), and copy and paste it into your document, and use Free Transform to size it down (as seen here). You’ll also want to copy and paste that Outer Glow Layer Style onto this layer, too (a shortcut is to hold the Option key on Mac / the Alt key on PC, and over in the Layers panel click on any one of the Outer Glow Layer Styles you’ve added and literally drag and drop a copy onto your new layer (holding the Option/Alt key like that makes a copy of what you drag). Lastly, to finish off this image, I went to the color gradient layer and lowered the opacity to 65% so the colors weren’t so vibrant.
OK, that’ it â” you did it. You made it. It took a few minutes, but it was all super easy, right? And, you hopefully picked up some cool techniques along the way (if you already knew all the techniques, that’s OK too â” you just learned a new special effect. One cool enough that Microsoft paid somebody do it over and over again in a whole series of ads).
Corey does this type of stuff all the time!
If you’re a KelbyOne member, you probably already know there’s a “Photoshop Down & Dirty Tricks” column in each issue of Photoshop User magazine (the KelbyOne members’s print and/or digital magazine created just for members), and our own Corey Barker is always coming up with really cool stuff in that column, so make sure you check it out when you get your next issue.
I’m off to Photoshop World Vegas!
I’ve got a fashion shoot on a dry lake bed on Sunday in the 115-degree desert heat (it’s part of a class I’m doing on using the Elinchrom ELB 400 Pro Head Kit battery pack strobe kit on location), and then it’s PSW time! Hope to meet a whole bunch of you there!
Have a great weekend everybody!
Best,
-Scott
P.S. If you’re going to Photoshop World Vegas, remember Canon is still running that special where if you buy a Canon DSLR (like a 7D Mark II, or a 5D Mark III, or a 6D), you get a year of the Adobe Creative Cloud Photographers Bundle (Lightroom cc and Photoshop CC), and a year of a bunch of our training on how to learn it all. Canon will be at the Expo, so stop by their booth, or go to this link with more details. See you there!




Like you said long but cool!
See you in Vegas, Scott! Don’t forget to bring the sunscreen for your desert shoot. :-)
–John
Cool stuff, Scott!
Great timing. I’m off to a river cruise on the Danube tomorrow (based on your very positive comments about the one you did last year). I’m thinking I’ll use this technique to make my cover image for both my book (I took your recommendation to make one after every trip) and my exposure website (again, your recommendation).
No, I’m not stalking you. But if you see a shadow behind you it might be me. I really wanted to go to PSW again this year, but the move to August caught me off guard — I had already paid for the cruise and its airfare.
this time of year – make sure you have some cheap rain covers – it can happen…
Cool tutorial! I used my Photoshop World photos from the Atlanta conference 2014. :) I hop on the plane Sunday for Vegas! See you there!! :)
I did the tutorial and liked the results but would have liked to sent photos directly from LR. I know you can send photos as layers to PS but wasn’t sure about the size that was used in the first step.
I thought I would try out the tutorial. Worked great. BTW: your favorite football pics you posted…..they are AWESOME. Totally jealous!