


Hey there! Matt Kloskowski here today with an unofficial guest post. See, a while back, Scott wrote an article here on his blog called If I had $1000 to Spend on Improving My Portrait Photography, I'd Get⦠Well, I was talking to him later that day and he asked if I had read the blog post. I said "Heck yeah, and I wish I had thought of it first" :-) So he said I should write one for landscape photography as a guest post here.
First, as Scott mentioned in his original post, this is a question we get a lot. It may not be exactly $1000, but it usually around there. It may be $1200, or $800 but it's in the ballpark. Also, I’m going to assume you have a camera body and lenses already (we’ll talk more about lenses at the end though). Either one of those will immediately eat up our $1000, and then some. Finally, I really tried to give some thought to the title of this post that Scott started. The key word I noticed was “Improve”. So I tried not to just go through my camera bag and list every piece of gear. Rather, I tried to really add things that I think can actually improve your photography. Ready? Here goes:
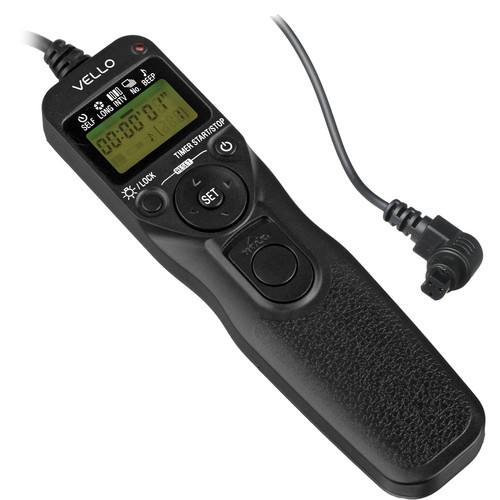
Remote/Cable Release – Vello Shutterboss ($50)
First, if you don't already own one, you need a cable release or some kind of remote way of triggering your camera. As with many areas of photography, sharpness is critical for landscapes. You'll see it on screen and you'll definitely notice it in print the larger you go. So you have to make sure you're not touching your camera and introducing any vibration or camera shake. I use the Vello Shutterboss remote for my Canon 5D Mark III. It's great for simply triggering your camera, but it'll grow with you if you ever get in to time-lapse or long exposure photography too since it has various timer modes.
They make them for other camera brands too and will run you about $50. They also make wireless ones, but personally I go with the wired version since I don't have to worry about losing the little pieces that come with the wireless one.
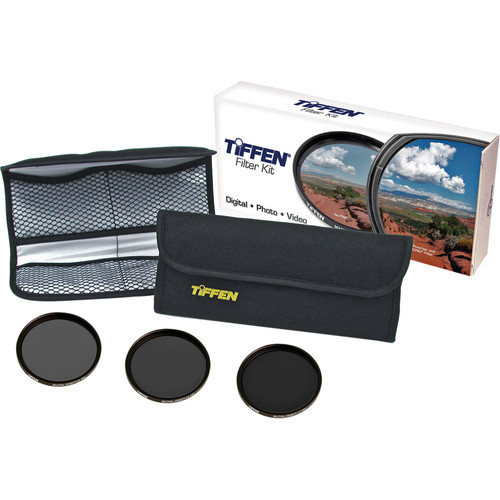
Neutral Density Filters – Tiffen ND Kit ($95)
Neutral density filters are a huge way to improve your landscape photography. They help smooth out water for that dramatic surreal effect and also add some motion in to an otherwise static looking scene. While there's a ton of filters out there, and I'd love to recommend you to my favorite Lee Big and Little Stopper filters, they'll eat up half of our $1000. So instead, I'll go with my first set of ND filters I ever owned and still use often today – the Tiffen 3-filter kit. It's got a 2, 3 and 4 stop filter in it. For most sunrise/sunset shooting as well as waterfalls, these will work fine at extending your shutter speeds enough to get that longer shutter speed that you'll need. Plus it even comes with a filter pouch to hold them so they don't get lost.
Oh yeah…Notice I didn't include a graduated neutral density filter. That's because I don't use â˜em. I wrote a little about why they're dead to me here on my personal blog, in case you want to read up on it. But feel free to save some cash and not buy any.
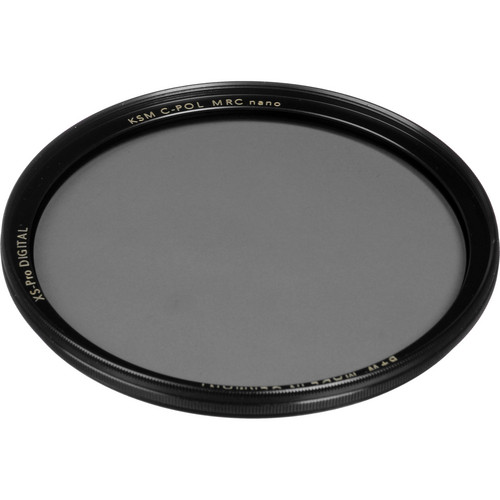
Polarizing Filter ($150)
A polarizing filter is a must-have for landscapes as well. In fact, I'd buy one of these before I bought any ND filters mentioned above. Most people think of using polarizers for the sky, to get a deeper darker blue. While I do use them for that sometimes, I mostly use my polarizer to help cut down on glare and pop the colors/contrast a little. Glare on mountains, trees, rocks, water, you name it. It really helps subdue haze and glare so you can appreciate the details in the photo.
The one I'm going to recommend is a bit pricey. It’s a B+W Circular Polarizer and it runs about $150. You'll definitely find cheaper ones out there, but I'm going to suggest you get a really good quality filter first – it’ll last you forever. I bought my B+W Polarizer nearly 10 years ago and I still have it today. Well worth the extra $50 from some of the more cheapy ones.
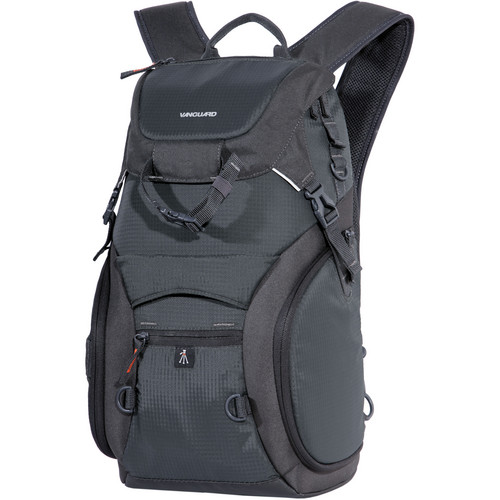
Backpack – Vanguard Adaptor 45 ($110)
It sounds kinda weird if I say a backpack will improve your landscape photography, but hear me out on this one. If all you have is a rolling bag, a shoulder bag or something similar, then it's going to be hard for you to climb around. Part of improving your landscape photography is getting in to the right place. And sometimes that means hiking, climbing and moving around a little. That's really hard to do with something hanging off your shoulder. You'll need both hands free sometimes and a backpack is the best way to go.
The one I use the most is the Vanguard Adaptor 45. It's a backpack but can also serve as a sling bag if you need to get at your gear quick without putting the bag down. It's not huge and really only holds a camera body and maybe 2 lenses. But I try to keep it light. Remember, you're a landscape photographer which means you have the luxury of needing very little gear. A camera body, lens or two, some filters, lens clothes, and maybe an extra battery and you're good to go. You don't need to be lugging around flashes, reflectors, etc⦠Travel light and keep your backpack small so it doesn't kill your back.
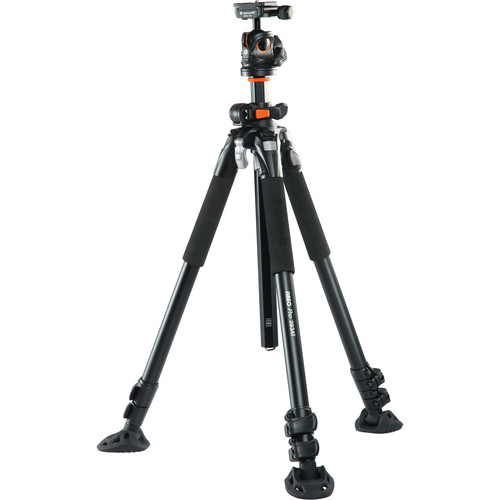
Tripod and Ballhead – Vanguard Abeo Pro 283 with Ballhead ($230)
This one is tricky. Remember, I'm writing this from the perspective of having about $1000 to spend. And if you've ever done any tripod research, you'll know that you could easily spend $1K on just the tripod (without the ballhead). So, while I personally use a Really Really Stuff TVC-33 most of the time, that'll break our budget right away. So, I'll go with another tripod I've used that I absolutely loved as well. It's the Vanguard Abeo Pro 283 with ballhead. Vanguard makes great products. They're sturdy, well made, and hold up well outdoors. Plus, this particular model even comes with the rubber feet with spikes to help dig in to the ground if you need it.
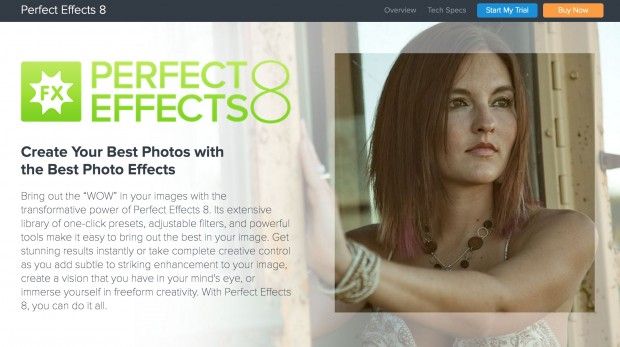
Post-Processing – onOne Software Perfect Effects ($100)
Just like I'm assuming you own a camera body already, on the post-processing side, I'm going to assume you already have Lightroom (preferably), or Photoshop. From there, the only other thing I use all the time on my landscape photos is onOne Software's Perfect Effects. Earlier I said sharpness is critical. Well I've not found anything as good as onOne's Dynamic Contrast (which is a preset effect in Perfect Effects). It helps take that sharpness, detail and contrast to a whole new level. It'll run you about $100 for just that plug-in, or a little more if you want to buy the whole suite.
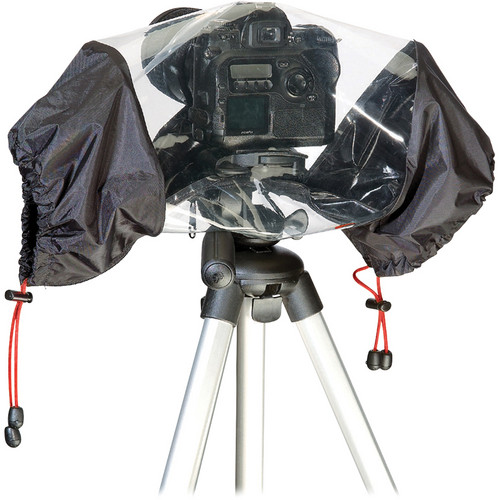
Rain Cover – Kata E-702 PL Pro ($65)
Some of the my favorite landscape photos were taken in crappy weather. Don't get me wrong. I love the gorgeous light we get during sunrise and sunset, but dramatic clouds and storms can really make your photos stand out from the rest. In order to stay out there shooting in that weather, you'll need to keep your camera and lens dry so make sure you pick up a rain cover. I use the Kata E-702. It keeps your camera and lens dry, while letting you see all of the controls on the back of the camera. Now, you'll find a ton of other options as well (and many that are way cheaper than this one). I’ve even used some of them, and they can be pretty good. But I keep going back to the Kata. The build quality and ease-of-use make it my favorite.
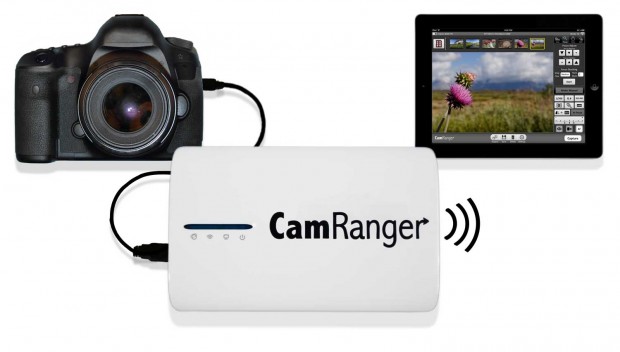
CamRanger Wireless Camera Control ($300)
Okay, at this point we’re right around $800. You could easily stop here and call it quits at $200 less than $1000. And honestly, it’s hard for me to think of anything else that will greatly improve your landscape photography. But I’m going to include one more piece of gear if you’re a little more advanced and really want some control over your photos out in the field. It’s called CamRanger. It’s a wireless camera control device that creates it’s own network. So even if you’re out in the middle of nowhere, with no wireless signals, you’ll still be able to use it. It works with iPad, iPhone, Android, etc…
Basically it’s an app that you install on your tablet. From there, you can see your photos and control your camera right from the app. It let’s you do things like wirelessly stream live view from the camera to the device. You can even zoom in and get really precise focus adjustments, as well as focus stacking. It’s also great if you get your camera in a difficult place where it’s hard to see through the viewfinder, because you’ll be able to see the image right on your device.
What’s really nice is that it displays full resolution images right on the device. So you can do things like check sharpness, highlights, shadows, etc… I’ve always found the image on the back of the camera’s LCD to be too small to really make any decisions from. The CamRanger helps you actually make decisions in the field, and walk away from the shoot knowing that you nailed it.
Training
Oh and you didn't think I'd let you go without recommending training did you? ;-) I've got two classes that I think could help out a lot. First, if you're just getting in to Landscape Photography then check out my Landscape Photography Basics class. And if you're in to long exposure photos that you'd take with those neutral density filters I mentioned above, then check out my Long Exposure Photography class. You can rent them for $6.99 each or subscribe for an entire month for $25.
What About Lenses?
You'll notice I left out lenses. Scott did indeed include a lens in his portrait photography post, but remember the spirit of the post is money I'd spend on improving my landscape photography. While I definitely agree with Scott that an 85mm f/1.8 lens can improve your portrait photography, I can almost guarantee you that you already have the lenses you need for landscapes. And that buying a new one won't "improve” your landscape photography.
But I won't leave you hangin' on this, because I know there’s a lot of lens questions out there. So here's a few thoughts if you do need to buy a lens.
1) Don't worry about prime lenses. If you're on a budget, don't get caught up in to thinking that prime lenses will change much in your landscapes. I've done side-by-side comparisons with a prime lens vs. a zoom lens and the difference is nearly impossible to see.
2) Don't worry about "fast" glass. Fast glass is generally known as lenses that can shoot at very wide apertures. f/2.8 is known as "fast" glass. But you'll see lenses go down to f/1.8 and even as low as f/1.2. As landscape photographer, you'll barely ever shoot with apertures that wide, because you'll want to capture everything sharp from foreground to background. So you'll more likely be at f/11, f/16 or even higher. So, while I may not recommend a lens with a widest aperture of f/5.6 for portraits, I’d totally recommend one for landscapes.
3) If I had to list the 3 lenses I use for landscapes, here goes:
– My most used landscape lens is a 24-70mm. Canon, Nikon, Tamron⦠they all make good ones.
– My second most used lens is the Canon 16-35mm. Nikon also makes one. Actually, if you shoot Nikon you can definitely save some money and buy the smaller and lighter 18-35mm.
– My third lens is the 70-200. It definitely doesn't get used as much as the others, but it's nice when you want to get in tight to some details further away. And if you do shoot portraits, it’s my #1 go-to portrait photography lens too.
What To Spend Your Money On If There’s Something Left Over…
If you decide to skip on anything above, and you absolutely feel like you have cash burning a hole in your pocket, then the last thing I’d spend my money on to improve my landscape photography is a plane ticket or gas in my car to get myself someplace cool. At the end of the day, location is the most important aspect of landscape photography (and lots of luck with the weather). Get yourself someplace great, and making great photos becomes that much easier :-)
Thanks for stopping by today and I hope you found this list useful. Also, I’d love to hear any ideas you have so feel free to leave a comment below.
Hi Matt,
Thanks so much for writing a sane post about gear. It is so easy to get caught up in the moola hoopla and feel the need to spend outrageous amounts of dough better spent getting you to cool places with amazing vistas!
This is a useful post, one that I will be sharing with students and others looking for advice on shooting landscapes. And your friendly personality shines through, making it always a joy to read your posts.
Grateful Annie
http://www.f8fotog.com
Thanks Anne! :)
Great article Matt. One comment for your readers, before pulling the trigger on CamRanger, have them also check out HyperDrive’s iUSBportCamera product. I compared the two before my purchase and found the iUSBport product a better fit for me. Here’s a link:
http://www.hypershop.com/HyperDrive/iUSBportCAMERA/IUSB-CAM.html
Can purchase from Amazon: http://ow.ly/xz3oC
I run it from my iPad to see my shots on the larger screen and remotely control my camera settings. It’s my favorite tool in the bag!
Hey Thomas – I researched that one as well. I liked the CamRanger more though.
Thanks :)
Ooo! What made you go with Cam Ranger, Matt? These seem to have similar features!
Honestly, the people at CamRanger are out there at every show and expo. I met them, had them explain everything to me, and because I could tie their product to the actual people that own the company, I felt more comfortable with them.
I haven’t looked at the CamRanger capabilities recently, but when I evaluated both solutions there were a few things that stood out with the iUSBportCAMERA product.
1. iUSB was about $100 less expensive.
2. iUSB can join an existing wireless network to considerably expand the range and give you internet access on your iPad or mobile device while shooting.
3. iUSB can connect to more than once mobile device at time. I don’t use this for real estate shoots but do in other situations… let the client view the shots on an iPad or Android in proofing mode while I control the camera with my iPad.
4. I can continue to shoot while iUSB downloads the images.
Again, I haven’t evaluated CamRanger for over a year, so they may have added functionality. And I suspect CamRanger has some cool stuff that iUSBportCAMERA doesn’t have. My point is, evaluate both products before you decide and pick the one that best meets your shooting needs.
Really handy tips for smart buys. Keep this series of blog posts up.
Great tips Matt. As a KelbyOne member I have watched both your classes you mention a couple times and they Rock! I do think its easy to get caught up in that you need to spend millions to take great photos. I think a good eye is probably what is really needed. I still love shooting film now and then with my old AT1 Canon! Now that Camera teaches you “manual”!
Hey Matt, Great tips, but have you also made the switch from Nikon to Canon? I know Scott has, but I thought you were a Nikon shooter.
Just looked into CamRanger… it can be used as an intervalometer?! Wow!!! Have you tried this feature? I’ve been wanting to do a time lapse of the Milky Way this summer and have been planning on picking up an intervalometer (already have a simple single-button cable release, but that’s all it does, release the trigger once), but if I can save a little more and get something that will let me preview more clearly how my exposures will look before I set the intervals to run all in the same device… wow!
Do you ever use a hood if you’re out shooting in super bright daylight? I often have to shoot during the brightest parts of the day at work and am really tired of having to find shade, or pulling a jacket over my head to review my shots/video. Can you recommend any particular models/brands? I have a Canon 7D. Thanks!
Matt, why didn’t you mention the Hoodman HoodLoupe?
I don’t use ’em :)
So did everyone over there switch to canon? Great post!
Thanks Matt, That was really good. However you spend 30% of the budget on a wireless CamRanger. Today many cameras can be controlled by a tablet via WiFi for free. (I have a Sony A7). I would spent the 300 dollars on working shoes :).
Not a problem Frank, the Camranger is not available for Sony cameras. I have a Sony A77 and have looked at the Camranger, but Sony won’t release an API to developers for any third party hardware or software.
Of course we do have the focus peaking that Canon and Nikon doesn’t.
I love focus peaking!
That feature is something like blinking blown highlights, except it shows the plane / items in focus ?
Yep. Very cool!
I see CC is going to have a new feature that will allow you to select pixels that are in focus and do masks from them (or the inverse etc.) That is very useful…
Hey Frank. While many cameras can be controlled by WiFi, MANY more cannot. Also, I included that part last and actually said, you could easily stop at $800 without it. That said, I love that feature on the Sony. It’s awesome! :)
Would you say the wireless features in today’s cameras are as good as having a CamRanger? I’ve been thinking about one for a while and your write-up has me thinking again.
I think Matt is sad so may are talking of the CamRanger since he found it the less important.
My first point was just that with the WiFi you have it for free and could use your money on something else.
Personally I prefer to ad my setting on the camera, so I only have to pull the trigger on my tablet. Second point is that you get a bigger screen to watch at. For landscape everything work. Normally you are not in a rush. – But it all depends.
On the Sony you can adjust all important features except, white balance and zoom.
Take a look at TriggerTrap. Much cheaper and more creative (and usable on more than just Nikon/Canon).
Matt, thanks for the great advice. One item that I recently got that has really helped me out is a Hoodman Loupe. It will block out all the light on your live view and really help get a sharpe focus. I think you could even use it with the Camranger and a tablet.
The other peice of gear that I would recommend is a RRS ball head. I know that would eat up half the $1,000 budget, but once you have one you will wonder why you didn’t get one sooner. I was blown away with how superior it was to my old head.
One last thing that I would add is environment appropriate clothing. Last year my wife and I spent a large part of the this budget on electric heated jackets, gloves, and socks. We spend cold winter nights outside shooting Northern lights in Alaska and being warm is the difference between staying out longer and getting a great shot and going home early.
Hey Jeff. Thanks!
I personally don’t care for the Loupes. I have one. I’ve used it. And I just don’t find it useful for me personally.
As for the ballhead. I couldn’t agree more and I debated and listing it. However, while I absolutely love the RSS ballhead, and when I finally bought one I couldn’t believe I waited that long – it was more about smoothness and many intangible qualities. I don’t feel it actually improved my photography though. And since it’s nearly double the cost of the tripod/ballhead combo I listed, I couldn’t see recommending it.
Finally, on the clothing. You’re absolutely right. Having the right clothing will improve your photography because you won’t be sitting there thinking about how cold you are. That woulda been a good one to include in the post. Maybe next time :-)
Thanks again!
I think one of the reason I like my loupe is the way I can position the LCD on my Sony A77, I haven’t seen any other camera that has the same range of motion my does.
The reason I think the RRS ball head improved my photography is that it just works. I get to a location, compose my shot, set up the tripod put the camera on it, frame the shot and lock it down and it doesn’t move. With my old head I would lock it down and the camera would sink a quarter of an inch. I would lessen up the head raise the camera to where it would drop sink down into the frame I wanted and it would stay. Extreme frustration… I could never get a good long shot with an ND filter because the camera would move. I know that my BH-55 would blow half the budget here ( more with the pano kit) but it is one of the best pieces of gear I have ever bought.
I love my shutter boss and i have the wireless. The plus to wired? 2AA batteries and you’re good to go. The downside? It can flop in the wind during a longer exposure unless you anchor it.
The downside to the wireless? You also have to get that annoying little CR2 3V battery that’s not cheap or easy to find. It also really needs a loophole to attach a lanyard too so you don’t lose the remote. But I overcame that by simply putting a piece of female velcro on each of my tripods, and hard velcro on the bottom of the remote. I can start a long exposure or set of exposures and plant the remote right on the tripod without shaking it. But you also have the versatility of using it as a very very long range shutter remote!
I’m pretty new at photography but have been following you since day one of my interest. Can you tell me approximately how much any of the lenses you mention cost? I am in the market for a new lens since I am shooting with a Canon kit lens and feel the need to upgrade. Thanks!
Hey Paul. They range in price from $1000 to over $2000. Check your favorite camera store or B&H Photo to get the exact on each one.
Save $100 and get Perfect Effects 8 Premium for free while it lasts… http://www.ononesoftware.com/landing/CLIVE/?utm_campaign=PEPE_Partner&utm_medium=banner&utm_source=CLIVE
Awesome, just grabbed it. Many thanks :-)
Hey Matt, for a thousand bucks and the sandwich of your choice, would you spend a few hours landscape shooting with me? That’s what I’d do if I had an extra thousand. :-)
Peter, I’d do it for just the sandwich. And maybe a ride to the airport ;-)
Hope all is well!
Hi Matt, great article, i like the way you get it down and make it understandable.
Personally, the biggest revelation for me in Landscape was a wide angle lens. It was expensive even used, but inspired so many shots. I use it either hand-held or with a small table tripod for long exposures.
The second revelation was a ND filter. I do have a variable ND2 to ND400. I found the ND variation just gives more options on the exposure without changing the setting.
The last aquisition is a light tripod, i found a used one for half the prize. It is for me very important, not to carry too much weight. If you carry too much, you’ll miss the really nice spots.
Thanks Peter. Tripods are one of the toughest purchases to make. You want a light one because it’s easier to hike around with. But once the wind picks up, it simply won’t hold the camera steady. I’ve had way too many blurry photos because my light tripod couldn’t hold up :-/
So I just have to resort to lugging around my heavier one :-)
It’s nice when landscape photogs buy those heavy tripods and then change their minds… I picked up a big sturdy one used for an incredible price because some guy put it on consignment at a camera shop and opted for a smaller/lighter model ^_^ It’s great for my personal work and I’d never have been able to afford it otherwise!
Peter, who makes your ND filter? I want to look into one but am unsure where to start.
Hi Katie,
i ordered a cheap one on amazon http://www.amazon.de/gp/product/B0013UMT5K/ref=oh_details_o07_s00_i00?ie=UTF8&psc=1
My personal experience is, that often the filter does not stop down enough. So i would probably go for a ND1000. Also the filter is difficult to adjust at the high end, som spots are darker than others.
Another issue is a slight vignetting when the lens is at 10mm, so you might want to look for a ‘flat’ model. But for the price of 10$ i am more than happy with it!
Generally, my strategy is to first buy a cheap model and try it out for some time to see the weaknesses. Then, when i understand it fully, i still can buy the ‘right’ thing if needed.
Maybe Matt has some advice on this? Would be much appreciated as the purchase of those accessories can be quite difficult.
Thanks Matt, those are great suggestions. I especially liked the Kata Rain Cover and plan to order one. For the CamRanger, I love using my iPad RAM X-GRIP III to mount the iPad to my tripod. I sent one to RC to use about a year ago. You can read more about them and iPhone clamps at http://www.tripodclamps.com/products/ram-b-121-un9u-am/
Thanks Marty – I’ll check it out.
Great article. I found it interesting.
First Question: I have been trying to get a 10-24/10-20 lens for a while. Any particular reason you didn’t list a lens that goes that wide?
Second, a comment. While it is not nearly as cool as Cam Ranger, My wife picked up the Shutterbug remote for my birthday. I used it during the meteor shower. I can set it all up on my Android phone or iPad, tell it to start shooting, and it will act like a remote. It can do timer, intervalometer, and even brackets. Kind of spiffy. It is also bluetooth, so I can get into a picture and use it as a wireless remote. :-) http://shutterbugremote.com/ It’s also pretty inexpensive.
The 10-24 and 10-20mm are not full-frame lenses if I recall. But I purposely don’t shoot that wide which is why 18mm is the widest lens I have. And I rarely shoot it at 18. I personally just don’t like how wide angle minimizes everything in the distance. If there’s a REALLY strong foreground, then I’ll pull it out. Otherwise, I’m going with my 24-70mm.
Oh what i’d give for $1000 to spend. Ebay was my friend, everything i needed for $700 (which included the camera and lenses).
If I wanted to spend an extra $1000 to get better landscapes I’d buy a plane ticket somewhere beautiful, I have all the gear crap :)
my exact thoughts, inspiration comes from seeing!
Agree 100%. The best way to improve your landscape photography for $1000 is to buy a plane ticket and get a hotel room for a few days near Yosemite, the Grand Canyon, Yellowstone, or one of dozens of other parks or other natural wonders near you that are all around the world, not buy more gear!
You don’t need to travel to see “better landscapes”. Learn to use the vision in the landscapes that surround you close to home. Too many people think you have to “go somewhere else” to see what’s “beautiful”.
Great list, Matt! Should have listed an airplane ticket to someplace cool to photograph!
I’m really glad I got a wide angle lens, especially for those cool cloud formations.
–John
Matt- good stuff in here. I wondered about the CamRanger- in daylight, how much help is viewing on iPad or phone? Also- that reminds me how much I love my Hoodman Loupe :)
I’d bet you that grand that if you tried the Manfrotto
410 MINI GEARED HEAD (3275) you’d give all your other tripod heads away.
One of the best investments I’ve made is on a pair of ‘filter wrenches’ – they’re cheap and flimsy, but when your $150 B+W filter is fused onto the end of your lens, I haven’t found anything else that works as well, and I’d say it’s the best $7 I’ve spent on photography –
http://www.amazon.com/gp/product/B003TOWNT0/ref=oh_details_o01_s00_i00?ie=UTF8&psc=1
Thanks for the great article.
Yup,,,,,
You can also use the flat, rubberized jar openers, which have packed and worked well for me
ah dude! This was great. I am totally looking into the filters and the rain cover. Great article as well. I think a lot of the products here are ones that not only would help the beginner but a good number are ones that even more experienced photographers might have overlooked.
Awesome post Matt! Some great tips and thanks for sharing… Now to get out and shoot me some landscapes. :)
Hi Matt, If you have a camranger, would there be a need for a remote shutter release?
Yes, because it’s probably not something you’d always use. If the weather wasn’t great, or you just had a quick setup, a cable release would probably be easier.
Have you considered the Trigger Trap instead of Cam Ranger? Much cheaper and some really cool ways of triggering the shutter.
I just came back from Oregon on a Jack Graham workshop and the only thing I would add to this list is a Hoodman loupe at $80. Borrowed one many times from a fellow photographer and wished I had one of my own.
Matt,
Great article, right on point for what we should be thinking about if we want to improve. Just a couple of thoughts to build along the lines that you’re thinking.
For a backpack, I recently chose a smallish Camelback pack for hiking around Capitol Reef for a week+. With just the three lenses (and so only 2 in the bag), this worked well, held what I needed, gave me easy access to the water I regularly wanted, and provided backpacker-level comfort. I put the tripod into the side “pockets” and secured it with straps on the bag and kept the camera and one lens on a Sun Sniper strap. This helped me get into some of the more remote areas with my gear, which definitely improved my output.
Second, on the lens front I recently switched from the 17-40 Canon to the Sigma 12-24 (about the same cost and both cheaper than the 16-35). For me, it has proven about as sharp (on a 5D iii) and there are times when the added width is really useful (especially once you undistort the image in LR). Not so much a factor in wide open areas, but in a canyon or such, sometimes there’s no substitute for a really wide angle lens – you just have to keep your feet out of the shot ;-)
Great suggestions Matt…you talked me into grabbing a Kata rain cover.
After giving it some thought, if I had a grand to spend on improving my landscape photography, I’d go for the Vari-N-Trio filter from Singh Ray. It’s an expensive filter ($540), but it affords the photographer individual control over both polarization and 4-8 f-stops of variable neutral density, in addition to subtle color enhancement. For long exposure enthusiasts (especially waterscapes), this filter is an extremely efficient solution to control lighting, glare, and subtly adding a touch of color depth to a scene. And, the build quality of all SR filters is second to none, in my two-cent opinion.
For the remaining roughly $400, I’d purchase a good quality portable point and shoot…and take that little sucker everywhere I go. I can’t think of how many times I’ve driven by potentially awesome landscapes, barns, meadows, that I’d love to shoot during the golden hours, but just seem to forget about. With a trusty pocket-sized point and shoot, pull over and take a few quick reconnaissance shots to not only remind you of these potential locations (you could build a file folder at home with the images organized for future reference), but to also do a little homework with the images and scout out what can make the scenes uniquely interesting when you head back there.
I still pack ND Grad filters, despite your arguments in your post.
Sometimes, bracketing works, and that is great, but sometimes, when stuff is moving in the foreground (you don’t know how just how many leaves on a tree can move until you have to fix them in photoshop) and sometimes the exposures are just too long to bracket.
Like when shooting a sunrise, say, 10 seconds exposure. By the time you get to your 20 or 40 seconds, the light and mood will have altered dramatically.
Sometimes, it feels just right of getting it straight in camera. Especially, when reshooting involves the purchas of an airplane ticket.
I would love to get a Gigapan for my Canon 70D. Granted, I should have some very good quality glass to go with that, but when I saw the Gigapan Epic Pro, I could only think about so many places I would love to deploy it at. I could create some absolutely beautiful gigapixel photos. Granted, it would be better to have a full frame camera, but the 70D is the best I could afford.
I still can’t get over how Canon bought out Kelby training…
Thanks for another great post Matt. I personally use the Tiffen Variable-ND in 77mm (the largest filter size for my lenses) & then have step up rings for my smaller lenses. Also, I personally like the Hoodman Loupe– it’s saved a few of my photo shoots. BTW, I just got back from the Oregon coast & found Thor’s Well (had to think about your recent trip out there). Took me 4 different trips (40 min each way for from where I was staying) to get the shot I wanted. But worth it!