


10 Years of Lightroom Help Desk Advice
On Feb 19th, 2017 Lightroom celebrated it’s 10th anniversary, which also happens to be the
day I celebrated 10 years of providing Lightroom Help Desk support. Huzzah! I’ve had the honor
and pleasure of helping a lot of people in that time, and I owe that all to Scott. Being invited
back for a second guest post here is a privilege, and I figured it was the perfect opportunity
to share back some of the most important (and hopefully useful) Help Desk advice I’ve given in
that time. Here are the top 10 things every Lightroom user should know*:
*Disclaimer, these tips are intended to be helpful, but don’t just do them without
understanding all of what is involved. If you have any questions feel free to reach out to me
directly before you act, and I can help you with your specific situation.
1. Set Your Default Catalog
The most important thing every Lightroom user needs to know is where your Lightroom catalog
is located on your system. Even if you think you know, it’s worth taking a moment to make sure
(you’d be surprised how many people find it is not where they expect). With Lightroom open,
go to Lightroom > Catalog Settings > General (Win: Edit > Catalog Settings >
General), and note the name of the catalog and the path to where it is located. Is it where you
expected? If so, great! If not, here’s how you can move it to a new location:
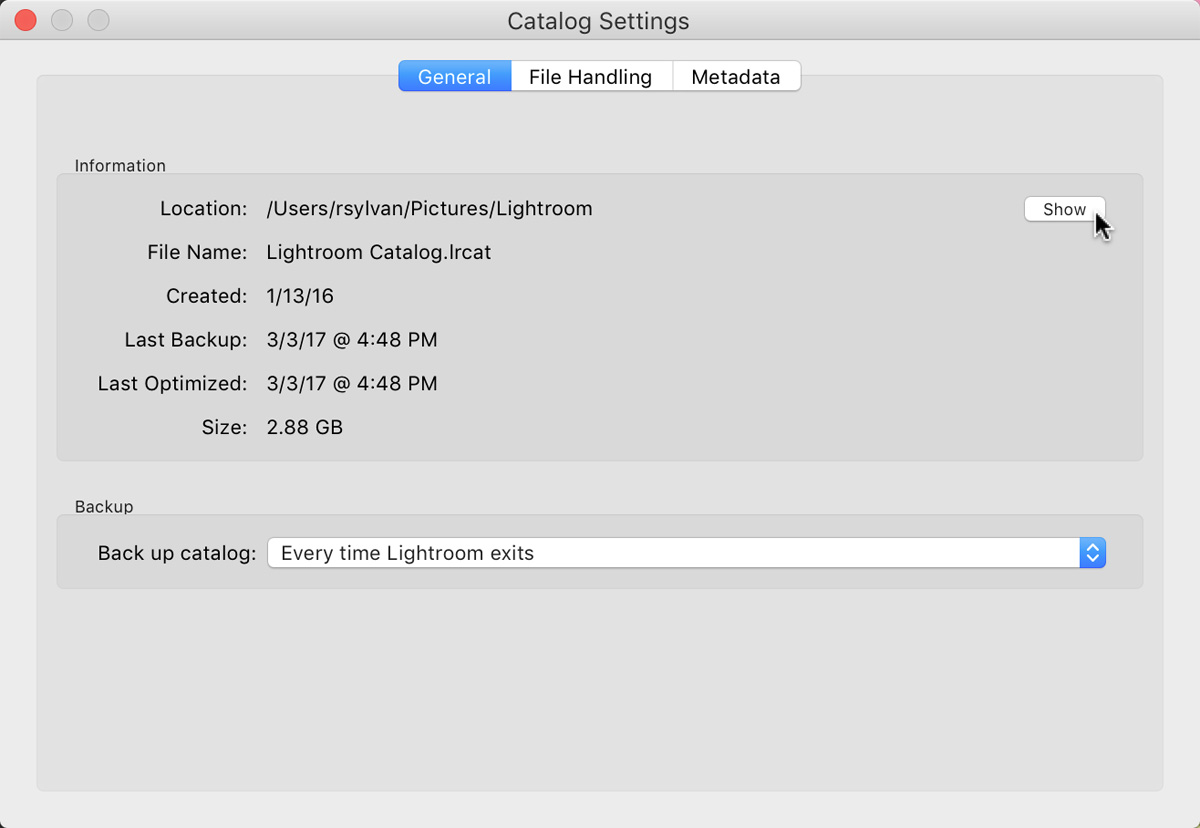
- Click the Show button on the General tab of the Catalog Settings to open the folder
containing your catalog in your file browser. - Quit Lightroom. If prompted to backup, click skip for now.
- Copy the folder containing the Lightroom catalog (.LRCAT) and its associated preview
caches to the location you want it to be stored (pick a locally connected internal or external
drive). - Once the copy operation is complete, double-click the catalog file to open it back
into Lightroom. This way you can make sure all is working fine, and the new location will be
included in the preferences.
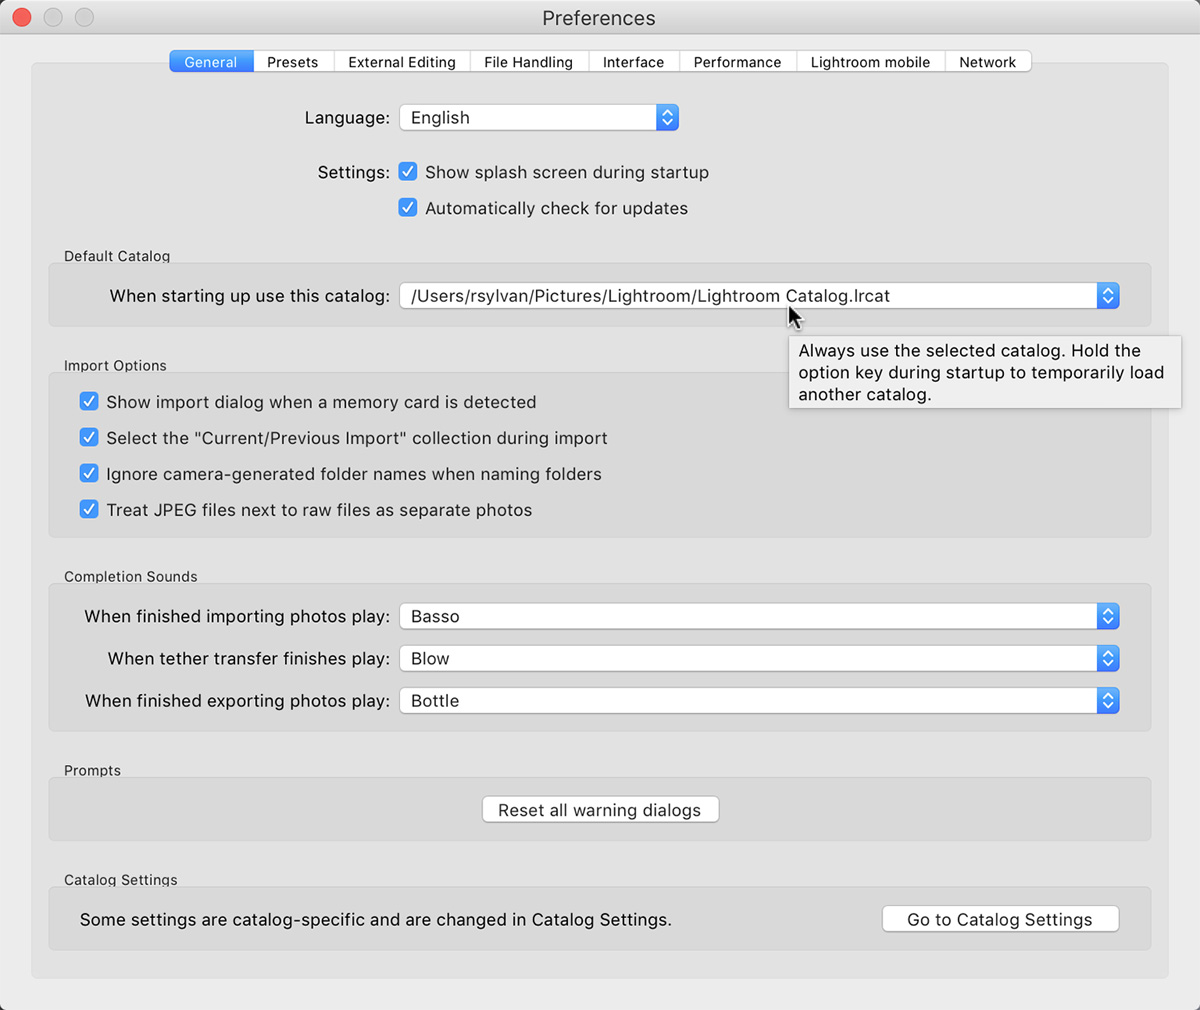
Now, whether you moved your catalog or not, this next step is important. I highly recommend
that you manually configure this catalog to be the Default catalog (in other words, don’t use
Load most recent catalog). To do this, go to Lightroom > Preferences > General (WIN: Edit
> Preferences > General), and set the When starting up use this catalog option to the
specific catalog you just opened.
Remember, if you moved your catalog to a new location, don’t forget to go back and remove
the original folder containing your old catalog. Having a good backup in place is good idea too
(which I’ll cover in a bit).
2. Know Where Your Photos are Located
It is equally important for all Lightroom users to know how to find exactly where a given folder
or photo resides on your drive from inside Lightroom. There are a few ways to identify where
your folders and photos exist on your drive. The easiest is the good old right-click contextual
menu. Go ahead and right-click any folder in the Folders panel and choose the Show in Finder
(WIN: Show in Explorer) menu. This will open your file browser right to that folder and show
you where it exists on your drive.

Similarly, you can right-click any photo and access that same Show in menu to take you right to
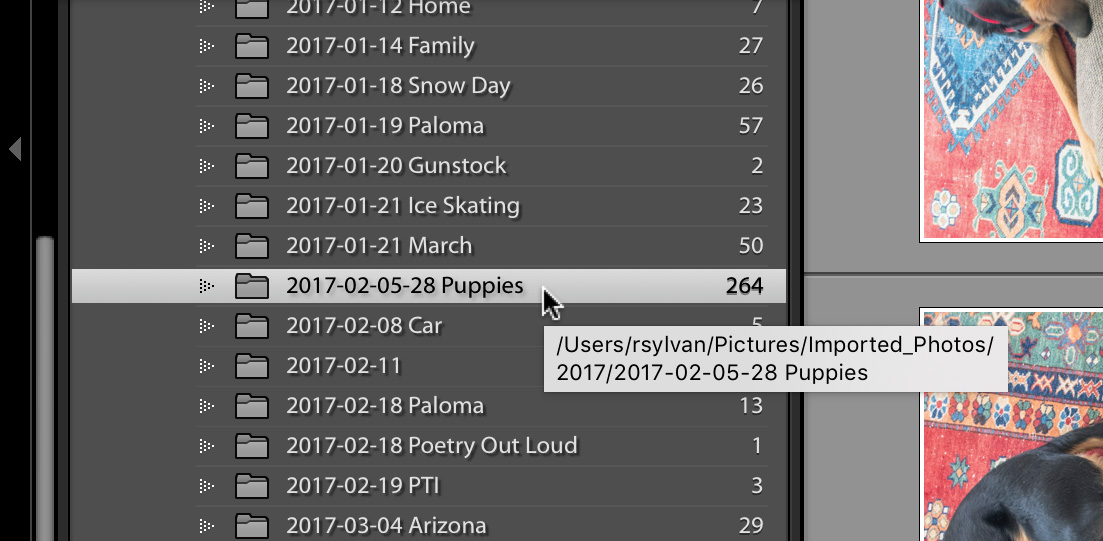
that photo in your file browser. You don’t have to go that far to find that information though. If
you just hover your cursor over a folder you should see its path revealed in a tooltip popup. So
take a moment to make sure you know exactly where all of your photos are located on your
drive.
If they’re not where you want them, then let’s look at how to move them.
3. Know How to Use Lightroom to Move Photos and Folders
Now that you know where your photos are located it is in your best interest to use Lightroom to
move them if you need to put them somewhere else (with one exception that I’ll cover in tip 5).
Moving photos between folders or moving entire folders is as easy as drag and drop. By using
Lightroom to do the moving it not only moves the photos to the new location, but it also keeps
the catalog up to date with where the photos can be found. You see, Lightroom stores the
complete path to each photo in the catalog, and if anything in that path changes outside of
Lightroom you end up with a situation where Lightroom tells you that your photos are offline or
missing (here’s a link to an article I wrote on how to reconnect missing
photos). This is easily avoided by doing the moving inside of Lightroom.
So to move a group of photos (or even just a single photo) from one folder to another try this:
- In the Folders panel, select the folder containing the photos you want to move.
- Press G to jump to Grid view.
- Select the photo(s) you want to move, and drag/drop them on the folder you want
them to be moved into. The destination folder will highlight in blue to signal it is the target of
the drop.
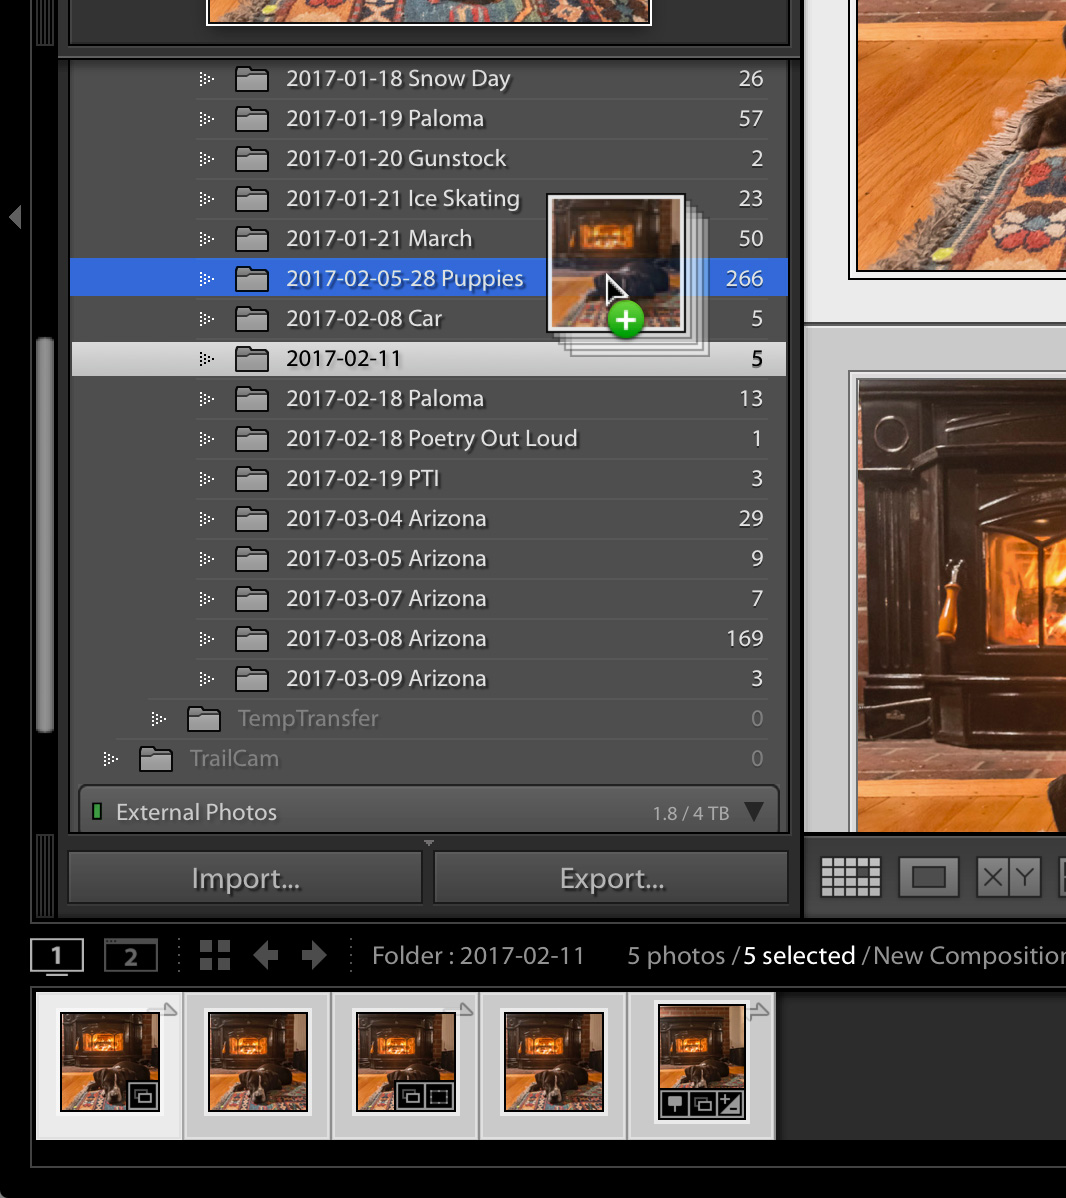
Lightroom will then do the moving, and update the catalog accordingly. You do need to have a
destination folder already showing in the Folders panel to complete the move, so let’s look at
how to add a folder next.
4. Keep All Photo Folders Within a Single Parent Folder
I have found it incredibly useful to always keep all my photo folders within a single parent
folder on each drive I use to store photos. The reason is that it makes my life so much simpler if
I ever need to move the entire photo library on that drive, or if I need to reconnect the catalog
to the photo library in the case of a primary drive failure/loss.
In typical Lightroom fashion there are a couple of ways to create new folders. To start, you can
go to the Library menu and choose New Folder, or click the plus sign at the top of the Folders
panel and choose Add Folder to launch the Choose or Create New Folder dialog. From here you
can either choose an existing folder you may have created in your file browser or you can
create a brand-new folder. For example, let’s say I want to add a new drive to my catalog and
want to select/create a folder on it:
- Connect drive.
- Go to Library > New Folder, to open the dialog for finding and creating a new
folder at the location of your choosing. - Create a new folder or select an existing folder. In my case, I had previously created
a folder on this drive in Finder.
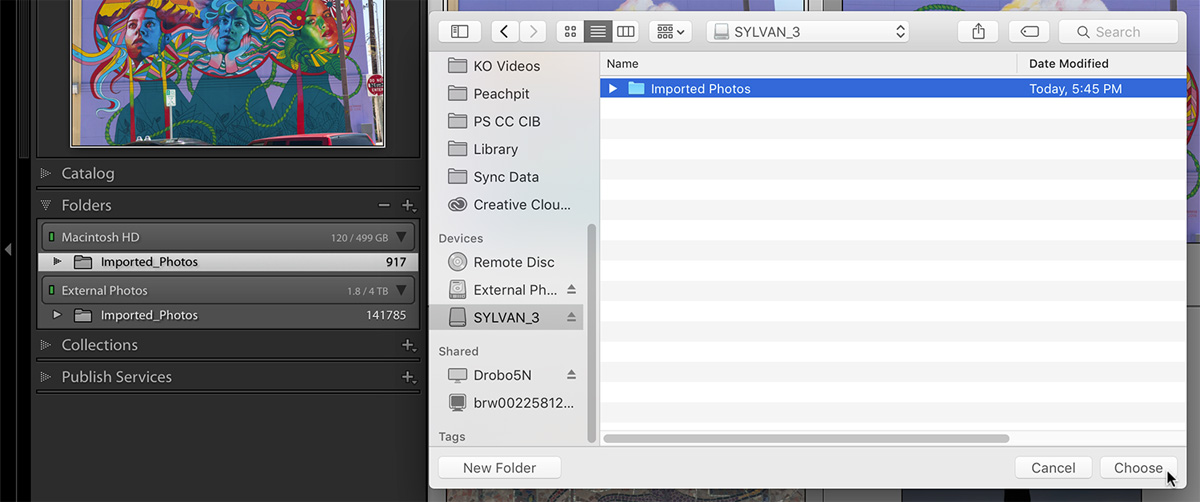
Note, my screen capture shows the dialog on a Mac, but on Windows you’d get a
Windows dialog. This is one of the few visual differences in Lightroom due to the operating
systems.
That drive and folder will now appear in my Folders panel. I can drag and drop photos or folders
into that folder from anywhere else in my catalog.

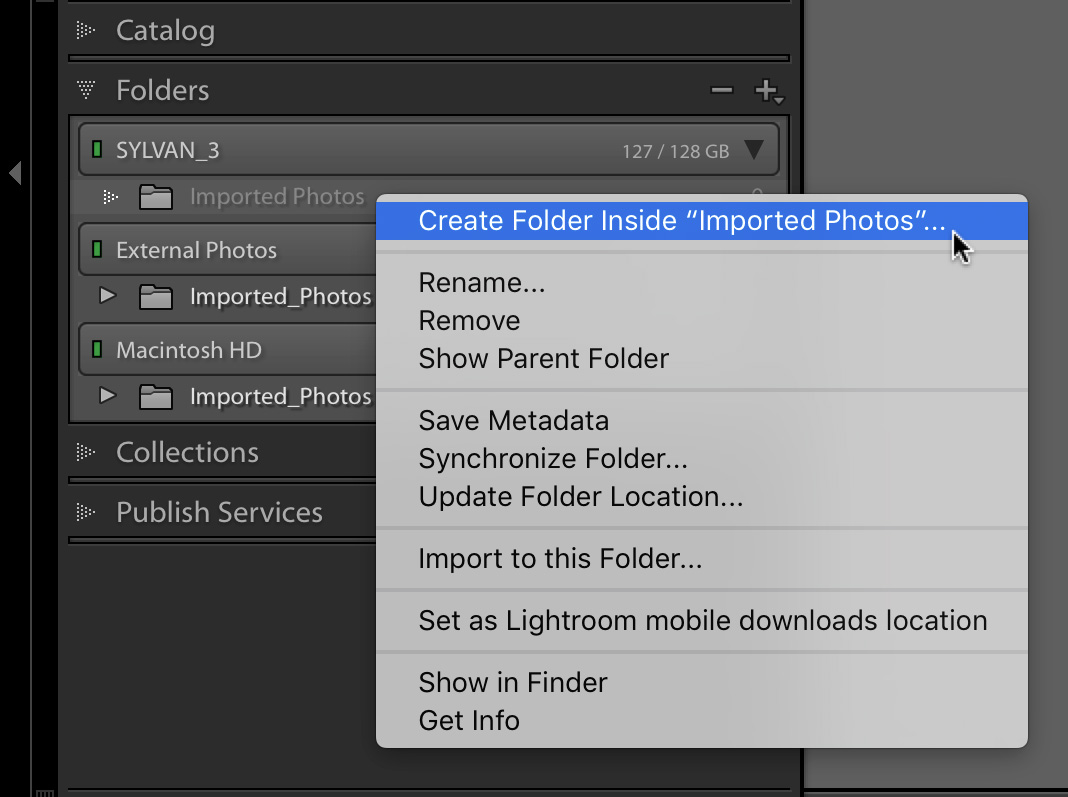
Another common scenario is the need to create sub-folders within existing folders to help with
your organizational needs. This process works in a similar fashion, but you start by selecting the
parent folder you want to create the subfolder within.
- Select the folder you want to create the subfolder within.
- Right-click to open the contextual menu and choose Create Folder Inside
“foldername.” This opens a smaller Create Folder dialog box where you can give the subfolder a
name and click Create to complete the process. The subfolder will then appear in the Folders
panel. These folders are ready for me to add photos, and even new folders as my organizational
needs demand.
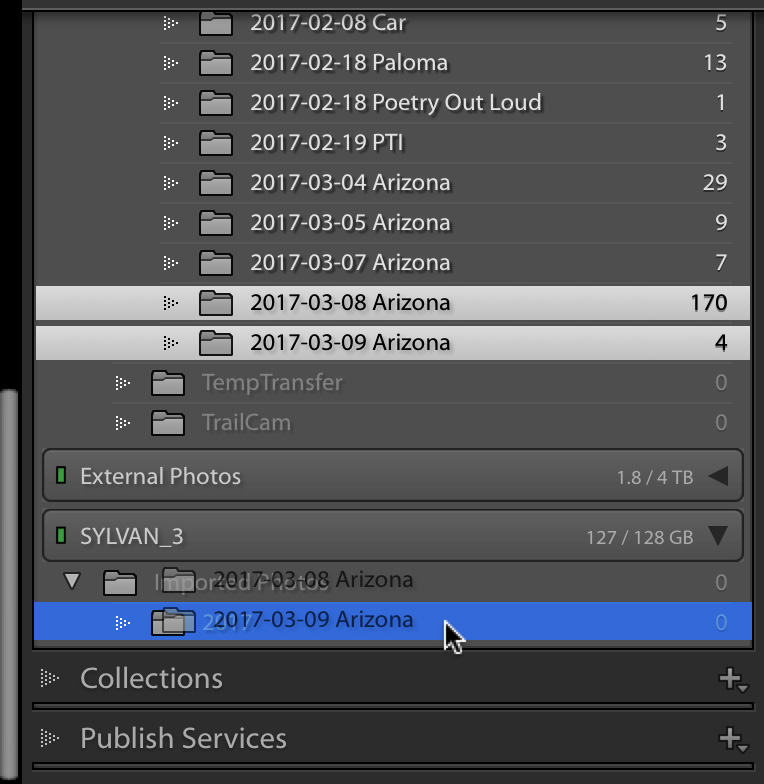
Now that I have a parent folder, and a subfolder within it, I can move folders from another
drive into this drive by dragging and dropping on my new folder.
5. Know How to Move Your Photo Library to a New Drive
This is useful if you are wanting to move your entire photo Library from an internal drive to an
external drive, or if you are running out of space on one drive and want to move to a new larger
drive. Now, you could use Lightroom to move the folders as I just did in the previous tip, but I
don’t recommend doing that when your entire library is at stake. Using a move command is
risky, because if anything goes wrong in the middle of the transfer you could lose data. I prefer
a technique that involves copying the folders to the new drive outside of Lightroom, updating
Lightroom to this change, and then later manually deleting the files from the original location.
Here’s how:
- Open Finder (WIN: Explorer).
- Copy the entire folder structure (as-is without changing the structure) to the other
drive. - Open Lightroom.
- Once the copy operation is complete, right-click/ctrl-click the top-most-level folder
in the Folders panel and choose Update Folder Location. - In the resulting dialog box, navigate to and select that same top-most-level folder in
the new drive (the one you just copied over there).
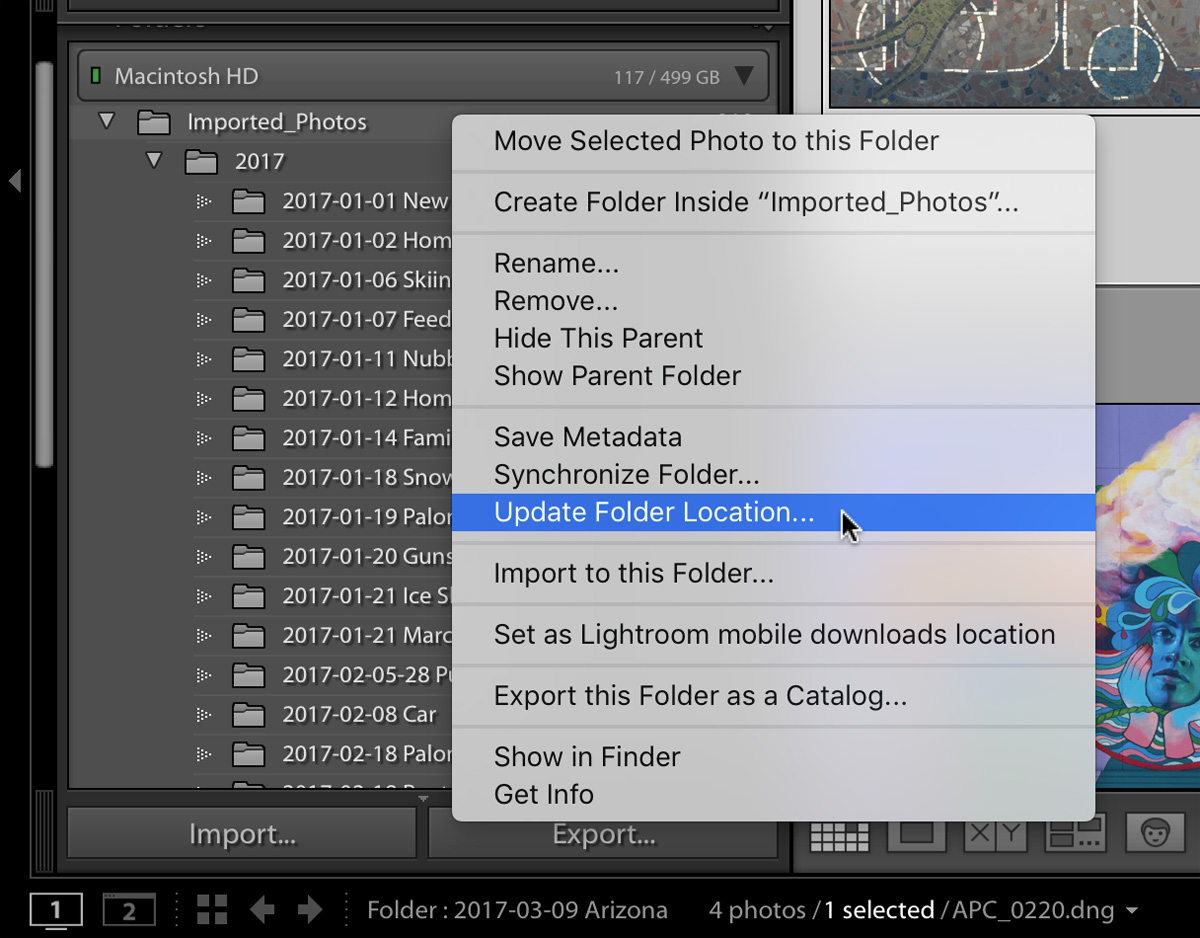
Lightroom will update the catalog to point to the folder in the new location (and everything
inside of that folder). If you have all your folders/photos in a single parent folder then you are
done, but if there are additional folders at the same level as that top folder you just need to
repeat steps 4 and 5 with those folders. Give it a test run to make sure everything is as it should
be before removing the originals. Again, having a good backup in place before you do this is
always a good idea.
6. Know How to Back Up Your Catalog
On the subject of backing up, there is a lot to say about backup strategies in general, but in the
context of Lightroom catalogs I simply want to address the built-in functionality Lightroom
provides. On the Catalog Settings dialog (see first tip) there is a place at the bottom where you
can configure Lightroom to create a duplicate copy of the catalog at some interval of time. This
is a set-it-and-forget-it type of feature, and its sole purpose is to create an exact duplicate of
your working catalog file in a location of your choosing (no photos are included in this backup).

I will assume you already have some sort of full system backup running that regularly backs up
all your important files, and so you may wonder if you really need this option running too.
Based on the experience of helping people with Lightroom problems over the years I feel that it
is in your best interests to take advantage of this built-in functionality. Sure, it may be
redundant, but it is free, it is easy, and it may just one day make you weep with gratitude. I set
mine to run every time I quit Lightroom, which make Lightroom throw up this prompt every
time I exit.
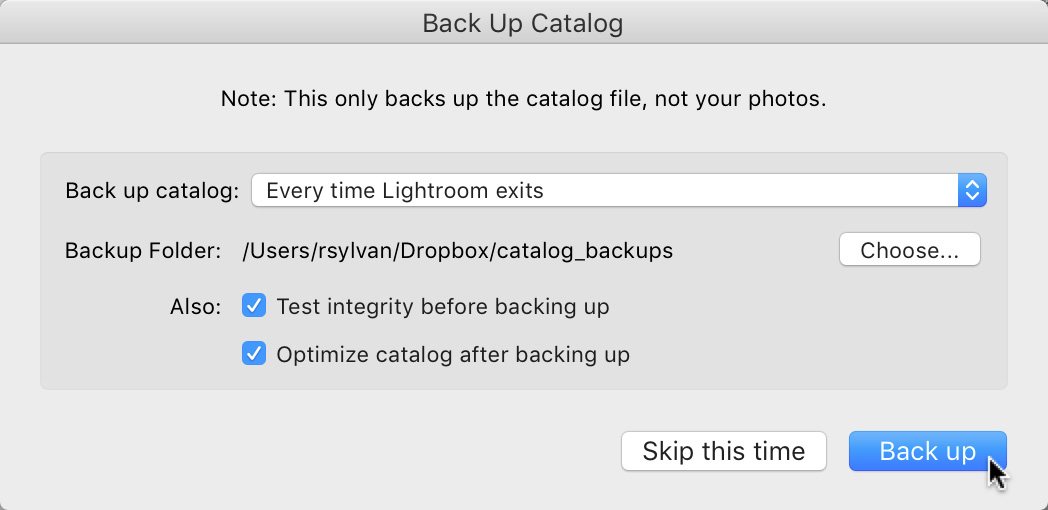
It is only in this prompt that I can choose where I want my backup copy to be saved by clicking
the Choose button and selecting a location. I recommend that you choose a different drive than
the drive where your working catalog is stored. In my case, my laptop has a single internal
drive, so I direct the backup to be saved to my Dropbox folder, which is automatically synced
with the cloud and my other computers. I also take this opportunity to check the boxes for
testing integrity and optimizing the catalog. Now, just because it prompts me each time doesn’t
mean I backup every time. There is a Skip button that I use when I’m in a hurry and just want to
quit.
I try to create a backup at least once a week or after I’ve done a whole lot of work. Each time
this function runs it saves a copy of your catalog to the folder you chose. Lightroom does not
overwrite existing backup copies. As a result you end up with a folder of iterative copies of your
catalog. This can be very handy for recovering from self-inflicted problems or from the rare case
of catalog file corruption.
7. Know How to Restore From Your Backup
Since a backup copy of the catalog is an exact duplicate of your working catalog at the time the
backup was created all you must do to restore from the backup is the following:
- Close Lightroom (if open).
- Open the Lightroom folder containing your working catalog file in Finder/Windows
Explorer. - Move the “bad” catalog file out of that folder to another location for
safekeeping. - Move the latest/greatest “good” backup catalog copy into the Lightroom folder to
replace the bad one. Starting with Lightroom 6/CC 2015 the backup copy is also compressed
into a zip file to reduce file size (and keep people from accidentally opening a backup copy), so
you may need to unzip the backup before you can move it into the Lightroom folder. - Once placed in the Lightroom folder, double-click the catalog file to open it into
Lightroom and take it for a test drive.
The backup copy of the catalog has the same name as your working catalog, so you should be
good to go. It will only contain all the work up until the moment you made that backup copy, so
backup frequently. If restoring from the backup solved your problem, don’t forget to delete the
“bad” catalog that you moved out earlier.
8. Manage those Backup Copies
The only downside to running the catalog backup function (aside from the time it takes to run)
is that Lightroom will keep putting new copies of the catalog into that folder until the drive is
full. The management of the backup folder falls on us. Since we only value the most recent
version(s) of the backup copies I periodically go into that folder and delete all but the most
recent 2 or 3. Note that Lightroom doesn’t backup the preview caches because those can
automatically be regenerated if lost. I’ve seen people regain hundreds of gigabytes of free
space after clearing out old backup copies.
9. Know How to Rename Your Catalog
I often hear from people who are using the most up to date version of Lightroom, but have a
catalog file named with an older version of Lightroom and it may also have some other
numbers in it, such as Lightroom 5 Catalog-2. They wonder if this is a problem, and they want to
know how to rename the catalog. First, it is not a problem at all. You can call your catalog file
anything you want to call it. Lightroom doesn’t care. However, if you want to rename it to
something that makes more sense to you, here’s how:
- With Lightroom closed, go to the folder where the catalog resides using your
operating system’s file browser; Finder on Mac, and Windows Explorer on WIN. - Using your file browser you can rename the catalog file, but keep the file extension
the same (.LRCAT). Then rename the Preview cache and Smart Preview cache (if applicable) the
same way, but retain the word Previews and Smart Previews in the name along with the
original file extension.
So, for example if your catalog and preview cache was named:
Lightroom 5 Catalog-2.lrcat
Lightroom 5 Catalog-2 Previews.lrdata
And you wanted to change it to “Lightroom Catalog,” you would end up with:
Lightroom Catalog.lrcat
Lightroom Catalog Previews.lrdata
Once renamed, double-click the catalog file to open it into Lightroom. Now you can give it a
quick test drive to make sure all is well, and this writes the new catalog name into the
Lightroom preference file. Be sure to update your Default catalog setting to point to this
renamed catalog (see Tip 1).
10. Create a Custom Camera Raw Default
OK, all those tips were focused on library management, so let’s end on a Develop tip that could
speed up your workflow. Lightroom has a set of default processing settings that are applied to
all raw photos after import. Did you know that you can customize those settings to start your
raw photos down the processing pipeline using your preferred choices? I’m not talking about a
preset selected on the Import screen, but rather the built-in default settings. Save your import
presets for something creative, and customize the baseline settings.
Let’s go through the steps to customize the default settings to include two of the most common
adjustments people ask me about, lens corrections and camera profiles, but feel free to add any
other settings you want to customize your process (or not include these if you’d rather not).
- Select a raw photo that has not been processed at all beyond the default settings
and press D to jump to Develop. Click the Reset button for good measure to ensure it has no
other settings applied because every adjustment (even set to 0) is included in the default
settings. - Expand the Lens Corrections panel, click the Profile tab if not active already, and
check Remove Chromatic Aberration and Enable Profile Corrections.
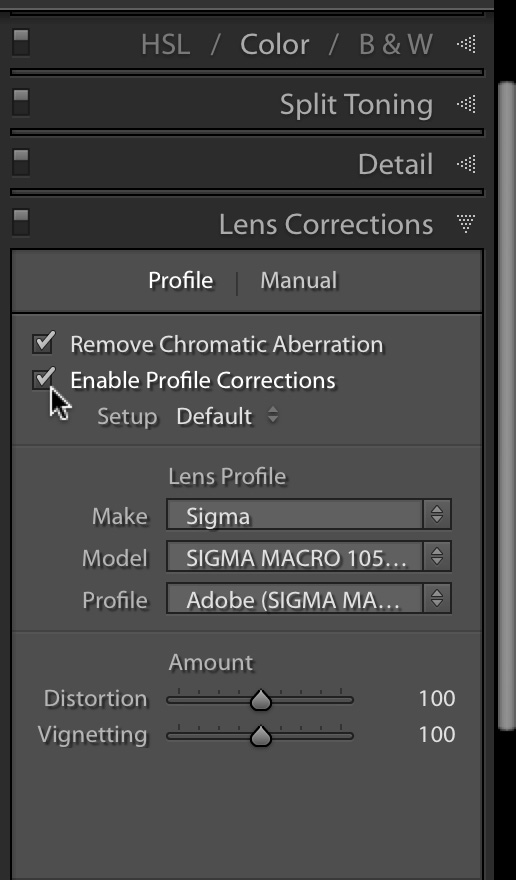
Note: Including profile corrections can be resource intensive, so exclude this from your
defaults if performance is degraded.
- Expand the Camera Calibration Panel, click the Profile drop-down menu and choose
the camera profile you prefer to be the starting point.
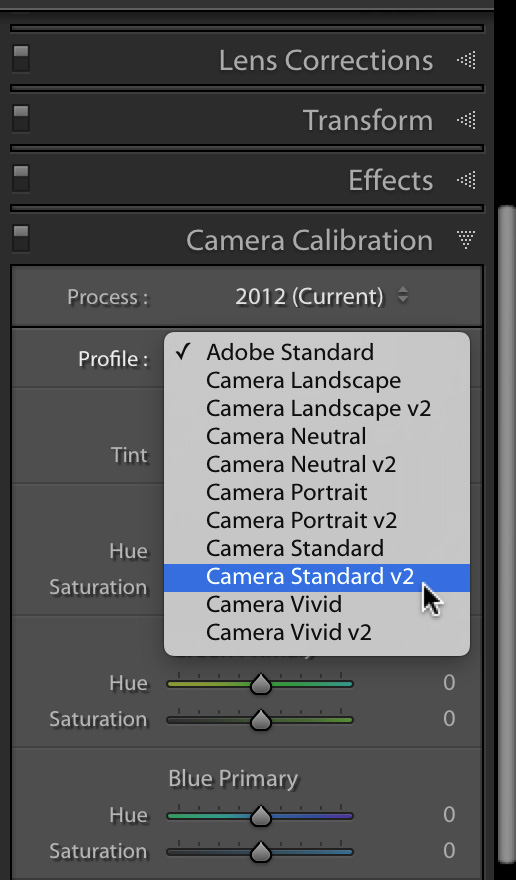
Note: The list of camera profiles varies with the camera model used to create the selected
photo.
- Go to Develop > Set Default Settings to open the Set Default Develop Settings
dialog box. Default settings are specific to each camera model, in this case a Nikon D610, so if
you are using multiple camera models you will need to update the defaults for each model
separately.
Tip: You can also hold the Option (WIN: Alt) key and watch the Reset button change to Set
Default and click that button to open the Set Default Develop Settings dialog box.
- Click Update to Current Settings to customize the default settings to include the
changes you made.
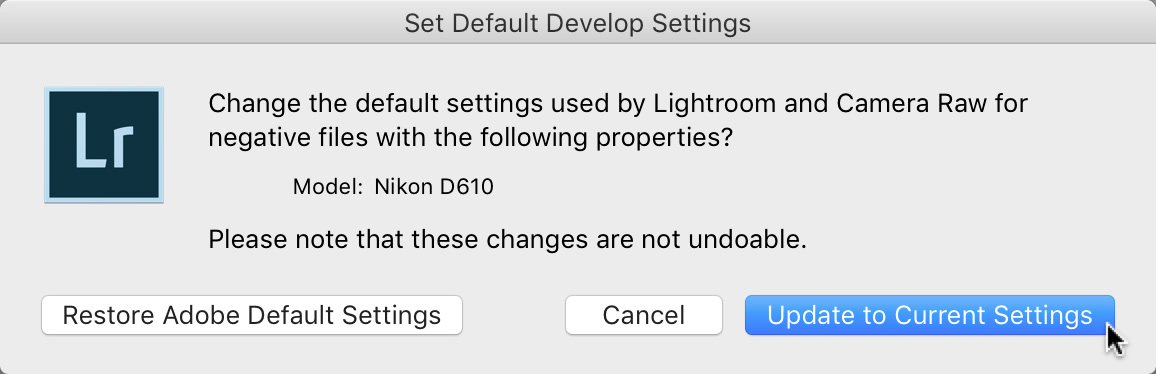
Note: While it states the changes are not undoable, this just means that you can’t revert
back to the Adobe defaults via the Edit > Undo menu. You can always open this dialog box
and click Restore Adobe Default Settings if you want to go back to the original settings.
This will only affect raw photos from that specific camera model as they are imported in the
future, and if you hit the Reset button on a previously imported raw photo from that specific
camera model. You must repeat that process to set defaults for any other camera models you
are using. This does not change the settings on any previously imported photos.
I hope you’ve found some of those tips helpful. Please feel free to reach out to me with any
questions you may have, or come see me at Photoshop World, where I’ll be teaching, and
answering questions at the Expert Bar.
You can see more from Rob at photofocus.com and follow him on Twitter and Facebook. Aside from also being a KelbyOne Help Desk Specialist, and Adjunct Professor at NHTI, he is a founding member of Stocksy United (a stock photography co-op). Rob writes the “Under the Loupe” column for Lightroom User Magazine, and is the author of many photography related books. His latest book is Taming Your Photo Library with Lightroom.


Thanks Levi – excellent blog!
Levi? :D
were you wearing Levi’s maybe ?
Good blog post btw.
Thanks!
Oops – apologies – thanks Rob – very helpful article
No worries! Levi gets top billing for the photo. :)
Great article! Check #8 title :-)
Thanks Dave! Those mangey backups … :D
Great article Rob!
Thanks Lorri!