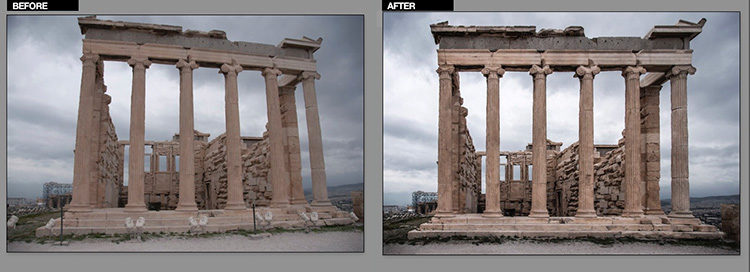
(Above: There’s more here than first meets the eye).
Mornin’ everybody! I’ve been getting a ton of really great feedback on my “From Flat to Fabulous in Photoshop” course on KelbyOne, so to celebrate, I recorded a new segment just for you to give you an idea of what the class is all about.
Download The Practice File
Plus, you can download the RAW file and follow right along with me (that’s the link, right below). BTW: in the online course, I make all the files available for download so you can do the same thing with every single project.
Now Watch The Video and Follow Along
There’s lots of really useful Photoshop stuff in this short video, including a bunch of little tips and timesavers, which is what I love about teaching these types of projects.
Also, I don’t use any plug-ins, presets or actions in this tutorial. Just all stuff that’s already in Photoshop. OK, let’s get to it:
I hope following along with that made you interested in learning more, and taking my course (you can sign up for the free 10-day trial and watch the entire course right now). Here’s the link to my full “From Flat to Fabulous in Photoshop” course.
Here’s wishing you a great Monday, an awesome week, and starting off August on a high note!
Best,
-Scott
P.S. Here’s the official trailer for my “From Flat to Fabulous in Photoshop” course (below), ya know…just in case. :)


Good tutorial !
$.02 ? If columns have fluting grooves, try running the centerline of them rather than the outside edges. Many columns are narrower at the top than the bottom, and it will reduce the exaggeration of that top bulge you had to later reduce. Our mind will process a tiny bit of keystoning as natural, because we don’t really ever see perfectly planar and rectilinear, especially if we’re fairly close to the building face.
Is it possible, that you are overthinking this just a bit. LOL!! ;-)
Moi ? ;)
Hi Scott,
Thanks for the in depth tutorial this morning. As it happens, I watched your “10 Essential Post Processing Tips” video yesterday. In that video you talk about Unsharp Mask as using ancient math and recommend smart sharpen. However in this video you went to Unsharp.
Is this just a matter of when the recordings were done, or is there a better time for one vs another?
Smart Sharpen is better, but it just never caught on, so since everybody uses Unsharp Mask, that’s what I use in the class (BTW: I just recorded that video this weekend). :)
I like it better when you lead from the front. If Smart Sharpen is the better choice I would have rather seen the numbers you used there.
For what its worth (very little, perhaps) I use High Pass and Hard light for things that can handle quite a bit of sharpening like that one.
Having a great time making my RAW flat images fabulous! Thanks Scott and btw loving all the awesome classes. So many now I can’t keep up with them… :)
Kathy – when are you coming by to see us!!!! We need some Kathy time! :)
I love how one of the ‘categories’ for this post is “Fun!” Scott, you are ALWAYS fun. That’s one of the things that makes a KelbyOne membership so special. Best bargain on the planet and always more fun than anticipated. Thanks a ton, as usual.
Thanks you, Marie. That really put a smile on my face. :)