

 Today we’re moving into the studio, and we’re starting with a lighting set-up that is ideal for:
- Product photography
- Portrait photography
- Studio photography of anything that doesn’t move a whole lot
- Anyone who wants to get into studio lighting, but is unsure, afraid, or uncomfortable with the whole studio lighting world.
I’m going to give you the same advice I’ve given to so many of my friends who wanted to get into studio lighting, but weren’t quite ready to deal with the complexity of using multiple strobes, wireless triggering, light meters, and all that it entails. Get a Westcott TD-5 Spyderlite.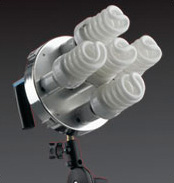 These are continuous (“always on”) daylight-balanced lights that give you soft, wrapping light, but because they use fluorescent blubs, there’s no heat, so you can use them right up close for shooting everything from people to food. The TD5 is shown above, without a softbox, so you can see what the light itself looks like (photo courtesy of Westcott).Advantages:
- Since they’re always on, what you see is what you get. There’s no guesswork, no wondering if the light is going to fall where you want it–you see everything live just like it will look
- Since they’re daylight balanced, they look like natural window light.
- They’re surprisingly affordable
- You don’t need wireless triggers
- Since the light is continuous, you can shoot just like you were shooting in natural light, so for the most part you don’t need to use a lightmeter, like you do with strobes.
Disadvantages:
- They don’t put out nearly as much light as traditional studio strobes, so you’ll need to shoot on a tripod, and you want to avoid shooting objects that move a lot (so regular portraits, where your subject stays fairly still are no problem. Shooting toddlers, who are in constant motion, is another story, and you’ll wind up with some blur). However, you can raise your ISO to get a faster shutter speed and this limitation goes away, so if you’re shooting with today’s high-end Nikon or Canon gear, which both have very low noise, you can’t shoot toddlers all day.
- The other disadvantage vs. studio flash (strobes) is that there are only three power settings: low, medium, and high on the Spiderlites (I keep mine set on high all the time), whereas with a studio strobe you have much more control over their power output (brightness).
But if you do commercial photography (advertising, product shots, etc.) or portraits, it’s really hard to beat them. Note: I’ve been doing all my cookbook food shoots using Spiderlite TD-3 (TD-5’s smaller, lower-powered little brother), and it’s been absolutely ideal. BASIC KIT: To get started, I’d tell a friend that you’d need:
- One Westcott TD-5 Spiderlite
- A Medium (or Large) Softbox
- A Medium-sized Lightstand
- A Tilt-Bracket (so you can tilt the light)
- A 30″ Reflector, and boom arm stand (mentioned yesterday)
B&H Photo has a kit like this (but without the boom arm stand), for $530 (right now B&H is throwing in a free 30″ silver/gold reflector, but I have no idea how long this freebie will last—here’s the link). This DOES NOT include the five 30-watt fluorescent bulbs you’ll need (they’re sold in packs of three, so you’ll need two packs. They sell for $58 a set (here’s the link), and you’ll need two sets, so you’re at $646 for the kit and the bulbs.I would tell you to get that boom stand for the reflector (here’s the link), which will add another $80, taking you to a total of $726. Not bad for a studio kit, eh?If you want to take it up a notch, you can get the exact same Spiderlite kit I used on my nationwide Lightroom Live Tour, which comes with
- Two Spiderlite TD-5s (I use the other for a hair light, or kicker light)
- Two Medium Light Stands
- Two Softboxes: a nice big 36″x48″ softbox for the softest most wrapping light, and a 24″x32″ softbox you can use for a hairlight, or fill light, or whatever.
- A 5’x6′ Westcott Illuminator pop-up collapsible background (white on one side, black on the other).
- A background stand to hold that Illuminator background
B&H photo calls it “The Scott Kelby Studio Kit” (just a reminder: I don’t get a kick-back or commission on sales—B&H put this together as a courtesy to my students who saw me using this set-up on my tour and wanted the exact same kit). The kit goes for $1,099, but you’ll still need the bulbs, and for two lights you need 10 blubs, and as luck would have it, they come in packs of three, so you need four packs, so add $232 for the bulbs. Hey, think of it this way; you’ll have two back-ups. Here’s the link to the kit on B&H.I’ve recommended Spiderlites for the past year and I’ve gotten so many emails from people who’ve bought them who are just wild about them. For more info on them, visit Westcott’s site (here’s the link).Tomorrow, we’re taking it up a BIG notch; I’ve sold all my old strobes, got rid of all my existing softboxes, stands—you name it, and switched to an entirely new set-up for when I need strobes, and it absolutely rocks. It’s not cheap, but this is the real deal, and it can change the way you work with studio strobes in a big way. See you then!
Is this light easy to travel with? I want to take newborn photos in people’s homes and bring the light with me.