Yesterday, in my post about my first football shoot of the year (link), I mentioned that if some of the players wind up in the shade, that I remove the blue tint that appears over anything white (like their jerseys, helmet, the stripes on the ball, and so on) in Lightroom (or Camera Raw). Anyway, I had a few questions about it, so I thought I post a quick tutorial. Here goes:
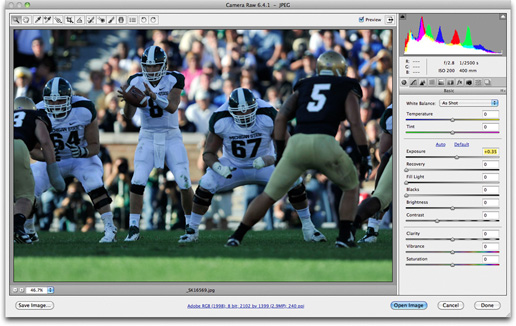
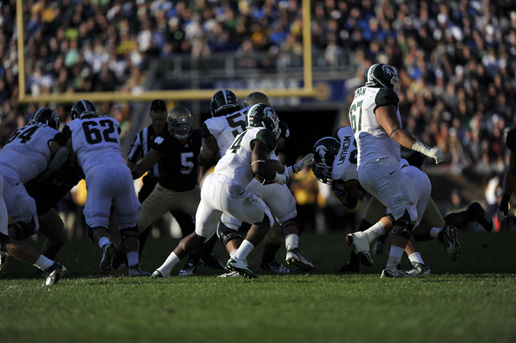
Above: Here’s a great illustration of the problem: when the team winds up on a part of the field that’s covered in shadows (as seen here), their white jerseys (and anything white for that matter) get a deep blue tint over them. However, you can see from the photo, that in a few seconds part of the team will be running in the daylight in front of them, which puts part of the image in shade, and part in daylight, which creates the double-white balance problem).
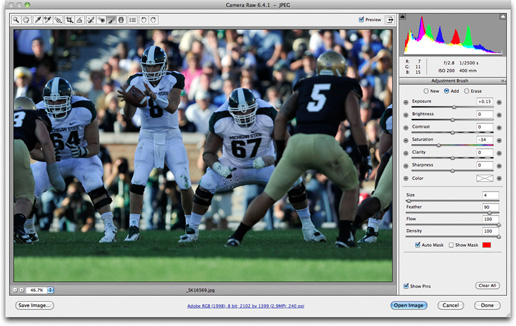
STEP ONE: In Camera Raw (shown here) or in Lightroom’s Develop Module, get the Adjustment Brush, then over in the Adjustment Brush panel on the right side, lower the Saturation amount a bit (as seen here), and set everything else to zero. Now, with the Auto Mask checkbox turned on, start painting over the white parts of the player’s jersey’s (here’s I’m painting over #67’s jersey and pants, and you can see the blue is going away as I paint.
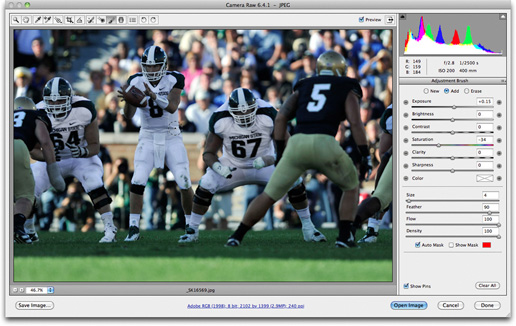
STEP TWO: Continue painting over anything that’s tinted blue (here I painted over all three players in white, but to finish this off, I’d have to paint over the “5” on #5’s jersey as well. Now go and compare that with the image at the top of this post and you’ll really see the difference.
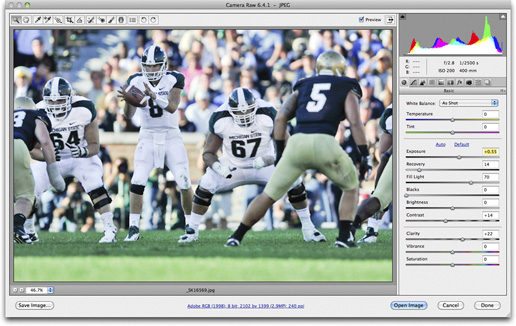
STEP THREE: Of course, since they’re in the shade, the whole image is really dark, so you might want to increase the Fill Light quite a bit, and the Exposure a little bit (as seen here), so the players aren’t “in the dark..”
(Above: Here’s the typical type of shot you’d have to apply this technique to—where part of the action is in daylight [one white balance] and part is in shade [they look too blue]. If they all stayed in the shade, you could just change the overall white balance, but for some reason you can’t get these guys to stay put. ;-) ).
That’s all there is to it. Hope that helps.


You know what I love about photography, Photoshop and Lightroom ?
I learn something new every day :)
Cheers fella !!
My dear Scott, Hi
Great Tips for Everyone :)
Best Wishes
-Ali
Great tip Scott!
Thank you for sharing.
– Loybuckz –
Photography, is like a finely tuned race car, once your have your basic auto or in this case image. It take a skill to finely tune all the detail in that image. While enhancing the highlights all the while maintaining a balance in your image I find is essential. While sure one area may have more highlighting to draw attention to a particular item or area to get that wow factor out of your vehicle or image. I find that.. not just snapping a well composed or even a not so well composed image is only part of the process. But in fact when you get that shot into your garage or digital darkroom to make those so called fine tune adjustments that’s where the magic really comes together. Being able to enhance and bring strength to those weak area’s just enough to not go over the top and blow out the rest of the image. Now that takes eye of a highly trained eye. But with practice comes experience and thanks to Scott for these step by step illustrations, makes it easier to comprehend and fine tune our own learning curve. Thanks Scott.
A proud follower, Sorry I missed you in Amsterdam.
Greetings from Rotterdam.
Riker.
Super thanks Scott. I was one of them to ask for it.
I had no idea you could use brushes in camera raw, thats worth the price of addmission right there.
Thanks! This is a common problem for my action photos as well. Never thought to use the adjustment brush vs. changing white balance.
Doesn’t that leave all of the other parts of the subject in the ‘wrong’ color though? I still don’t get the advantage over altering the white balance for the whole frame. I know there just has to be one :o) so please, Scott, can you help me out with a few extra words of wisdom?
Fin: This technique is used when part of the action is in sunlight, and part is in shade, which happens pretty often in the late afternoon.
If both teams are in a part of the field that is fully in the shade, then yes—you can just change the white balance in camera (or after in PS), but if you look at the shot here, the crowd in the back, and the grass in the foreground are both in daylight (and usually there is a player or two in the daylight part which is where it gets sticky, and where I pull out this technique because there are two different white balance needs going on at the same time).
I updated my post above, and included an extra image to help make this more clear for you.
Hope that helps.
I love ACR!
Hey Scott,
Great tips. Thanks!
For some reason, the last two weeks or so the script that loads your portfolio at the top of your blog takes what seems like forever to load. Once it finally loads I can read your stuff. Since this is such an important part of my morning rituals, I wait. Has anyone else addressed this? It does it on my machine and any machine in the computer lab I work in. All PCs.
Have a great day buddy!
Mike
I keep getting script running errors and then the whole page locks on me till I restart my browser. Thought it was just me having problems but it only happens on my fave website! :-)
Hi Mike:
I just send your comments to my web team. We’re on it! (Thanks for the heads up). :)
-Scott
Just to let you know, I’m getting the script error too and it freezes my browser. I have to use task manager to shut it down.
Scott, thanks for having your team look into it.
#1 rule, no whining. 8-)
First off many thanks for all the great tips, books, blogs, pictures and advice you give to the rest of us aspiring photographers. I’m also a huge fan of the Grid and it’s always a joy to watch and I learn something every single time. I really appreciated the talk about the famed photo you order from mpix for a friend of yours and eagerly watch the video on Creating The “Notre Dame Poster” Layout. I noticed that the one you showed on the Grid had a “fake” matting look to it and I would just love if you post something about that as well. I tried creating one in PS but I swear it doesn’t look at good as the one you did. Would you share with us how you did that?
I had this same problem at Fenway Park this past weekend shooting your Tampa Bay Rays against my Red Sox. Sun and shade the whole game. Drove me nuts! This Tip will help greatly!
I don’t think that was the only problem this weekend between Scott’s Rays and your Red Sox that drove you nuts. JK
I think an even simpler way to fix blue shadows is to use the Color Balance tool and add some Yellow to the Shadows. Or if your sunny spots look too Yellow add some Blue to the Highlights. It might be more of a global change but it’s really fast if you have a lot of images to work on IMHO.
Mike Meyer
For 6 p.m. kickoffs in Ruston, LA…..this is perfect.
I would love to see some more images from the game. I spent 3 years going to Grad School at Michigan State, and you have some of the best images I have seen of the ND rivalry game. I saw the one posted on 500px, are there any other places you have been posting them?
It is blue because the white balance is off. Why not fix the white balance rather than go to all that trouble?