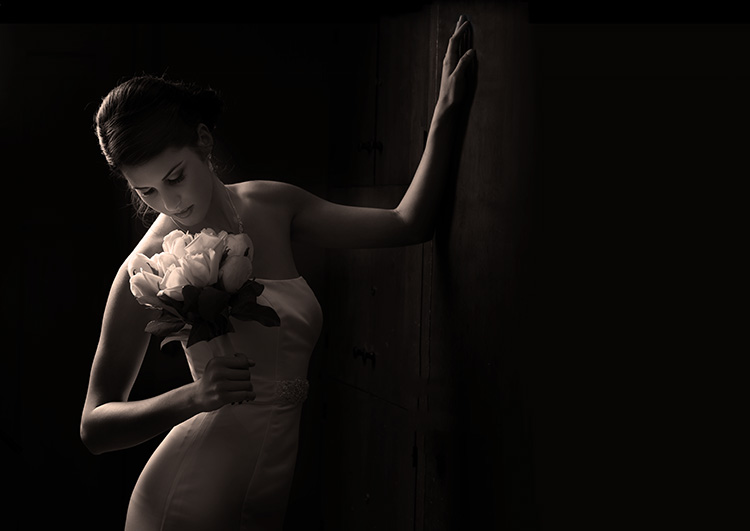
Happy Friday everybody! Today I’m going to break down the simple one-light bridal portrait you see above (camera settings, lighting and post production). Keeping it simple like this is ideal because it lowers the bride’s stress and yours, too. Plus, by just using one simple light you can focus on emotion and expression rather than fussing with a bunch of lights (it’s another one of those “less is more” things).
In this beautiful small church, there was a short hallway leading to an exit door, and some storage closets, but the doors were a vivid red color, and I thought that would contrast beautifully with our bride (who had a white dress and a pinkish bouquet). I thought we’d try posing the bride in that short hallway, but getting a light in there with the bride, without being seen in the shot, would be kind of challenging.
Lighting Gear
I used just one small flash head running an Elinchrom Ranger Quadra kit, which consists of a very lightweight battery pack (I believe it’s about 2-3/4 lbs.) with a strap on it so you can just sling it over your shoulder, and a very small, very lightweight flash head (literally just 10 ounces ). This is one of my “go-to” rigs for location lighting because:
(1) It’s very lightweight and portable — it all fits in a small carrying case that’s smaller than an airline carry-on,
(2) You get studio-quality light and a much brighter, more powerful light than you would with a hot-shoe flash,
(3) It has a built-in wireless trigger and lets me control the power of the strobe from right on my camera (the other matchbox-sized trigger sits on my cameo’s hot shoe mount),
(4) You can use two strobe heads with just this one pack if you decided you did indeed need a second light. And..
(5) …it’s designed so I can use any of my studio softboxes with it, and in this case it was a small 24×24” Elinchrom Rotalux square softbox.
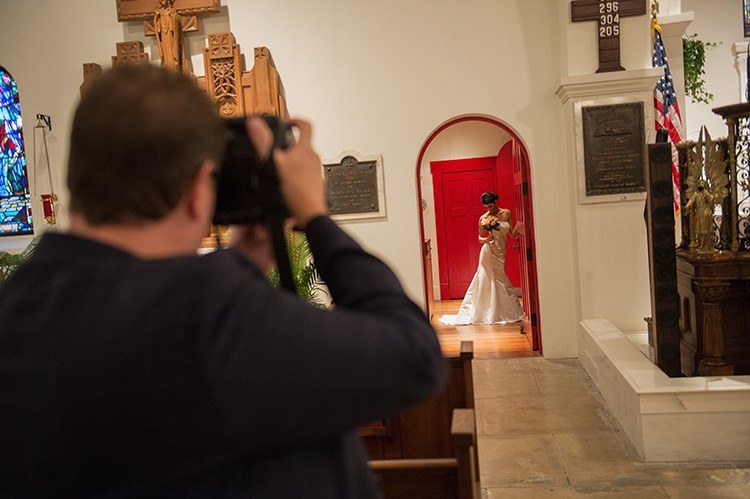
Above: The Hallway with the red door.
Here’s an over-the-shoulder view of the short hallway with red doors I was talking about. It’s actually much darker in the church that it shows here – this behind-the-scenes production shot was taken in Aperture Priority mode at a high ISO, so these behind-the-scenes shots look properly exposed, but in reality it was quite a bit darker, especially in the hallway, which was lit with just a few harsh overhead floods).
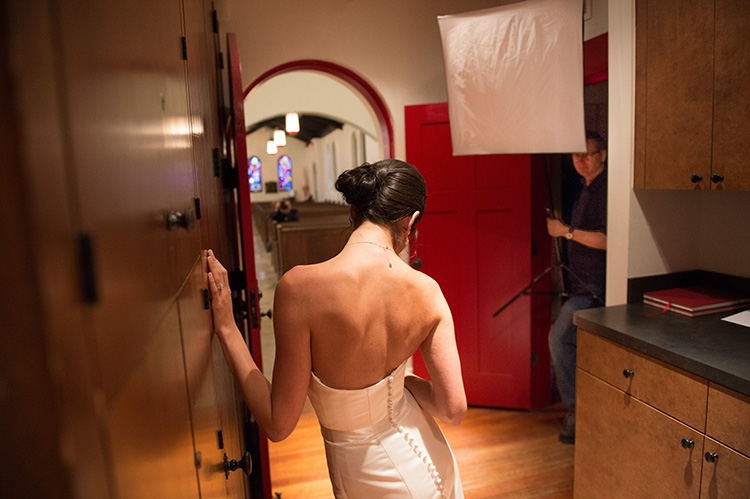
Above: Finding a place to hide the softbox was a challenge in this tight hallway, so we opened a closet door and had our 2nd assistant tuck-himself inside the doorway a bit to keep the soft box from extending into the frame.
If you look at this behind-the-scenes image, you can see me sitting in the pews, quite a-ways back from our bride — that way I could capture either tight or full length shots. The position of the light was pretty standard: at around a 45° angle from the bride, up higher than the bride and aiming down at the bride.

Above: Here’s the shot that resulted from me shooting full length from out in the pews. I’m not super-digging it, and it took a lot of post-production to tame the red light spilling everywhere and tinting everything, so the search continues for a better shot.
GRIP TIP: We normally use a monopod for shoots like this (it’s easier to “run and gun”), rather than a lightstand with legs, but since we started our shoot using a lightstand in the back of the church, we just kind of picked it up and kept shooting. Normally, we’d prefer to have the strobe mounted on a monopod for faster and easier mobility between pews, and in tight situations. The only downside? You have to keep holding a monopod — it doesn’t “set down” very easily (there are no legs and feet) without crunching the soft box, so you wind up leaning it against things, which means you run the risk of it falling over. It’s a tradeoff (like everything, right?).
The Lighting Problem with the Red Door
I wasn’t happy with how the overall color looked because of how the light was reflecting off the red door. So, I thought we’d try one where the bride would be backlit, with just a little of the light spilling over onto her.
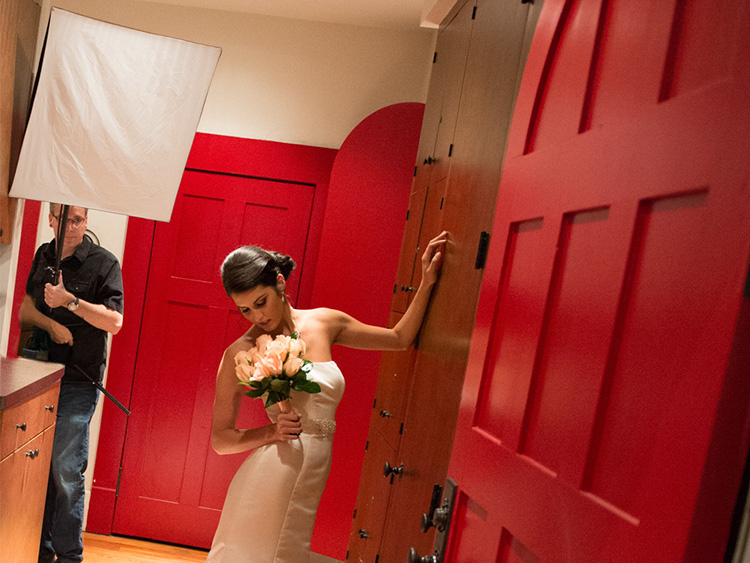
Above: Back lighting our bride
I left the bride in the exact same spot, but I had our 2nd assistant take the strobe and softbox move to the other end of the hallway to position the light behind her and off to the side (so it’s pretty much the same lighting set-up — 45°-ish angle, up high aiming down, etc. it’s just positioned behind the bride this time, as seen above).
I did crank up the power of the light for this backlit shot, because I wanted to make sure it was powerful enough not just to put a rim of light around her shoulders, arms, etc., but that it also spilled over enough so you could see her face. I also made sure to have the bride turn her head and body toward the direction of the light. Had she been looking the other way, we wouldn’t have had enough light spilling on her face or bridal gown.
Camera Settings:
I shot in manual mode, so I could make sure the shutter speed didn’t get past the normal sync speed (this pack lets you do hyper sync, but I shouldn’t need to do that in a dark hallway), so my shutter speed was 1/60 of a second (I normally use 1/125 of a second, so I have to imagine at some point I accidentally hit the dial on the back of my camera). My ISO was set to 100 ISO (the cleanest ISO on my camera), and my f-stop was f/5 in case there was any background visible behind my subject, it will be a little bit soft. Using such a wide-open f/stop meant keeping the power of the flash at less than 1/4 power most of the time.
Post Production:
Light picks up the color of whatever it hits, so when white light hits a red door it reflects red light. Once I saw the color image of her backlit, it looked very red from the reflected light, so I knew right then it was a candidate for being converted into a black and white image.
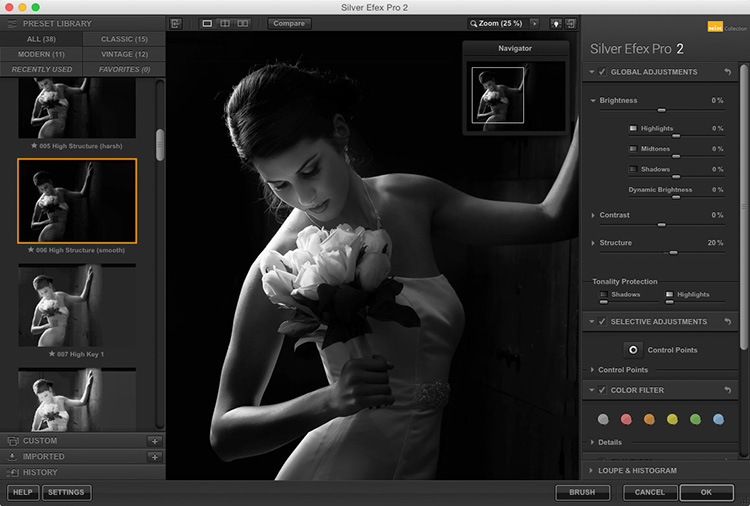
Above: Converting to Black & White in Silver Efex Pro 2
I used Nik Software’s Silver Efex Pro 2 plug-in to convert the image to black and white (I used use one of their built-in presets — my three favorite preset choices are (in no particular order): (1) Full Spectrum (2) Fine Art Process and (3) High Structure Smooth, so I usually wind up choosing one of these three.
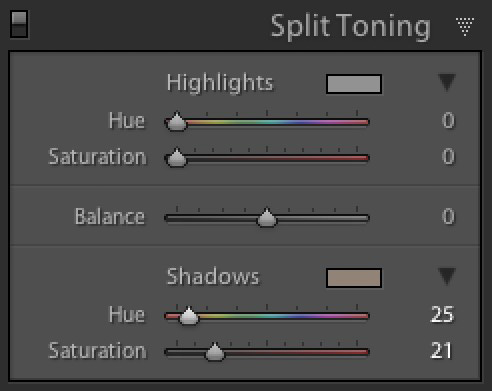
Above: Adding the Duotone look in Lightroom CC
Once I converted the image to black and white in Silver Efex Pro 2, I added a Duotone look in Lightroom using the Split Toning panel, but then only moving the Shadow controls; putting the Hue at 25 and the Saturation slider amount at 21. Don’t touch the Highlight settings up top or the balance slider — this is all done just using the Shadows Hue and Saturation sliders, so leave the other stuff untouched. It works wonders (and prints beautifully, by the way).

Above: Here’s the final image with the Duotone look applied in Lightroom (same as the opening shot).
Hope you found that helpful, and I hope your Tuesday is already off to great start! . :)
Best,
-Scott
P.S. I’m up in Boston with my seminar on Wednesday, March 30th — just a few weeks from now. Hope I see you there.


Fantastic explanation of the process that went into making this photograph. The final image is beautiful.
AWESOME! Thanks so much for the tip… makes me start thinking of a number of different ideas! :)
Nice photo and writeup :)
Thanks, “bob” ;-)
Super lovely photograph, Scott. Excellent pose too. The rim is very beautiful on her.
Yes! These are the great tips we know and love you for!