

#TravelTuesday has come around again, and right here at Scott Kelby’s Photoshop Insider that means one thing… Dave’s here! Aren’t you lucky, lucky people! I’m Dave Williams and I’m a travel photographer, writer and educator from the UK, and I’ve got a little idea for you to try out.
First off, better late than never, Peter Treadway and I led a photowalk in London this past Sunday. We used to run them quite frequently, and this is our very late attempt at tagging on to the Worldwide Photowalk. With thanks to KelbyOne, Platypod, BlackRapid, and Lonely Planet, we gave away some awesome prizes on the day, and we had an amazing yoga model come along too, who I couldn’t help but go head to her with (literally) for a crow-off!


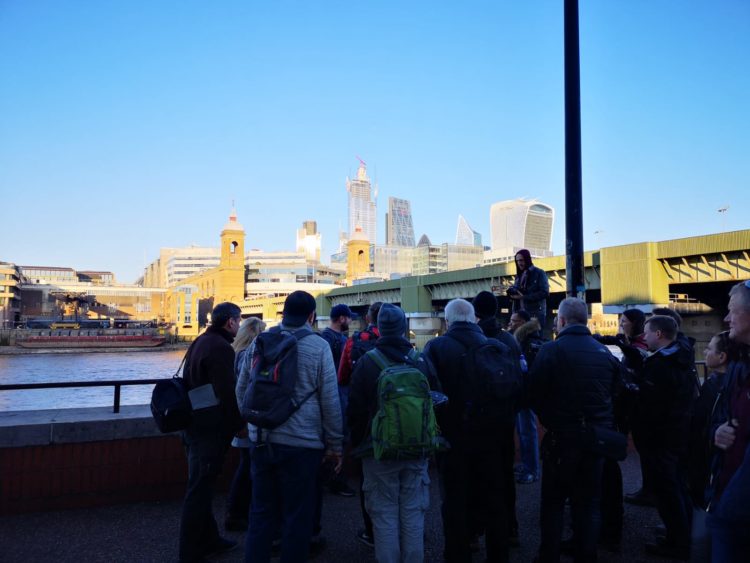
Thanks to everyone who came along! Peter and I had a great time, and if you’re on our side of the pond keep an eye on our social media for the next one!
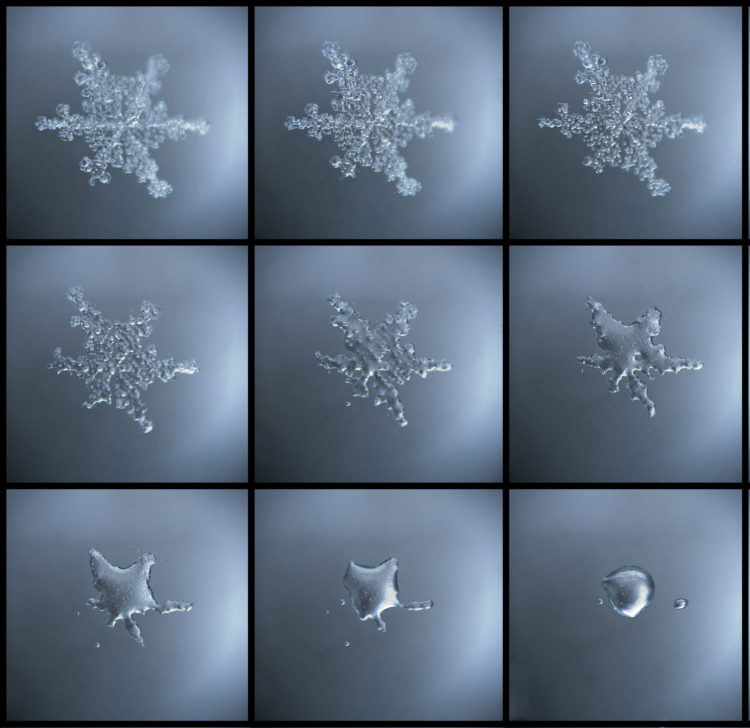
But, moving on, this week I want to plant a little idea in your mind for a winter challenge. A couple of years ago I was experimenting with reversing rings and I made some photos of snowflakes. It’s so simple to do it, but so difficult getting your head around all the intricate complexities of what’s happening to your glass with this technique. Here’s on example of what you can achieve, before I tell you how to achieve it: –
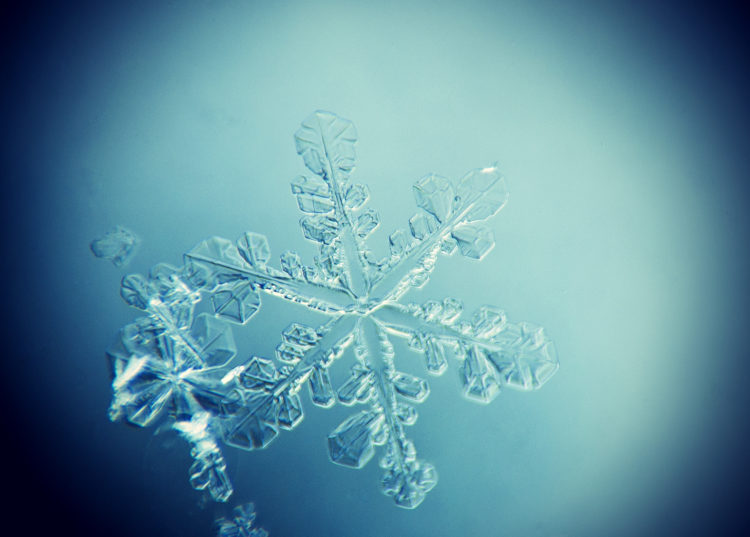
This was done with a reversing ring, and the lenses involved were a 50mm prime mounted backwards in front of a 28-300mm lens. A reversing ring is an inexpensive ring which has two threads, allowing you to mount the front ends of two lenses together and basically making a magnifying glass. I won’t go into too much detail on it, but I want to share some quick tips with you if you’re willing to take on the challenge and give this a go!
Firstly, the focal plane becomes insanely narrow so finding focus is hard work. You need to be absolutely rock-steady to keep everything in focus as best as possible, perhaps by mounting your gear onto a Platypod.
Secondly, there’s a lot of glass between the sensor and the subject, with a lot of lost light! You need to shoot with a higher than normal ISO, and the reversed front lens needs to have its aperture ring fixed open to maximise on the light. An extra source of light will help you, too!
Thirdly, because everything is reversed it’ll take a minute to find your feet and figure out what action is having what affect on your image. Some things work regularly, and some things work totally counter-intuitively, so give yourself plenty of time to familiarise yourself with cause and affect of all of your movements – they’re not always going to be what you expect! I’ll leave you to figure that out ;)
And finally, if you’re shooting snowflakes like I did in this example, act fast! Those little shards of natures beauty will melt faster than you’d believe. Literally, blink and you miss it. If you’re holding the front of your lens for stabilisation the heat from your hand will potentially melt your subject. Just keep that in mind!
So, challenge accepted? I’d love to see what your imagination creates with a reversing ring, and I’d love to see how you can handle the mind-frazzling flux of everything you thought you knew about focus and light that drastically changes when you mount a lens backwards! Show me what you come up with! I’m @capturewithdave on all platforms and I can ‘t wait to see what you make.
Until next week
Much love
Dave
2 comments