

Straightening a shot is something that is one of the absolute fundamentals of photography post-processing, yet it’s commonly overlooked. Those of you who catch The Grid every Wednesday with Scott will no doubt be aware that it commonly pops up whenever blind photo critiques are the theme of the show.
To that end, my post for this week’s #HybridDaveTuesdays is about two correction techniques you can use in Adobe Camera Raw before you hop over to Photoshop. I’m Dave Williams, a travel photographer from London, UK, and you can catch my weekly posts right here at ScottKelby.com every #TravelTuesday—feel free to drop me a message on Instagram where I’m @Hybriddave.
It’s fair to say that, this week, I’m writing about something that’s widely considered very basic, and perhaps you’re wondering whether it’s even worth the read. Here’s why this is so important:
An image that isn’t straight, but has every other element nailed—the composition, the tones, the balance, the content—can be ruined or overlooked if it’s not straight. It’s as simple as that. A “Dutch tilt” is, of course, the exception, but a simple degree or two really can be the difference between hanging it on the wall or raising an eyebrow while giving a half-hearted “meh.”
Let’s look at using Camera Raw to straighten. The reason Camera Raw is my default choice for straightening is its ease, its accuracy, and its varied applications of the Straighten tool.
Just last week, I was in Portugal with Scott, so it seems appropriate to use one of my crooked photos from the trip, hosted by Chicki Nando, as the example.
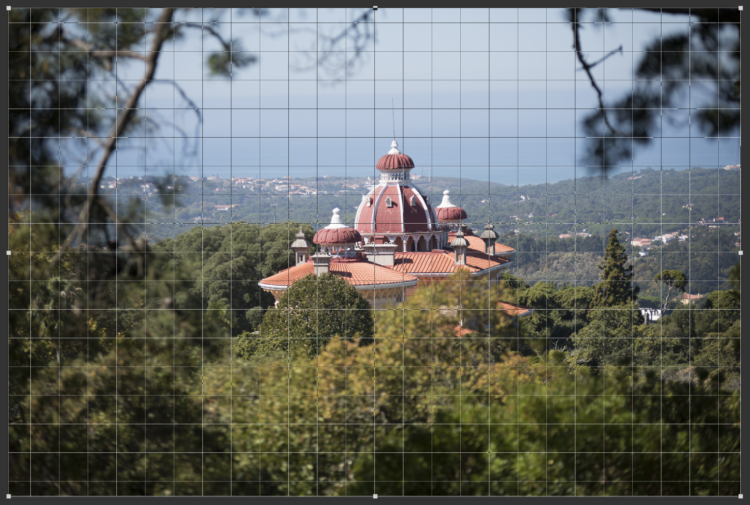
As you can see, this shot is crooked. I’ve overlaid a grid to show that the horizon isn’t straight, and it’s having a detrimental effect on the shot because the building looks as if it’s leaning. The simplest method to correct this in Camera Raw is to hit the A key on your keyboard to access the Straighten tool.
There are two options from here:
Option 1:
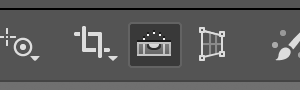
Double-click on your image. This sets the Straighten tool’s automatic process off, and the horizon will be found automatically, and your image straightened to match. This works 99.9% of the time (no scientists were consulted in order to reach this figure, but I’m probably not far off).
Option 2:
The Straighten tool changes your cursor to a kind of spirit level thing. Use this to draw on the horizon yourself, or any other horizontal line in the absence of a horizon, and the image will rotate slightly to set this as the horizon line. Hit Return (PC: Enter), and your shot will straighten.
That’s it! Your crooked image is now straight!
n.b. If you have a bowing horizon, get yourself over to the Lens Corrections panel to fix it. ;)
I know this is so simple, but for some reason it’s so often overlooked. Let’s put it this way:
If you have a straight photo, people ignore the fact that it’s straight and enjoy the other elements of it. If you have a crooked photo, people ignore the other elements of it and focus on the fact that it’s crooked.

So, for this week, I thank you for dropping by.
Much love,
Dave

1 comment