OK, last week’s was a bit of work, took a bit of time, but at least today’s Part 3 (of 4 total) is much easier. It does require some thoughtful decision-making on your part, but it sets you up for success in the next and final part of this journey.
NOTE: If you’re just reading this journey for the first time, you’re welcome to join in — just start with Part One — it’s a critical step.
In Part 2, we essentially played “image detective” using a checklist I gave to help you down that path. Now, let’s take this a step further for this step.
Go to your list, and assign a numerical value to which of those things you wrote down in Part 2 and decide which of those things you wrote down was the most important to making that image work. Was it the location? The subject? The person? The lens the photographer used? The Lighting? The composition? The perspective? One of these is the most important — the key thing that makes that image that image. There are probably multiple things that make it great, but you have to rank them in the order you feel they affect the image.
You only need to do the first three or four, but you can do all 11 if you want (the 10 on the list plus the bonus), with 1 being the most important attribute of the photo, and 11 being the least important.
What will help you get started is that last week the bonus question was, “What is the single most important thing in this image?” So that will probably automatically be #1 in your rankings, so just three or four more.
Here’s an example:
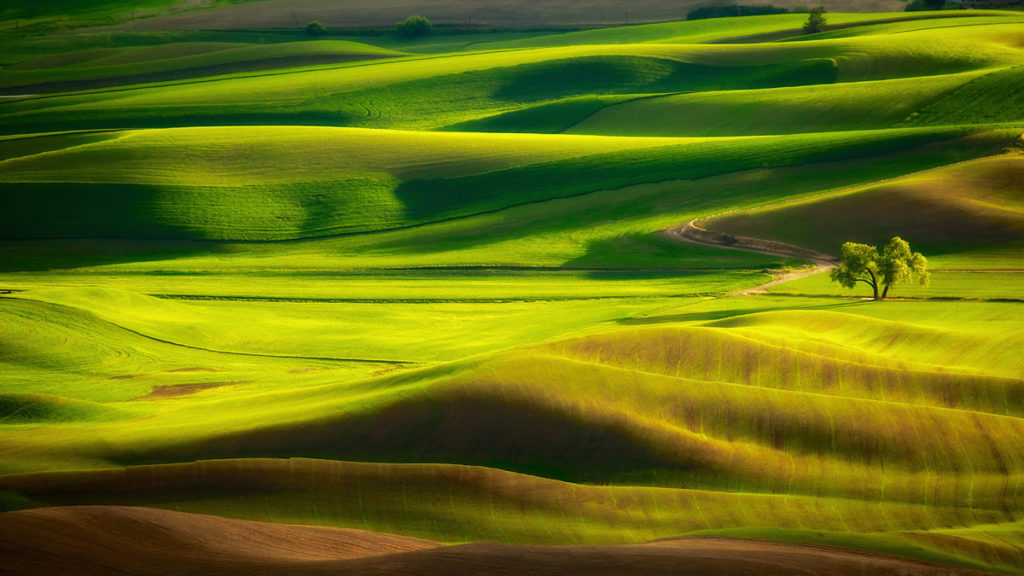
If this was my shot (it’s not — it’s a stock photo from Adobe Stock), how would I break this image down (image detective wise) and then how would I rank the top five in order of importance of what to me makes this a great image?
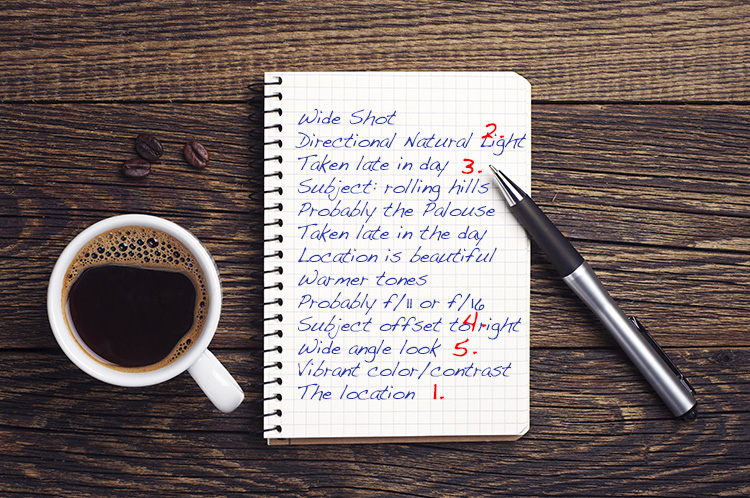
- So, for me what makes that shot is the location. I think it’s the Palouse, but it could possibly be somewhere in Tuscany, but I’m going with Washington State’s Palouse region. It’s pretty unique geographically, and I’ve always been drawn to The Palouse since I saw my first shots of it (though I’ve never had a chance to shoot it.
- After the location, I think the light is really wonderful. It’s low, so directional, and I think this same location was photographed at high noon, it never would have made my list, so take that great location and add really interesting, almost dramatic light, and it’s a winner.
- One reason the light is so awesome is that the sun is obviously very low in the sky. Not late enough that it turned the scene orange, but low enough to rake across the scene. Very late in the day sun, I’m guessing.
- The composition is really nice, too with the two lone trees set off to the far right and that made the whole shot more interesting as the image pulls your image to the trees. All that negative space to the left helped a bunch to draw your eye, too.
- The shot has a wide-angle look, and I would have guessed that the photographer used a wide-angle lens, but I’ve been told by friends who have shot the Palouse that to get the classic shots you need to use a very long lens, so I’m guessing that what they did here, but it is in a wide format versus tall, so let’s just say it a wide shot that’s not necessarily shot with a wide-angle lens.
TIP: Did you notice that I didn’t choose “camera settings” as an important aspect s what makes this shot great? Spoiler alert: for most images, you’ll analyze, camera settings will be almost irrelevant to the success of the shot. There’s an important photography lesson in there. :)
So, that’s the next stop. Number the ones from last week in the order that you think they contributed to the success of the shot. You can do three, four or five, but you can see from my list, by the time you get down to numbers four and five, they’re just not as important as those top two or three.
Good luck, and we’ll catch you maybe on Friday (if all goes as planned, but nothing is going as planned these days, so…).
Looking forward to teaching a bunch of photographers in Houston today (and LA on Wednesday).
We switch my live in-person eminar to a live online seminar (for everybody’s health and safety), so today I’m doing my full “Ultimate Photography Crash Course” seminar to the folks in Houston, Texas today live, just like I would do it if I were there in person. I’m doing the same thing for photographers in LA on Wednesday. I’m looking forward to chatting with those fine folks, and answering questions and spending the day together online.
Have a safe, healthy, stay-indoors kinda week. :)
-Scott