

Editor’s Note: This is the second part of a two-part series. If you missed it, check out the first one, Gear For Photographing Music Festivals.
As creatives, we want to focus on creating, right? But if we don’t have the technical side of things set up properly, it can hinder our ability to create on a larger level. Like, if I spend more time than absolutely necessary downloading my images and manually adding metadata every single time, it’s going to take longer for me to get back out to all of the amazing things happening that I want to photograph.
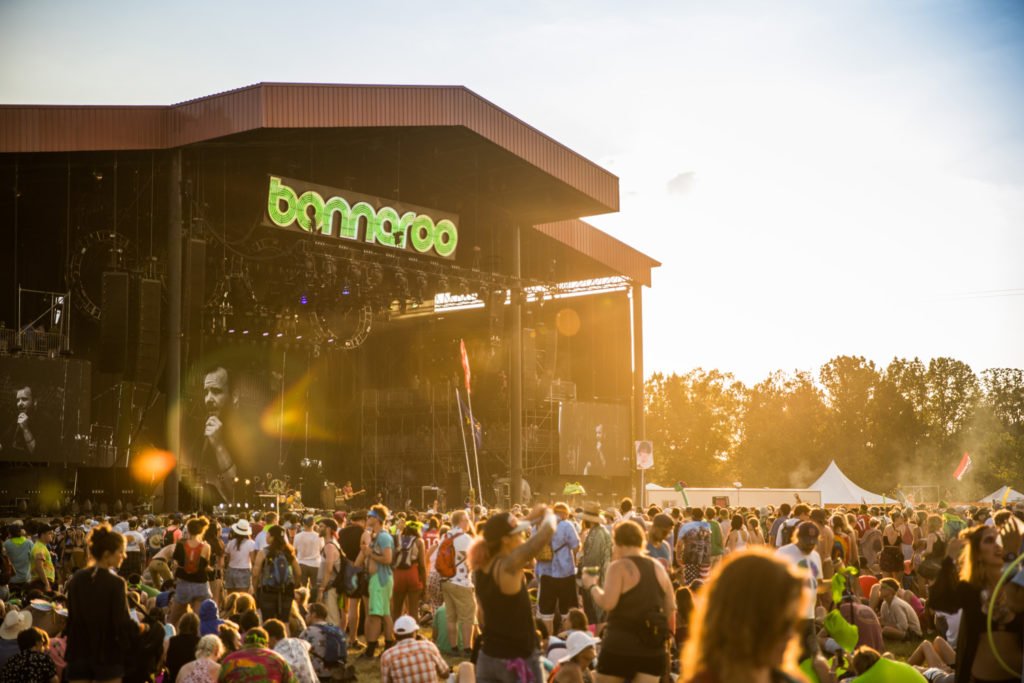
So, by taking the time to set ourselves up for success BEFORE we arrive to a job, we are able to focus on actually creating and doing a better job at it. Here are the steps I took to do just that ahead of photographing Bonnaroo.
Camera Setup
First, I made sure the dates and times were synced up exactly between the two camera bodies. This is vital when you’re covering an event with more than one camera body, as well as when you’re working with other photographers. If things aren’t synced up correctly, it can cause your editor and others huge headaches trying to keep everything straight and in order.

After that, I got all my settings dialed into one body, then copied those settings onto a CF card, put that card into the other camera, and loaded the settings onto that body. Then I entered in my copyright and artist info into the metadata of each body. I also used the Canon EOS Utility to input “1” or “2” into the Instructions IPTC info on each camera. More on this in a bit.
Here are the basic camera settings that I use as a starting point. They may change depending on the situation, but this is always where I begin:
File Type: RAW. You want as much file/image information as you can get to work with to create the best image possible.
Shooting Mode: Aperture priority.

Auto ISO: If you aren’t familiar with Auto ISO, here’s how it works… You tell your camera the minimum shutter speed you want it to maintain, along with the maximum ISO you’re comfortable with it using. It will only raise the ISO as much as is needed to maintain the minimum shutter speed, until it reaches that maximum ISO. Once it reaches that, your shutter speed may fall below what you want it to be.
I usually set the maximum ISO to whatever the camera’s highest native ISO is, so 51,200 for the 1DX Mark II. And I normally set the minimum shutter speed to 1/250 for concerts, but I ended up bumping it up to 1/500 to make sure there was as little blur as possible.
Aperture: Wide open most of the time, which is f/2.8 on the 70-200mm and 24-70mm lenses and f/4 on the 11-24mm lens.
Focus Mode: Since there’s so much movement at concerts, I use continuous focus (AI Servo on Canon and AF-C on Nikon) mode all the time. If you use single focus (One Shot on Canon and AF-S on Nikon), you’re constantly having to lock focus every time someone moves.
Metering: If your camera allows you to lock spot metering to the focus point, use that. I think a lot of Nikon bodies let you do this, but only the 1D series in the Canon line allows for this. If you’re not using a camera that lets the spot metering lock into the focus point, just stick with evaluative (Canon) or matrix (Nikon) metering and keep an eye on your exposure so you can compensate accordingly.
White Balance: Auto white balance does a really great job in any current camera body. With concerts, the stage lighting varies so much so quickly, there’s not much point in trying to get a “correct” white balance because you’re going to be making adjustments in post no matter what.
Drive Speed: Continuous High. This can be a blessing and a curse with any of the top of the line camera bodies that capture 10+ frames per second, because you’re pretty much guaranteed to catch the perfect moment, but you’re also getting a TON of photos, and that eats up card space and hard drive space. As long as you’ve got those fast cards and lots of space though, why not?
Computer Workflow
I use Photo Mechanic to ingest images from cards. I’ve been using it since college to make selects after downloading, but I only just learned more about the power of Photo Mechanic to help minimize metadata input as I was researching during my prep for Bonnaroo. Basically, it allows you to use “variables” to automatically fill in lots of different information. It also uses “code replacements,” which allows you to set up custom codes to automatically put information in captions.
Code replacements are mostly used by sports photographers, but I’m sure some of you could find other ways to use them. Here’s a YouTube playlist that I found particularly helpful to learn about variables and code replacements. And here’s another video that shows how to use them in tandem with folders you can create in-camera to automatically dynamically name your folders by artist or category upon ingest!
Here’s what my Photo Mechanic ingest screen looks like:
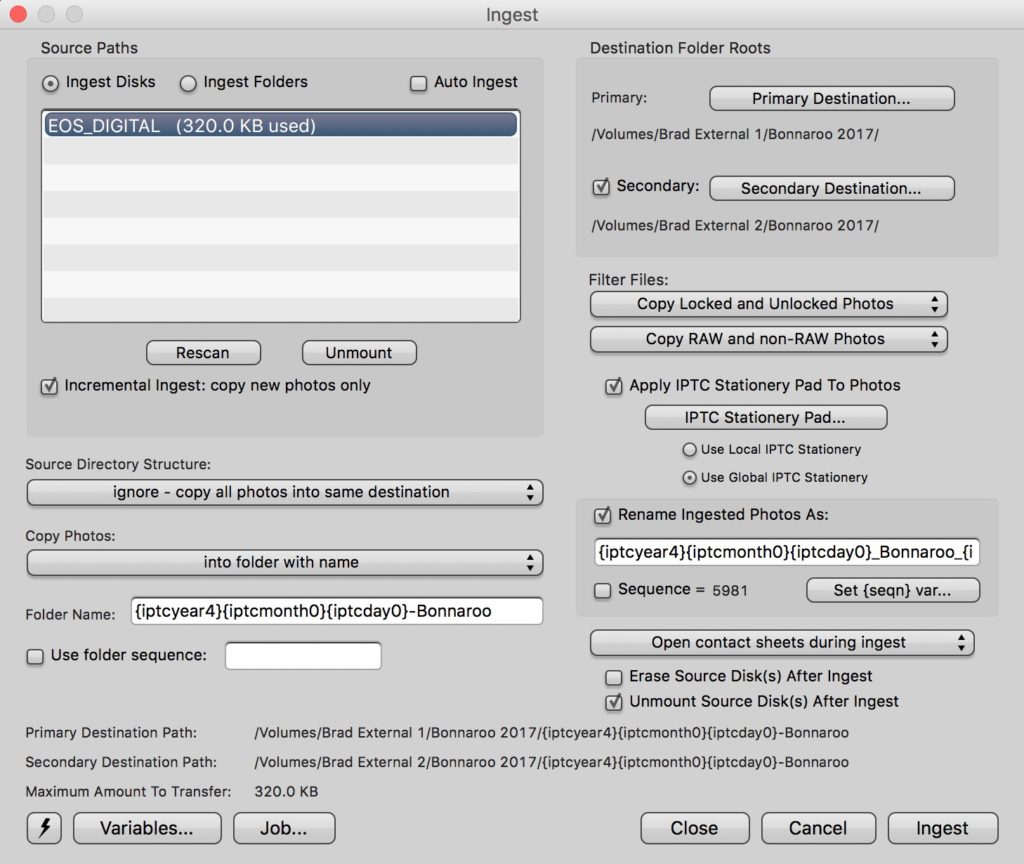
It shows what cards are inserted, and below that I have the Incremental Ingest box checked. This means it will detect if there are photos on the cards that have already been downloaded and only download new ones.
For Source Directory Structure, I have it set to ignore the folder structure on the cards and just copy everything to the destinations and folder structure I have set.
On Copy Photos, I’ve chosen “into folder with name,” and below that I have the folder name set up. If that folder doesn’t exist, it will be created, and if it does exist, it will be detected and photos copied into it. Those squiggly brackets/braces with stuff inside are the variables I mentioned before. I use a file naming and folder structure that always begins with the four digit year, then the two digit month, and two digit date, followed by a dash and the name of the project. These variables will automatically detect the date info and create it based on the metadata of the images.
At the top of the right column is the destination section. This tells Photo Mechanic where I want it to copy the photos, and also gives us an option for a secondary/backup destination. This is where those two portable hard drives come in. I have it automatically download to both drives so I have an instant backup as soon as the download is finished.
Under Filter Files, you can choose to copy both locked and unlocked photos, and RAW and non-RAW photos. If you’re shooting an event and have time to chimp during it and make selects in-camera, you can lock those selects, then tell Photo Mechanic to only copy locked files. And if you’re shooting RAW+JPG, and you know the JPG is good enough to use out of camera, you can choose to only copy those so you can get them posted as quickly as possible. In my case, I didn’t have a ton of time to make selects in camera and was only shooting RAW, so I just copied everything over and made my selects on my laptop.
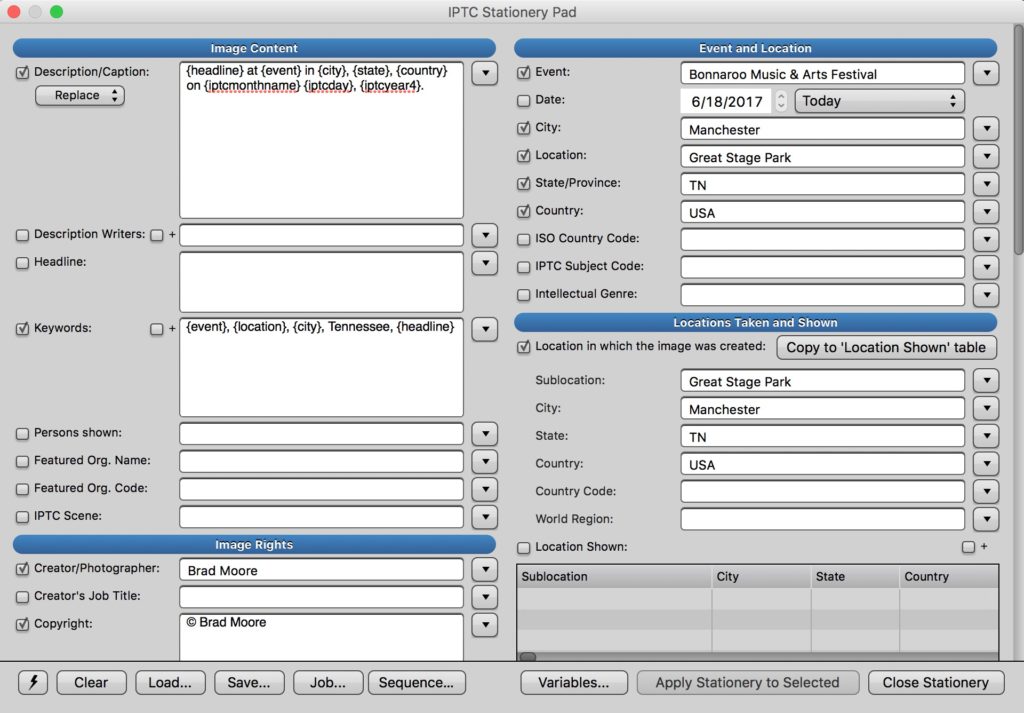
Next, you have the option to apply IPTC info to files upon ingest. To do this, you just fill out the IPTC Stationery Pad with all the info you want included, and it’ll copy to the files as they come in. This is another place that utilizes variables to automatically fill in lots of fields for you.
Then there’s the all-important Rename Ingested Photos As box. Again, here I used variables to fill in most of the file name. Here’s the exact text since it cuts off in the screenshot:
{iptcyear4}{iptcmonth0}{iptcday0}Bonnaroo{instructions}{frame4}
Again, the first part is the full date, followed by _Bonnaroo and {instructions}.
If you’ll remember from the beginning of this post, I used the Canon EOS Utility to input the numbers 1 and 2 into the camera’s instructions IPTC field. This just tells me which camera I shot the photos with and ensures I don’t have any duplicate file names if the four-digit frame number (the final variable shown above) happens to be the same at any time.
Lastly, I opted not to format the cards after ingesting them, but I did choose to unmount them when they were done so I could pull them and pop them back into the cameras. I didn’t format till the end of each day, with maybe one or two exceptions, and the 64GB cards were pretty much big enough for the amount of shooting I did each day.
After ingesting, I would go through the take and mark my selects, usually narrowing it down to 10 or fewer frames from each artist, and only a few from each lifestyle setup. I go through all the images at full-size and mark any that stand out to me with the number 1, which assigns them the color pink. Then I hide all the unmarked shots and go through the marked shots again to narrow it down further with the number 2, which marks them red. Then I hide the pink shots and if I still have more than 10 reds, I’ll go through again and either knock some back down to pink or bump them up to orange with the number 3. Once I’m down to 10 or fewer, we select those and drag them over to Lightroom to import.
I generally only bring over one artist at a time, so in the Lightroom import dialog I’ll add the artist name to the keywords. Once they’re imported, I add them to my Bonnaroo collection, then add the artist name to the Title and Headline, then adjust the caption accordingly.
Did you know that if it’s a single artist, like The Weeknd or Lorde, the correct verb is “performs,” but if it’s a band with multiple members, like U2 or Red Hot Chili Peppers, the correct verb is “perform?” This has been “Fun Facts with Brad,” now onto our regularly scheduled programming…
Once that’s all done, we head into the Develop module and make adjustments till the photos look as great as they can. I don’t really have a formula for this to be honest. I basically just move all the sliders back and forth until I’m happy with the outcome. I tend to prefer colors that vibrate well off each other, bright highlights and dark shadows, a decent amount of clarity, and just enough of a vignette to make sure the edges aren’t distracting.
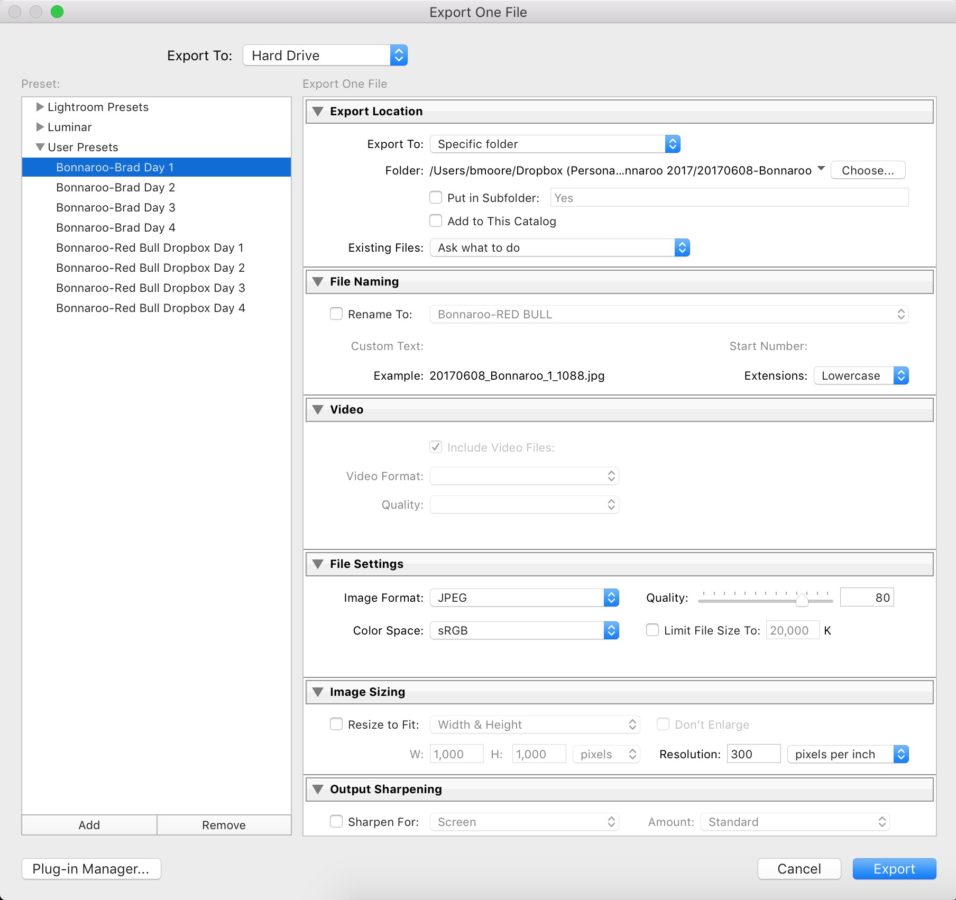
And then the final step, exporting! Above is the export preset I set up for myself, which keeps in line with all my preferred file naming standards and sRGB color space. I usually export in sRGB because it’s the color space with the least information. That sounds counterintuitive, but it actually means that the photos will look pretty similar across all devices. If you export in a larger color space, the images may display with odd colors if it’s a display that doesn’t support that larger color space. So sRGB is just a safe bet that my photos will most likely look great no matter where they’re displayed.
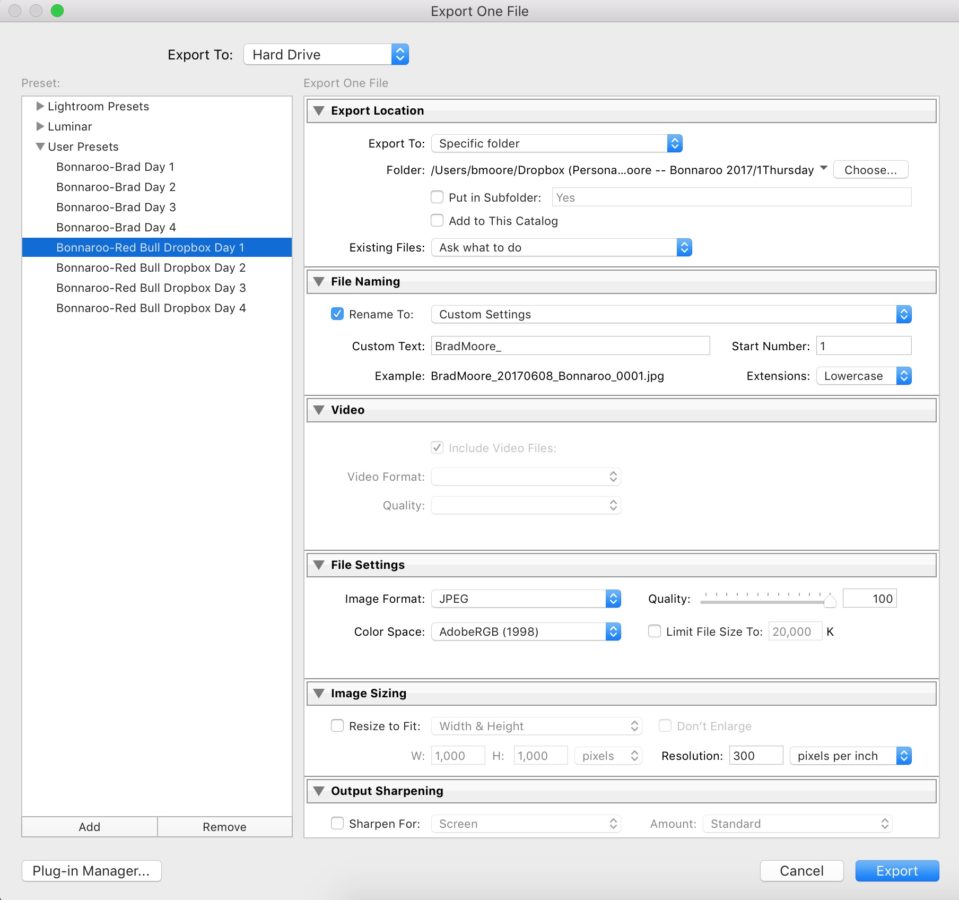
And this is the export preset I used for Red Bull. They have a slightly different file naming convention, and they requested files in the AdobeRGB (1998) color space, so this conforms to those requests. The only thing I had to do manually was update the start number of the sequence to make sure I didn’t duplicate any file names for them.
You may also notice I had a different presets for each day. Each day had its own folder, so I made these presets so I didn’t have to worry about it once I was on site.
From there, Red Bull would pull images from Dropbox for any social media posts they may have used them for, and then I would upload to their FTP to submit images to the Red Bull Content Pool!
Once I got back home, I downloaded and backed up all the images from the event to my server and backup server. I always keep my most recent projects on my external drives just in case I need them for anything, but I delete them as I need space for new projects.
You can see more of Brad’s work at BMOOREVISUALS.com, and keep up with him on Instagram and Twitter.
3 comments