Photo by Caleb Greene
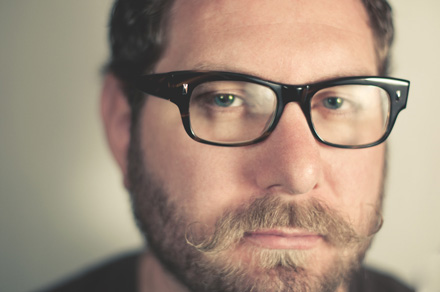
Greetings! My name is Aaron Greene and I’m a photographer based in Greenville, South Carolina. I recently shot an hour long documentary for Derek Webb, a musician based out of Nashville, TN. The film documents Derek and collaborator Josh Moore while making Derek’s latest record, Stockholm Syndrome, which released Sept 1st on INO/Columbia Records.
My goal is to share a bit about what I’ve learned working with video dSLRs. I shot the whole film on a Nikon D90. Additionally, Derek and Josh shot some footage with their Flip Minos that made the cut. About 90% of the final edit came from the D90, and there were a couple shots from the Canon 5d MkII that made the edit as well. That additional footage was shot by someone else in Nashville during a time in which I had previous commitments. All in all, everything came from either a dSLR or the Mino.
Here are the technical details in brief:
– One hour film
– Shot primarily on the Nikon D90 (with some additional footage from the Flip Mino, and Canon 5D Mk II)
– Shot on one camera (at a time)
– Shot available light
– Filmed on location in 4.5 days of shooting.
Here is the trailer so you can see the look and feel of the film…
When entering into a project like this there are many unknowns. No matter how much pre-production and planning you do, it’s tough to know what sort of situations you’ll face.
Here are some of the things I learned while shooting this project and others like it. Some of these might be new to you and help if you ever choose to take on a project of this nature. This list seems fairly obvious to me, but hopefully some of my experience will confirm and explain some of these essentials.
1) The Nikon D90 has limited controls while shooting video. Getting familiar with some ways to trick the camera is essential.
Locking the exposure is a must when working with video. Set your AE-L/AF-L button to AE Lock (hold). More on this after I explain your best lens choices.
2) Getting the right lens can give you back some of the control the camera doesn’t allow you to have.
Brad noted during our correspondence leading up to this post that the first time he thought I might be using a dSLR camera is when he heard the focus ring during one of the conversations in the film. At that time I was shooting with the new Nikkor 50mm AF-S f/1.4G. There are two obstacles in using this lens. First, it’s got an internal motor that does the focusing when you’re shooting stills. When manually focusing this lens there is a little resistance. This resistance makes it hard to focus smoothly for video and also makes audible noise. Many of us rarely focus our newer lenses manually and would hardly notice the stiffness and noise it makes until we start shooting video. Second, it’s a newer lens from Nikon and therefore doesn’t have an external aperture ring. For the best results, a fast prime with an aperture ring is a must when shooting video.
Once you have your AE-L/AF-L button set to AE Lock (hold) and you have a lens with an aperture ring, you’re ready to trick the camera into the best setup. First, set your exposure ring to somewhere around f/8. Point your camera in a direction that has more light than the subject you intend to shoot. Once the camera adjusts its exposure to this lighter area, lock and hold your exposure with your newly assigned button. Now, point your camera back at your subject and start to open your aperture ring until you have the desired amount of light.
Since the D90 decides your ISO for you, this is the best way to trick it in low light situations. By getting our exposure on a lighter area before locking it down, the camera will assign a lower ISO and will therefore generate much less noise. Locking the exposure will also stop any exposure changes mid-shooting.
Lenses
The 50mm f/1.4 AIS, now discontinued, is a great lens for video work. Not only do you have the ability to manually control the aperture with these older lenses, but the focus is much smoother. I’ve since gotten the older 50mm f/1.4 for these reasons and it works much better. I’ve also picked up the 35mm f/1.4 and the 28mm f/2.8. All are great for video work and can be found pretty reasonably if you look on eBay.
One more note about fast glass. The entire film was shot available light. At one point we were shooting vocals and one of the musicians suggested that all the lights needed to be turned off (he was just referring to the overhead lights). I was yelling, “NO!” inside, but didn’t really want to interrupt the process, so I didn’t say anything and just went with it. I was left with some candle light. So…I shot some candle shots.
3) Consume a lot of documentary before you begin.
Every story is different so just try to learn how these stories are made. I didn’t have a specific shot list from the director. He trusted me to give him good material with which to work. I did have a loose shot list in my mind that I wanted to try and capture. We had discussed a few shots we knew we wanted, but other than that, it was all kind of in the moment. And, even when there wasn’t a “moment” happening, I was still shooting.
4) Have lots of memory cards and hard drives and someone else to download them.
While we were shooting I would just hand off cards and keep shooting. Things generally only happen once and if you’re sitting around when there is any sort of action going on, you’ll miss something. Along these lines, every night when we’d go to dinner I’d pick one prime and a pocket full of memory cards and head out.
There is a certain craft to being in the midst of something and not distracting people. A balance between getting people to talk to the camera (you), but not always appearing like a statue that doesn’t respond. The more you live with the camera at all times, the more those being filmed will get comfortable with it, and eventually forget about it.
5) Change positions often when shooting occurrences that repeat themselves (in my case, vocals).
Generally, when a recording artist gets to the point in the recording process to lay down the vocals, all the supporting music is pretty much finished. Knowing this can help you a lot if you’re shooting with only one camera, like I was. Each time the artist does another vocal take, change your shooting position. Since they are singing to the exact same track, you’ll be able to edit each of the takes together and they’ll all match up fine rhythmically and visually. Whenever I was filming vocals I changed positions regularly. We got the final audio from the record and edited all my shots to it. All those takes match up perfectly. So, with only one camera you can create a lot of visual interest and energy and give your editor several options.
Here is an example of what I’m talking about. The pacing of this first segment is straightforward and slow. All shot on one camera.
Here’s a six minute section from the film that shows how you can do a lot with one camera. The clip begins with the two musicians working out a section of one of the tracks. This is a simple fly-on-the-wall sort of observation shot showing how they went about writing some of their material. This shot is simple. It’s all it really needed to be. From there we transition right into a full edit of the final track that they were working on. This section includes time lapse, drum tracking, vocal tracking, B-roll, and the bass being recorded. All of these shots were taken at different times during filming. This will demonstrate what a good edit can do and show some creative ways to use one camera and keep things interesting. Just a little over a minute from the end of the clip you’ll hear the section they were working out in the beginning. In this way we’ve told a small little story in the film about this track.
You can also do this for music videos. If you have the final audio from the record, just take the artist to several locations and have them sing along to their album through a boom-box or something (I just said boom-box. Awesome). When you get to the editing stage you just stack all of your takes in Final Cut as different angles and away you go, cutting all your best moments together. Since they’re all consistent with the audio, the sequence in which you shot, or the locations/set-ups, do not matter.
A word about working with this footage in post production. We did our edit in Final Cut. Before importing our material to the project however, we used MPEG Streamclip to batch process all the AVI files from the D90 into Apple ProRes format. Once this is done, the files are rendered clips in Final Cut, which are much easier to work with. It will save you a lot of time to convert your clips before you start to edit in Final Cut.
6) Get ready to work.
The artist schedule was loosely 11am to 2am. I was generally up before everyone else shooting B roll stuff and scenic shots to give the editor other material. I was also up later than everyone backing everything up making sure my batteries were charging and getting things in order for the next day.
The whole time you’re shooting, on each and every shot, you have to pull focus and really concentrate if you’re going to capture anything of use. Obviously this film isn’t technically perfect which was a predetermined style and a look we were embracing and seeking. Even still, I worked for every shot.
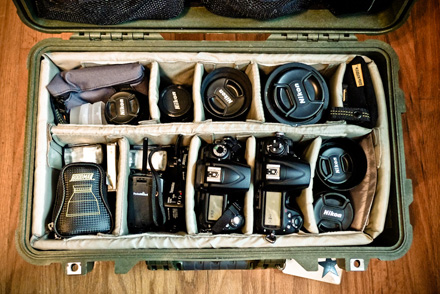
I shot the whole thing in four and a half shooting days on two different trips to Texas (where it was recorded). I was also responsible for shooting all the album packaging images as well as a behind-the-scenes gallery of stills during this time. I travelled very light, condensing everything down into my Pelican 1510 case and a tripod bag. Knowing I was going to a recording studio, I didn’t take any light stands. Instead I threw in some super clamps knowing there would be plenty of mic stands around. I lit everything with SB-800s attached to microphone stands with the super clamps.
Here is everything for the project minus my tripod bag which held my tripod, monopod, super clamps, umbrellas, and reflectors. I carried my case onto the plane with me and checked my tripod bag. Pretty simple.
7) Go for it.
I was inspired by Vincent Laforet’s Reverie project. There’s a guy who saw the potential and went for it. On his own time and budget. I was also inspired when Chase Jarvis released his video involving testing the D90. It was at that point I decided I was going to look for an opportunity like this to create something more substantial than a home video. These things don’t make themselves, so look for your opportunity and go for it! You don’t have to know it all before you dive in (I didn’t), but that was part of the fun and the challenge. Thank you Vincent and Chase for inspiring me.
Thank you to Scott and Brad for having me as well. I’ve been looking for a way to give back to the photography community and it’s my hope I’ve helped some of you here.
All the best,
Aaron
Here are some additional questions I’ve received about this project. If you have any questions that aren’t covered below, I’d be happy to answer them. Fire away!
Q&A
Q: What’s it like working with a director/editor, and what is the relationship like? What decisions do you make when shooting? How much freedom do you have and how much direction do you take from the director? How much input do you have in the editing process? Do you just hand footage over and hope for the best, or are you in there with the editor giving input?
A: These questions kind of all fit together.
In my case, the director and editor were the same person, my friend Brannon McAllister. The two of us were responsible for everything having to do with this record that was visual. In a sense we kind of co-directed this film. We had many discussions and watched some films together and had an idea of what we were going for, so during the shooting he really didn’t have to say a whole lot.
He then did the editing and asked for my feedback on several occasions when we’d sit down and look at some of the edits. In the end we just simplified the credits so I was the DP and he was the Director/Editor.
We were also responsible for all of the album packaging, web design, tour poster / tour t-shirt design, everything. Since we did it all we were able to make the look and feel of everything very consistent throughout all of the products and marketing. Other than the photography, I was involved with the art direction more than anything, especially while we were solidifying the look early on.
Q: How much footage did you capture vs. how much ended up in the film? What happens to the rest of that footage?
A: I’m not sure exactly how much footage I shot. I do know that after our first two day trip and initial edits, I was told that we needed more footage to work with. So I shot and shot. I remember shooting something like 8 hours of footage one day. The D90 is limited to 5 min clips. Only a handful of times did I ever hit the 5 minute mark on my shots, so there are a lot of short clips. Many times a shot was less than a minute in length.
In the second example, when they are setting up the drums, you only see about 15 seconds, if that, of a time-lapse. That was a 10 minute shot. I filmed until the camera shut off and then started it again. I wasn’t sure how we would use it so I shot the whole thing so we would have it. As far as the unused footage goes, I guess it lives forever on my hard drives.
Q: How much was hand-held vs. tripod? Did you prefer one over the other and why?
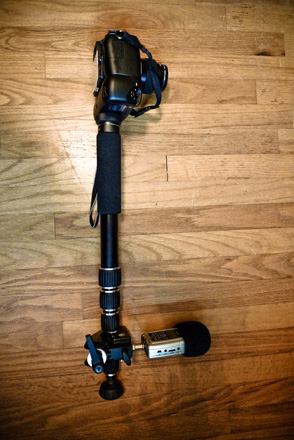
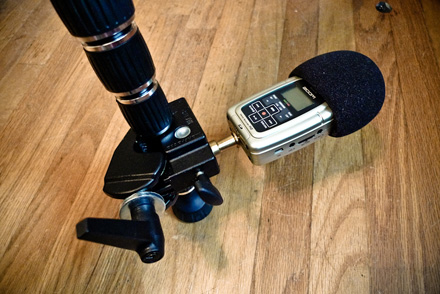
A: During each section of work I’d try to get several really usable shots with the tripod. Once I felt I had those, I would generally switch to shooting hand-held. I personally prefer the look of the hand held stuff. It’s a bit more engaging to me, more like you’re there in the midst of it. There is a certain feel you have to master to shoot good hand-held shots. To help me, I rigged a super clamp at the bottom of my collapsed monopod as a sort of steady cam. I’d hold the monopod with my right hand and pull focus with the left letting the clamp act as a weight about 18 inches below the camera. I also like to attach my H2 Zoom audio recorder to the clamp. If you have a monopod and a super clamp, try it out! It should help you make smoother movements.
Q: Did the vibe/sound/feel of the album have any influence on the way you shot the film?
A: No not really. I was hearing the album for the first time while shooting. It did, however, effect how it was edited.
Q: When you’re shooting, are you just trying to capture different angles to give the editor a bunch of options, or do you have a rough idea of what the final sequences are going to look like?
A: In documentary work you’re going for good options for the editor. You never know what’s next, so you just try to shoot compelling shots. Sometimes a conversation or a performance of some kind would begin and you knew you had one shot at it. In those cases, pick your best angle and composition, and hold steady.
Q: Did the subjects have any input on what/how you were shooting?
A: Not that I recall. They believed in me and let me shoot whatever I wanted, which was really nice. On occasion they would say “Hey, this might be cool to have on film,” and point me to something I might not have noticed, or if I was somewhere else they let me know if something was going on I might want to know about.
Q: Other than the lenses you’ve acquired since shooting this, are there any other tools/accessories you wish you would’ve had when working on this?
A: I could have used a couple more cameras. I pushed the D90 pretty hard take after take and at some points it just got too hot and refused to take anymore video. I had to wait for it to cool off before I could continue. Perhaps this is improved on the D300s, but I haven’t had a chance to try one out yet.
An external monitor to check focus would be a welcome addition. The screen on the D90 is great, but having things a little larger and adjustable for low shots would have been really nice. It’s tough to know sometimes if you’re really in focus on that little screen.
I’d also like to get a Zacuto or Redrock Micro rig sometime. There is no question these products improve the ergonomics of shooting with a dSLR. A better follow focus system would have been very helpful.
You can see more of Aaron’s work at jaarongreene.com.
You can also find more on Derek Webb, the subject of Aaron’s documentary, at his derekwebb.com.


