


5 Must-Know Photoshop Tips and Tricks for Photographers
In this article, I’m going to show you five of my favorite Photoshop tips and tricks for Photographers. These are techniques that most people probably don’t know, but are very useful and they can help you speed up your workflow.
#1 – OPEN THE SAME IMAGE IN TWO WINDOWS
In Photoshop, you can open the same image in two windows and set them side-by-side to work on both details and the overall image at the same time.
To open the same document in two windows, go to Window > Arrange, “New Window for [Name of Document].”
These are not two separate documents. They are the same document, and any adjustments that you make to one will reflect instantly on the other.
Then go to Window > Arrange > Two up Vertical to put the two tabs side-by-side. You can then Zoom into one window and zoom out on the other.
If you have two monitors, then you can place a zoomed in version in one monitor and a zoomed-out version on the other.
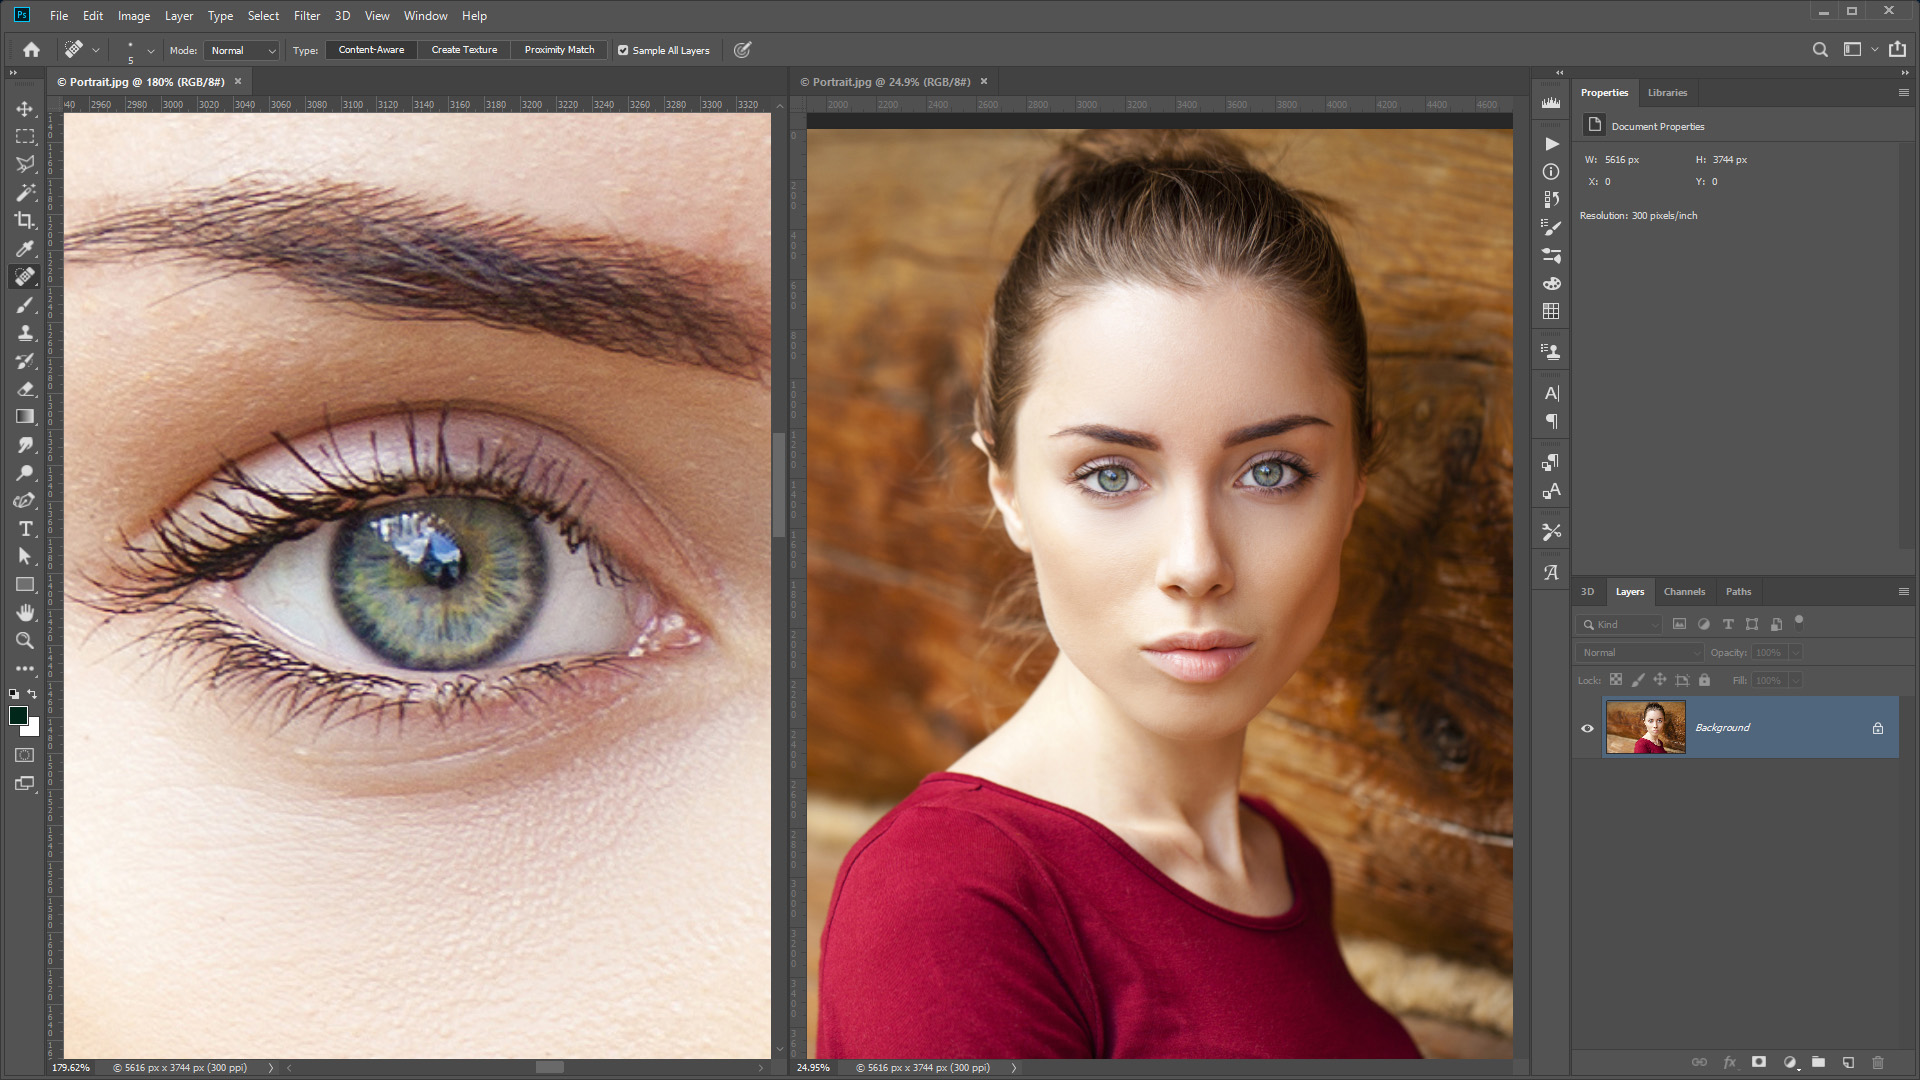
This technique comes in very handy when working with large documents. I once worked on a huge composite that had over 1,500 layers. By using this technique I saved a lot of time by not having to zoom in and out of an image after I made a small adjustment to details.
# 2 – NUDGE, SCALE, AND ROTATE CLONE TOOL SOURCE
To speed up your workflow when using the Clone Stamp Tool, remember that you can use keyboard shortcuts to nudge, scale, or rotate the sample source to better match the size and orientation of the cloning destination.
First, set the sample point by holding Opt/Alt and clicking on an area to sample from. You will then see an overlay of your sample source.
You can then try these keyboard shortcuts to adjust the sample source.
To nudge the Clone Source, you can hold Opt/Alt and tap on the Arrow keys (left, right, up and down).
To rotate the Clone Source Hold Alt (Mac: Option) Shift < or >.
To scale the Clone Source Hold Alt (Mac: Option) Shift { or }.
If you cannot remember these keyboard shortcuts, you could instead use the Clone Source panel (Window > Clone Source) to make these adjustments to the sample source.
#3 – SPOT HEALING BRUSH TOOL MODES
One way to quickly remove wrinkles, blemishes, and other distractions from portraits is to use the Spot Healing Brush Tool. But an often-overlooked option is the Modes dropdown which add a lot more power to this tool.
Under the Options bar, the Spot Healing Brush Tool has Blending Modes that you can use as you paint to better target the pixels that you want to remove.
To select the right mode, you first must look at the blemish, wrinkle, or distraction that you want to remove. Then ask yourself, is the distraction darker than the skin tone or is it lighter than the skin tone?
In the example for this article, the blemishes are darker than the skin tone. That means that you want to “lighten” those blemishes to reduce their intensity.
From the Modes dropdown select Lighten.

Then start painting with a small brush and small strokes over the blemishes and wrinkles to remove them. But notice how you will not lose essential detail in the highlights. The Spot Healing Brush Tool will only target dark pixels which are the pixels that you want to remove.
In the example below, you will see how the fine white hairs remained on the side of his head while the darker blemishes were removed.

If your blemish or distraction is lighter than the skin tone, then select Darken from the Mode drop-down menu, and paint away.
To learn more about how this technique works, you can check out my full-length tutorial on the Spot Healing Brush Tool.
#4 – LOAD LUMINOSITY AS A SELECTION
In Photoshop you can use the luminosity of an image (the bright pixels) as selections. The easiest way to select the bright pixels of a photo is by pressing Cmd Opt 2/Ctrl Alt 2.
If you cannot remember the keyboard shortcut, you can also load luminosity as a selection by holding Cmd/Ctrl and clicking on the RGB thumbnail in the Channels panel.
With a selection active, you can create an Adjustment which will target the bright pixels.
If you would like to target the dark pixels instead, you can “Invert” the selection. To do so, Select the Layer Mask, and click on Invert in the Properties panel. Alternatively, you can press Cmd I, Ctrl I when the layer mask is selected to Invert.
Now if you make an adjustment, the dark pixels will be affected instead of the bright ones.
#5 – CURVES AUTO COLOR CORRECTION
Did you know that you can color correct a photo with just one click?

With the Auto Color Correction Algorithms inside of the Curves (and Levels) Adjustment Layer, you can automate color correction in Photoshop.
This essential technique will let Photoshop do all the hard work, and it will automatically adjust each channel to color correct the image.
You can apply the Auto Tone non-destructively by creating a Levels or Curves adjustment layer, then click the “Auto” button in the Properties panel.
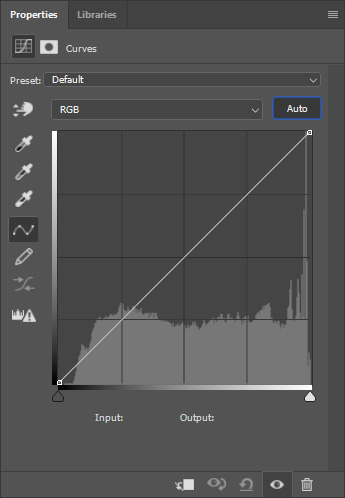
But the default algorithm is not usually the best one. To change the algorithm hold Opt/Alt and click on the Auto button.
Then, from the Auto Color Correction options you can select one of 4 algorithms to color correct your image. In Photoshop CS6 and newer, the default algorithm is Enhance Brightness & Contrast. In older versions of Photoshop, the default is Enhance Per Channel Contrast.
You can then click on the different algorithms and see how they affect your image. In most cases, I found that “Find Dark & Light Colors” give you the best results.
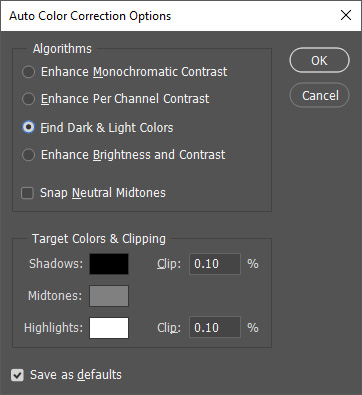
You can click on the “Save as defaults” checkbox so that this algorithm is applied when you click on the Auto button.
After you apply the color adjustment, you will see how the image will instantly be color corrected.

For more information on how this technique works and what to do when the auto color correction doesn’t work, you can check out my YouTube video on The Curves Auto Color Correction Options.
I hope that you enjoyed these tips and that they help you out in your workflow. If you want to learn more Photoshop tips and tricks like this one, then check out my video 19 Amazing Photoshop Tips, Tricks, and Hacks (That You Probably DON’T Know).
You can see more tutorials from Jesús at PhotoshopTrainingChannel.com, and keep up with him on Behance, Facebook, Instagram, LinkedIn, Pinterest, Twitter, and YouTube.

Just a quick FYI. You are missing #4, you have #3 twice. Good article.
Excellent tips – I can use all of them – thanks
excellent Jesus, as always