


Greetings! I’s been about two years since my last guest blog post on 10 years of Lightroom Help Desk Advice, and I thought it would be a good chance to follow up with 10 more tips to help you get the most out of Lightroom Classic.
1. Dig Into Smart Collections
Smart collections allow you to harness the power of the database inside of Lightroom Classic by leveraging the information contained in your photo’s metadata. Plus, any additional data you may have added (like keywords, titles, captions, etc.), to automate the process of finding, grouping, and organizing your photos in meaningful ways. You can think of smart collections simply as saved searches that run automatically.
Smart collections are just one of three types of collections you can find in the Collections panel. If you click the plus sign (+) in the header of the Collections panel, you can access the menu for creating each type of collection. In addition to the Smart Collection, there is the regular Collection type, which is useful for manually grouping photos together based on a common theme or purpose, and the Collection Set, which are essentially containers for other collections and enable the creation of an organizing structure for your various collections.
For example, you might have a Collection Set named for a trip or event, and then within that set, you could have a combination of regular collections and smart collections that contain relevant photos. These can be grouped together based on any criteria that suit your needs, such as dates, names of people, locations, and so on.
I typically use regular collections when I am manually going through photos and picking and choosing specific photos that I want to group together for some reason, and I use smart collections when I want to automatically gather up a group of photos that all meet the same criteria. I organize those various collections inside of relevant collection sets.
To create a new smart collection, you can use the Create Smart Collection menu in the panel header, the New Smart Collection command in the Library menu, or simply right-click anywhere inside the Collections panel to access the same Create Smart Collection menu. This opens the Smart Collection dialog box.

When it comes to creating the rules for the Smart Collection, you first need to decide if you want the photos added to this collection to match any, all, or none of the rules you go on to define by choosing an option from the drop-down menu next to Match. Leaving match set to all is the most straightforward way to get started. You can see all the possible rules at your disposal by clicking the rules drop-down menu and scrolling through the list.
Remember, the only way photos can be added to a smart collection is if they meet the defined criteria, and the only way they can be removed from a smart collection is when a particular photo no longer matches the defined criteria. There are so many ways Smart Collections can leverage the power of the Lightroom catalog and make your life simpler. Experiment and have fun!
2. Designate A Target Collection
Speaking of collections, have you discovered the ability to set one regular collection to be the “Target” collection? The Target collection has a super power, which is that you can add selected photos to the Target collection simply by pressing the B key.
The original target collection is the Quick Collection, which is found in the Catalog panel of the Library module. The purpose of the Quick Collection is to provide a simple way to quickly gather together a group of photos for whatever reason that makes sense to you. Perhaps you need to temporarily round up several photos that are stored across a range of folders for a quick export, or maybe you need to print them to give to a family member, or some other short-term reason that doesn’t quite justify creating a long-term collection for that group of photos.
You can drag and drop photos to the Quick Collection just like a regular collection, but the real benefit of the Quick Collection is the built-in keyboard shortcut of the letter B, which allows you to send selected photos to the Quick Collection with a single keystroke.
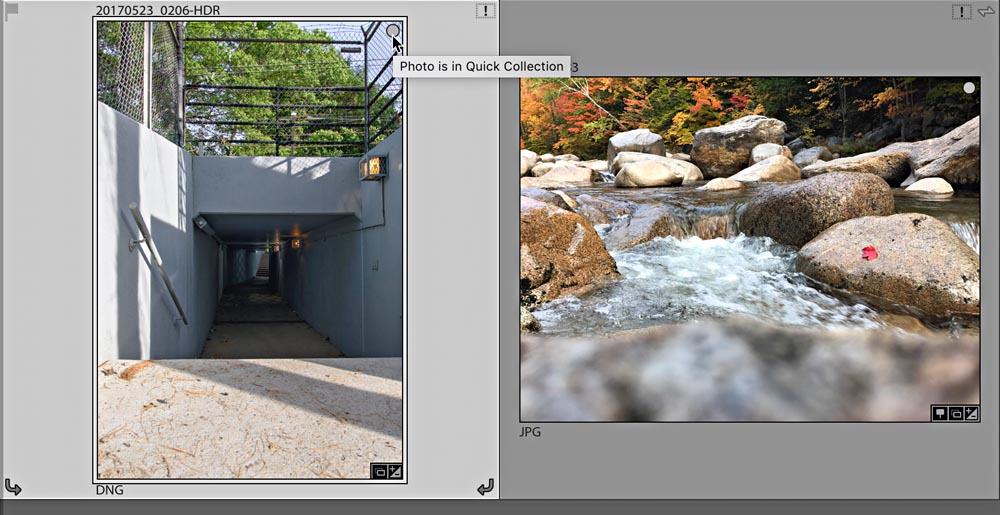
There is also a small round button that appears in the upper-right corner of thumbnails when you move the cursor over the photo. One click of that button will also send that photo to the Quick Collection. The button stays visible on photos in the Quick Collection to provide a visual clue to their status. You can remove photos from the Quick Collection by selecting them and pressing the Delete key (PC: Backspace), the B shortcut key, or by clicking that round button.
The Quick Collection functionality is very handy, but where Lightroom Classic takes it to the next level is in giving us the ability to assign any regular collection as the Target Collection. When you assign a regular collection as the Target Collection (there can be only one collection assigned at a time) you give that collection all the powers of the Quick Collection.
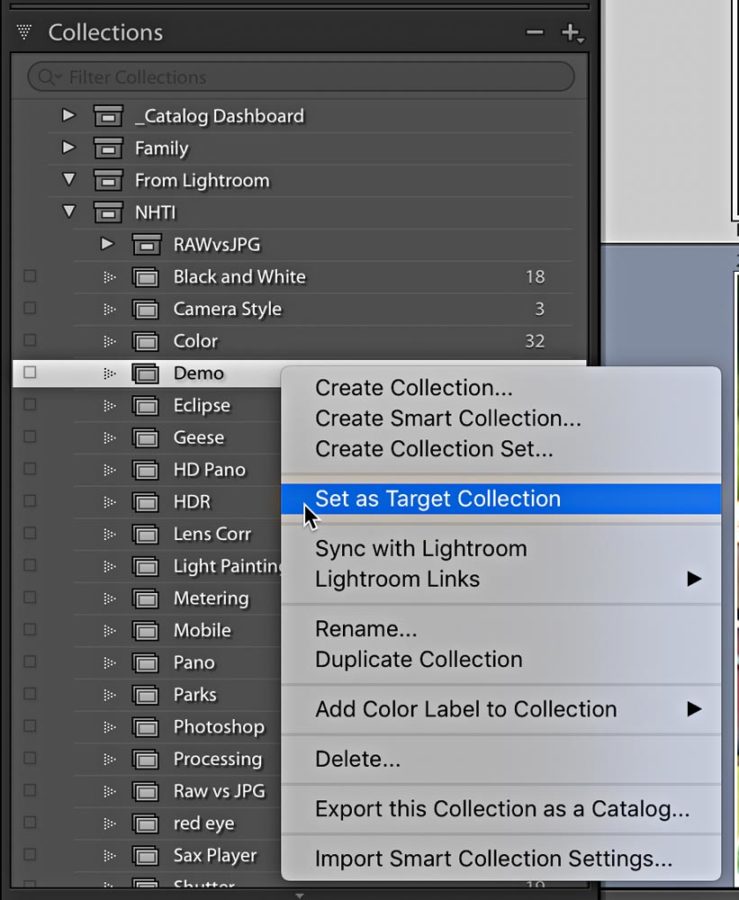
That means that now the B key and the round button will send selected photos to the assigned Target Collection instead of the Quick Collection. You assign a collection as the Target Collection by control-clicking (PC: Right-clicking) the collection and choosing Set as Target Collection from the contextual menu that appears. The chosen collection will be marked with the same small + icon that was previously showing on the Quick Collection as a visual reminder of its new status.
One way I love to use the Target Collection feature is when I need to sort through large numbers of photos to add to different collections, such when as I am working on a book project and I need to choose photos for different chapters.
I start by creating a collection set for the book, and then create a regular collection for each chapter. I’ll assign the chapter I want to work on as the Target Collection, and then it is easy to go looking through my catalog and quickly adding photos to that target collection just by selecting the photo and pressing the B key. It is a simple little feature, but one that saves me a lot of time, and I hope you’ll find it just as useful in your workflow.
3. Use Embedded & Sidecar During Import
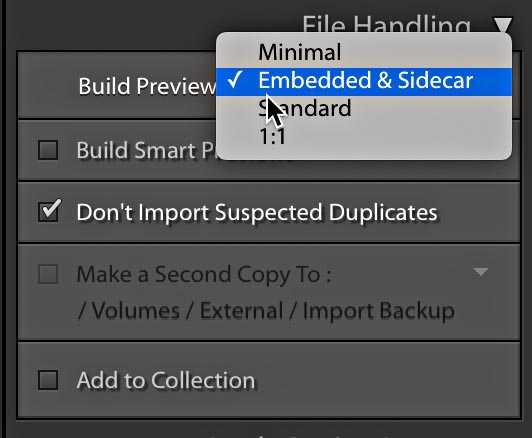
There is a setting in the File Handling panel of the Import window that can really speed up the process of seeing your photos appear during import. This slipped into Lightroom Classic a while ago, but I’ve been using it ever since. Expand the File Handling panel and choose Embedded & Sidecar from the Build Previews drop-down menu. This tells Lightroom to import the embedded JPG from the raw photo to display as the preview you see in Library.
This makes going through and making your initial selects (see tip 5) much faster because you don’t have to wait for Lightroom to render all new previews. Lightroom will quietly update the previews (using Lightroom Classic defaults) during idle time or when you switch to Develop.
4. Create An Import Preset
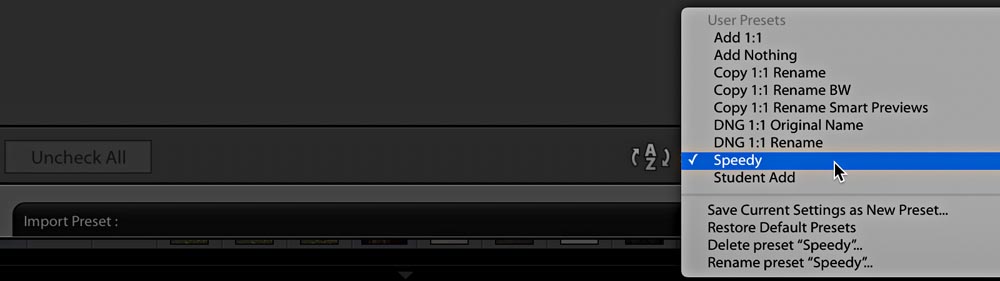
Once you’ve configured the Import dialog with your preferred settings, click the Import Preset drop-down menu (bottom-center of the Import dialog) and choose Save current settings as new preset. Give the preset a meaningful name and use that every import from now on. As long as your import preset is showing you’ll know all of your settings are dialed in.
5. Make Your Selects Faster
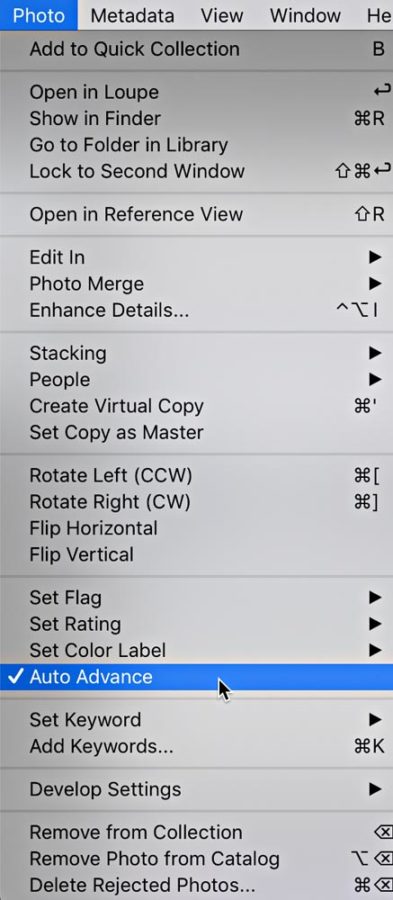
One of the best-kept secrets for improving speed in the process of separating the wheat from the chaff is the Auto Advance option under the Photo menu in the Library module. Give this a try, go to the Photo menu and check Auto Advance, press the G key to jump to Grid view (if you are not there already), select a photo and apply a rating, a flag, or a color label to that photo. As soon as any one of those is applied (whether by keyboard shortcut or button click) Lightroom automatically advances focus to the next photo. This is a huge time saver!
The most efficient way to utilize this is with keyboard shortcuts, and my favorites are P for pick, X for reject, and U for unflag. With Auto Advance enabled and those three keys I can very quickly move through a large volume of photos and end up identifying the ones I want to keep and the ones that will be deleted. If I come to a photo that I am on the fence about I use the U key, which doesn’t apply a flag but it will trigger Auto Advance to move me on to the next photo (think of it as a skip key). If you need to zoom in to check focus, just press and hold Z to zoom into 1:1 and then release the Z key to return to grid view and continue flagging away.
6. Crop In The Dark
To better see the final look of your cropped photo try turning out the lights. Go to Window > Lights Out > Lights Off (or press the L key to cycle through the Lights Out modes) to black out everything except the cropped image to easily visualize the final image without leaving the crop tool.

I find it best to crop at the beginning of the workflow because I like to start with the strongest composition, and the histogram updates to reflect the area inside the crop, so if there are some blown out highlights along the edge of the photo, just crop them right out and don’t waste time trying to fix them.
While you are in the crop tool you will find there are multiple crop overlays available to help you create stronger compositions. Go to Tools > Crop Guide Overlay to see the options, or just press O to cycle through each one. Hold the Shift key and press O to rotate the Triangle and Golden Spiral. You can show/hide the crop overlay by pressing the H key.
Always remember that the crop rectangle is fixed in the center of the screen, and while you can change the dimensions of the rectangle to suit the desired aspect ratio, you move the photo behind the rectangle to tweak the composition.
7. Customize The Panel Order In Develop
Back in the December 2018 update a new functionality was added that allows us to reorder the panels on the right side of the Develop module. How does it work?
Well, if you right-click any panel header on the right side of the Develop module (below the Histogram) you’ll see a contextual menu with Customize Develop Panel at the top. Click that to open the Customize Develop Panel dialog box, where you can change the vertical order of the panels on the right side. You can also uncheck the box next to any panel to hide that panel from view (though we’ve always been able to hide panels).
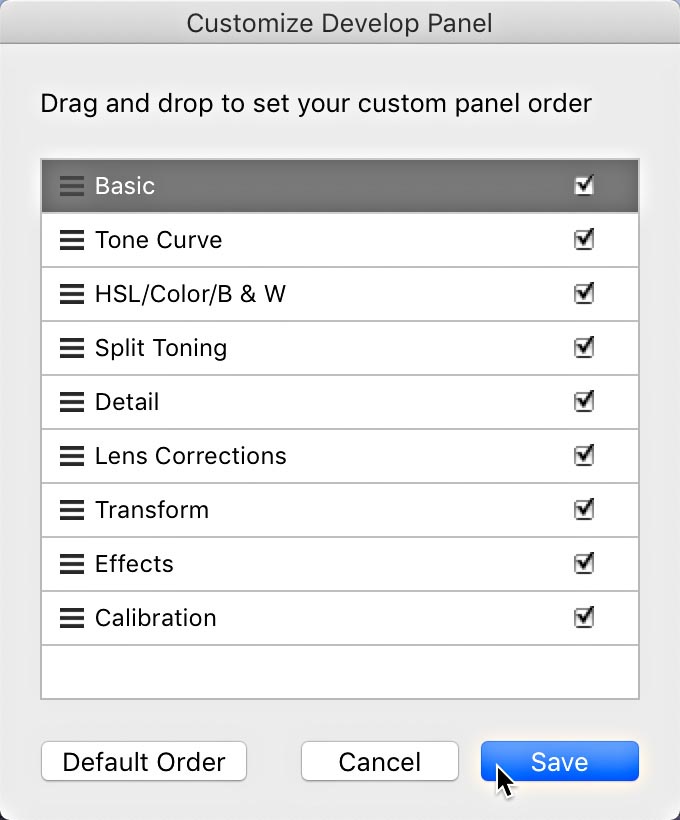
Just click and drag the panels up and down to create any order that suits your workflow. Once you’ve arranged the panels to your liking, click the Save button at the bottom. You’ll be prompted to re-launch Lightroom Classic for the change to take effect (or re-launch later if you are not ready to quit just yet).
If you ever change your mind, just right-click one of the panel headers again and open the dialog back up. At the bottom is the Default Order button that will put the panels back to the way they were before.
8. Make Use Of That Alt/Option Key
You probably know that holding the Alt/Option key while moving many of the sliders in the Develop module provides useful alternative views of your photo to help with that particular adjustment. For example, holding Alt/Option while moving the Exposure slider gives you a preview to easily see highlight clipping. The key combo with sliders is super helpful, but there are other tricks you can perform with that magic key.
Did you know there is a shortcut to open a photo’s location on Google Maps in your web browser? First you need to find a photo with GPS information. It can be GPS that was embedded during capture or from after you manually placed it on the map in the Map module.
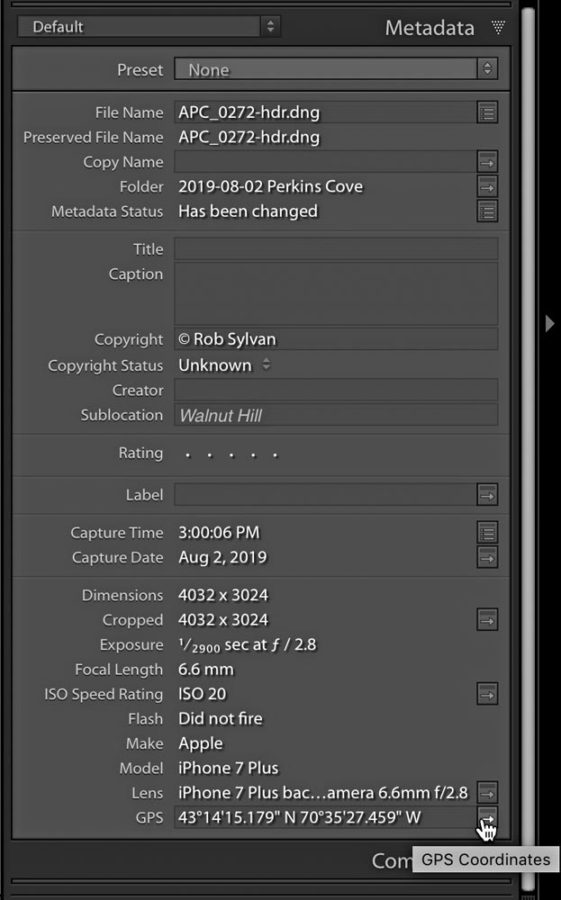
Select that photo and expand the Metadata panel (set to Default view) in either the Library module or Map module so that you can see the GPS field at the bottom. To the right of the GPS field is a tiny little button. Hold the Option (PC: Alt) key and click that button. It should open your default web browser to that photo’s location in Google Maps.
From there you can use the Google Maps tools to share that location, send it to your phone, get directions, and all the other fun stuff you can do with Google Maps. Pretty cool? I think so. Ok, head back to Lightroom Classic for the next tip.
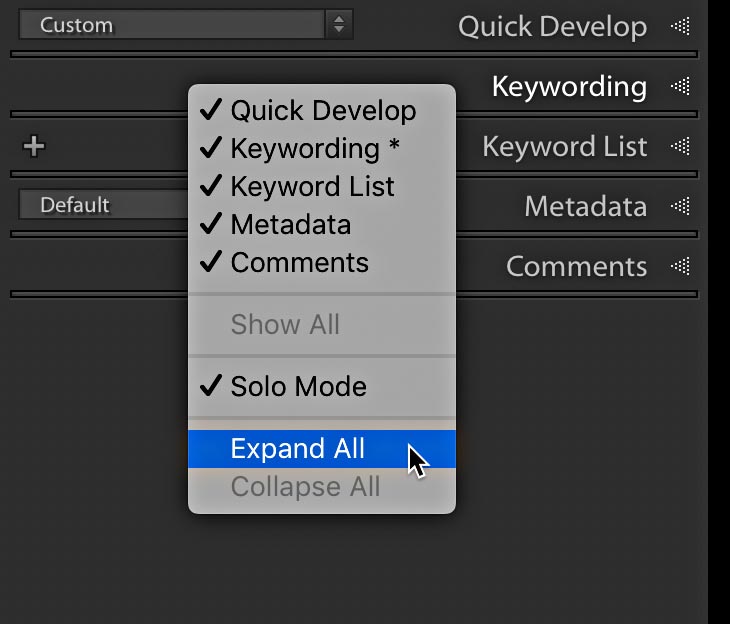
I’m going to guess that you know about Solo Mode on the panels in the various modules as a way to only have one panel open at a time which saves on scrolling, yes? You may have even encountered it accidentally by right-clicking on a panel and opening the contextual menu to discover Solo Mode as an option.
However, did you know Solo Mode works on the Export dialog too? It’s true! It isn’t as discoverable on the Export dialog because right-clicking there doesn’t do anything. Instead, hold the Option (PC: Alt) key and click on any of the panel headers within the Export dialog to enable Solo Mode. Say good-bye to scrolling on the Export dialog!
Pro Tip: If you need to have more than one panel open at a time, just hold the Shift key while clicking any other panel header to open that panel while keeping the existing panel open (that works on all the other modules too). Option/Alt click any panel header again to turn Solo Mode off.
Extra Bonus Tip: CMD (PC: Ctrl) click any panel header to open or close all panels at once (that works in all the other modules too). Hope you find that helpful.
9. Right-Click Everything
Following on from my last tip there are so many times throughout Lightroom that the contextual menu that appears after a (Mac) ctrl-click / (Win) right-click (which from here on out I’ll just refer to as right-click) is just the thing you are looking for to get the job done. Let me highlight a few examples.
Need to create a new subfolder right within an existing folder? No problem, just right-click the parent folder and you’ll see a contextual menu option to create a folder inside that folder. This is also where you can find the options to rename that folder and a whole bunch of handy folder related tasks.
Just discovered that one of the panels has gone missing from a module? No problem, just right-click one of the other panels on that side of the interface and check the missing panel from the contextual menu. Handy for setting Solo mode too.
Need to perform some action on a photo or selection of photos? No problem, just right-click and be amazed at the array of options that appear before you! I trust you get the idea by now that there is a lot to discover in those contextual menus, and all you need to do is right-click around to find them.
10. Control Where Photos Synced From The Cloud Are Stored
All of those tips have been focused on Lightroom Classic, but I do believe the cloud-based Lightroom makes a great companion to Lightroom Classic. If you do decide to sync your Lightroom Classic catalog with the cloud-based Lightroom, then I highly recommend that you designate a location of your choosing for where photos synced are stored locally. Head over to Lightroom > Preferences > Lightroom Sync (Edit > Preferences on Windows).

Then head down to the Location section and configure the location on your system where you want photos synced from the Lightroom ecosystem to be stored locally. Because any full resolution photos you import into Lightroom for mobile are uploaded to the cloud and then downloaded through Lightroom Classic, it helps to be in the driver’s seat for where you want them to go.
In my case, while I store the bulk of my photo library on an external drive, I designate a folder on my internal drive for these synced photos because my external drive is not always connected. Then I periodically use Lightroom Classic to move the newly synced photos to my external drive, which both moves them and retains the connection between the photos and the catalog.
I hope you’ve found some of those tips helpful. Please feel free to reach out to me with any questions you may have, or come see me at Photoshop World, where I’ll be teaching, and answering questions at the Expert Bar.
You can see more from Rob at LightroomKillerTips.com and keep up with him on Twitter and Facebook. Aside from also being a KelbyOne Help Desk Specialist, and Adjunct Professor at NHTI, he is a founding member of Stocksy United (a stock photography co-op). Rob writes the “Under the Loupe” column for Lightroom User Magazine, and is the author of many photography related books. His latest book is Lightroom Classic for Dummies.


1 comment