

THREE SONGS, NO FLASH
I photograph a lot of concerts, not for money or fame, but because it is something I truly enjoy. Photographing products, models, sports and landscapes are great, but nothing recharges my photographic batteries like the rush as the house lights go down and the stage lights go up.
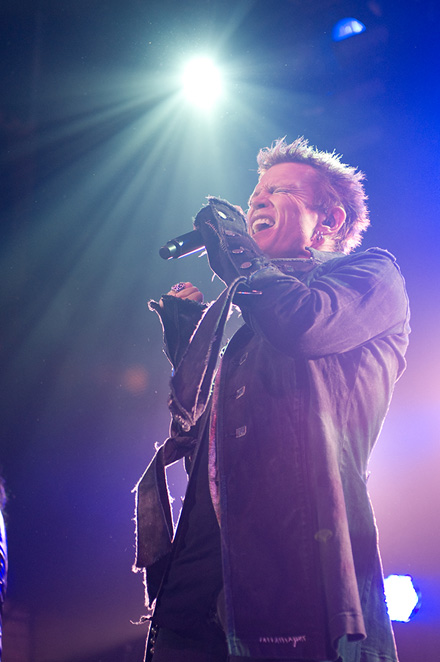
When Scott asked if I was interested in being a guest blogger, it was the same day that I was invited by Steve Stevens to photograph him playing with Billy Idol at The House of Blues in Los Angeles. I thought that a look into shooting a concert along with a dash of the new Bridge CS4 thrown in would make for an interesting read. Something a little different.

ISO 640 f/2.8 1/80 sec
Concert photography takes practice and planning. The combination of changing lights, moving subjects and a very limited amount of time to get the shot makes concert photography one of the most rewarding and frustrating experiences a photographer can have. As with all type of photography, the best way to get better is to practice. Since it is not all that easy to get credentials to photograph bigger acts, start locally. Most cities have a couple of bars with live music that don’t mind if you come in and photograph, and usually have little if any restrictions. Most of the time, these venues will have horrible lighting and you will want to use a flash to get a good exposure.
I have two good reasons not to use a flash in these circumstances; images taken with a flash will look flat and boring. Good concert shots are about the energy coming off the stage and nothing will kill that quicker than the flash firing straight at the performer. The second reason is that if you ever get to shoot bigger acts in bigger venues, you will not be allowed to use a flash. If you are not used to pushing the ISO or slowing down the shutter-speed, but instead have relied on a flash to get the exposures you want, you will be in for a very frustrating shoot.
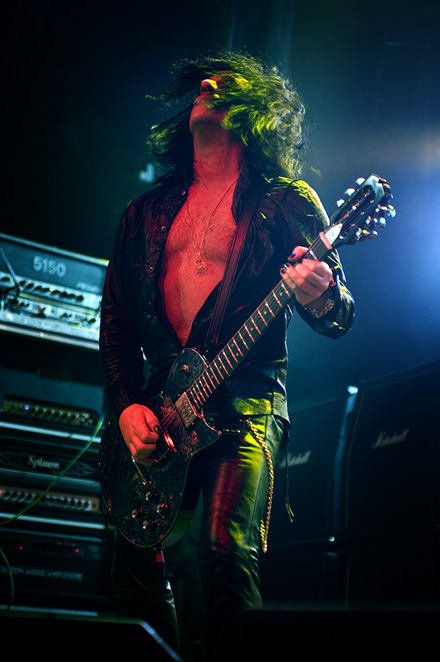
ISO 800 f/3.2 1/160
BEFORE THE SHOW
I get a lot of questions about the camera and lenses I use to shoot concerts with. My main camera for many years was Nikon D2X, with a Nikon D200 as a second body. In 2007 when Sony released the A700 I was asked to write the Digital Field Guide for the Sony A700 so I put aside my Nikon gear for a while and shot mainly with the A700. The lower noise in the higher ISO range of the A700 compared to my trusty Nikon D2X was truly eye opening. Since then I have also written the Digital Field Guide to the Sony A200 and I used that for my concert images for the first part of 2008. On a trip to New York City in the early part of 2008 I had the opportunity to use the Nikon D3 and its ability to shoot at high ISO (1600 and higher) with little noise is truly an amazing advance for digital concert photography. Even with all the improvements in the sensor technology, one of the most important parts of low light shooting is a lens that lets in a lot of light. Using “fast” glass is important to getting the shots you want. All the lenses I use for concert photography have a constant maximum aperture of 2.8 or greater.
Packing gear for a concert is all about making sure you only have what you need and nothing more. The space in the photo pit is limited, and usually you will be sharing it with other photographers, so bringing the big camera bag is not the best idea. I really like the Domke camera bags and use the F-2 bag for concert shooting as it offers protection and ample storage without being too big or bulky. I pack a selection of prime lenses that take up very little space, but having a 50mm f/1.4 or a 35mm f/2 lens can really save the day if the lighting is very low. For getting in close to the performers, I like the 85mm f1/4 and the 70-200mm f/2.8 Nikkor lenses. One other lens that I like to throw into the camera bag is the 10.5mm f/2.8 which is great for getting the whole scene. It takes up very little space and can create some great images. When shooting with a newer full frame sensor, the 16mm f/2.8 would be a good substitute. I also pack the 24-70mm f/2.8 Nikkor lens when shooting with a FX sensor as my main camera, or the 17-55mm f/2.8 DX lens if shooting with a DX sensor as my main camera. These mid range lenses let me adjust from wide to close without having to change lenses. I pack two camera bodies, and for the Billy Idol show, that was a Nikon D700 and a Nikon D2X. This makes for a pretty full bag, I feel prepared no matter where I am told to shoot from.
I carry extra batteries and CompactFlash cards in the front pockets of the camera bag so that I can find them by touch in a dark venue. Even though I am only shooting for 3 songs, I always carry an extra battery. I am sure I will never need it, until the day I don’t have it.
One more important note before leaving for the show, if you have a photo pass waiting at the venue, take the phone number or the confirmation email of the person issuing it along with you. At times, wires get crossed and it is better to be able to call some one or ask to talk to someone other than the box office staff.
AT THE SHOW
Once inside the venue, you will usually be allowed to shoot for three songs, but even this is subject to change. Last year when shooting Willie Nelson, there was two song limit, and when I shot Faith Hill and Tim McGraw, I had a one song limit. Now three songs might seem like a long time when stuck in traffic, or waiting in the doctor’s office, but it isn’t very much time when you are trying to capture a musical performance in a cramped photo-pit with rapidly changing lights and a performer who is constantly moving around the stage.
ISO 800 f/2.8 1/125
For Billy Idol, the three song limit equated to about 14 minutes,which is not a whole lot of time. That is one of the main reasons I bring two camera bodies, one has a wide angle lens and the other is used to get in close. At the House of Billy show, the wide angle was the 10.5mm fisheye lens on a Nikon D2X and since I was shooting right up at the stage, I used the 24-70mm lens on a D700. This let me change quickly between close ups of the musicians and a wide angle view of the whole stage. If the stage would have been deeper I would have used the 70-200mm lens instead of the 24-70mm.
I was sitting low in the photo pit situated between Billy Idol and his bass player, Stephen McGrath. This was not ideally where I would have liked to set up but since there were 8 other photographers all in the same photo pit, it was the best I could manage. I have found that it is not always the best idea to be right in front of the performers, but a little bit to the side, this lets you shoot past microphones and mic stands. Since there were so many other photographers in the pit, it was impossible for me to move from one side to the other during the shoot.
I think of shooting the performance as a balancing act, using a shutter speed fast enough to freeze the action with an ISO low enough to avoid the digital noise. When Nikon introduced the D3, they changed the way that low light photographers could shoot. The noise in images shot with the D3 at ISOs of 1600 have less noise than the same images shot with the D2X at ISO 400. This makes it possible to use higher shutter speeds and deeper depths of field to get the same exposure without the noise usually associated with the higher ISOs.

ISO 1000 f/2.8 1/320
Since concert lights are changing constantly, I have found that that the only real way to control the exposure is to shoot in manual mode and make any adjustments to shutter speed, aperture or ISO myself. The Billy Idol stage set had a massive amount of lights right behind the band, which makes it very difficult for the cameras built-in light meter to get a correct exposure reading.This is where the practice comes in. With practice I am able to look at the lighting and have a good starting guess at what the ISO, shutter speed, and aperture need to be to get a correctly exposed image. One big advantage with digital is being able to check the exposure on the back of the camera, something that just couldn’t be done back in the dark days of film.
I usually start with the camera set to ISO 800, the aperture set at f/2.8 and the shutter speed at 1/80 of a second and the metering mode set to spot metering. If I feel that the lights seem bright, I will drop the ISO to 400 or raise the shutter speed to 1/125 of a second. A quick look at the back of the camera helps in seeing if the exposures are in the ballpark.
After the first three songs are over, it is time to grab my gear and leave the photo pit. Each venue has their own set of rules, some will allow you to keep your camera with you, others will require that your gear is removed from the venue. At the Billy Idol show, The House of Blues required that all camera gear was to be removed from the venue after the first three songs. After safely locking my gear up, I got to enjoy the rest of the show from the balcony.
AFTER THE SHOW
I download my images using a Lexar UDMA card reader and the Adobe Bridge CS4 Photo Downloader. The downloader lets me rename the photos, store the photos into two different locations and add copyright information to the images all in one step. I download the images to two different locations purely as a safety measure. One copy is on the working drive, while the second copy is backed up to a Drobo on import.

My next step is to do a quick sort of the images and this is where the new review mode in Bridge CS4 comes into play. I use this new review mode as a great way to do a quick sort to get rid of the images that are out of focus or badly under or overexposed. When I enter the Preview mode, my photos are presented in a carousel view in a full screen mode. Pressing the left and right arrow keys will cycle through your images, while pressing the down arrow key will remove the image from the preview mode. When I am left with the images that I want to keep, I click on the X on the bottom right of the screen to return Bridge to its normal mode with all the images that were not dropped in the Preview mode selected. I then use the Copy To command to create a folder of the selected images. I then burn the original folder to DVD and delete it off the working drive. I think of these DVDs as my original film and file them away in a safe offsite location.

My workflow now switches to Lightroom 2, which lets me sort, tag, and edit my images, but more importantly, it lets me output the images so that others can see them. I import the folder of the selected images into Lightroom 2 and from here I can edit, create prints, slideshows and web galleries from the images. Depending on if I am shooting for myself or for hire, at this point I can submit the images to a client, or post a gallery to my website. At this point I have a set of the Raw files on DVDs, a set on the Drobo and a working folder with the selected images on my main hard drive. When I am completely done with the images, I will burn the finished images to DVD and copy any changes over to the files stored on the Drobo.
I then delete the working folder. This Keeps my main working drive free for the next set of images, while I have a DVD of the original images, a DVD of the processed images and a folder on the Drobo with all the images. I then update the location of the files from the working drive to the Drobo in Lightroom 2 so that I can still access the files if needed.
So that is my concert shooting workflow. I hope that this has been an interesting read, but more importantly, I hope that each and every one of you has something that you really enjoy photographing. Something that will recharge your photographic batteries.
CONCERT PHOTOGRAPHY TIPS
Practice without a flash. Most bands, venues and promoters do not allow flash photography, even with the proper credentials. It is better to learn how to get the correct exposure without relying on a flash. The flash will also make the images look flat and boring, and who wants that.
Know your gear and where it is packed. Shooting in dark venues makes it important to know where everything in your bag is. Being able to find that extra battery or memory card in the dark can be the difference between getting the shot and missing it.
Protect your health and hearing. Shooting concerts can be hard on your hearing. Packing a set of good earplugs will pay off in the long run.
Pay attention to your surroundings. If you are shooting in a photo pit in front of the stage, chances are there will be speaker cables, power cables and other stuff that it is best not to touch. Stay out of the way of any working crew, they have a job to do.
Be polite. Remember that the majority of the people there are to see the band, not the back of your head. Try not to cause any problems for any of the concertgoers because security will have no problem asking you to leave, photo pass or not.
–Alan Hess
No mention about signing a contract or copyrights?
I’d like to know more?