

Hi Gang: I thought I’d share the painful, behind-the-scenes step-by-step lighting set-up for the BMW 650i I shot a week or so ago at Studio 75 in Seminole, Florida (I shared the final shots on my Facebook, Twitter and Google+ pages).
Since I had all the test shots as we were piecing the lighting together, I thought I show you how it looked in stages, all right out of the camera (until the end when you see the final shot). It’s not going to be pretty, but here goes:
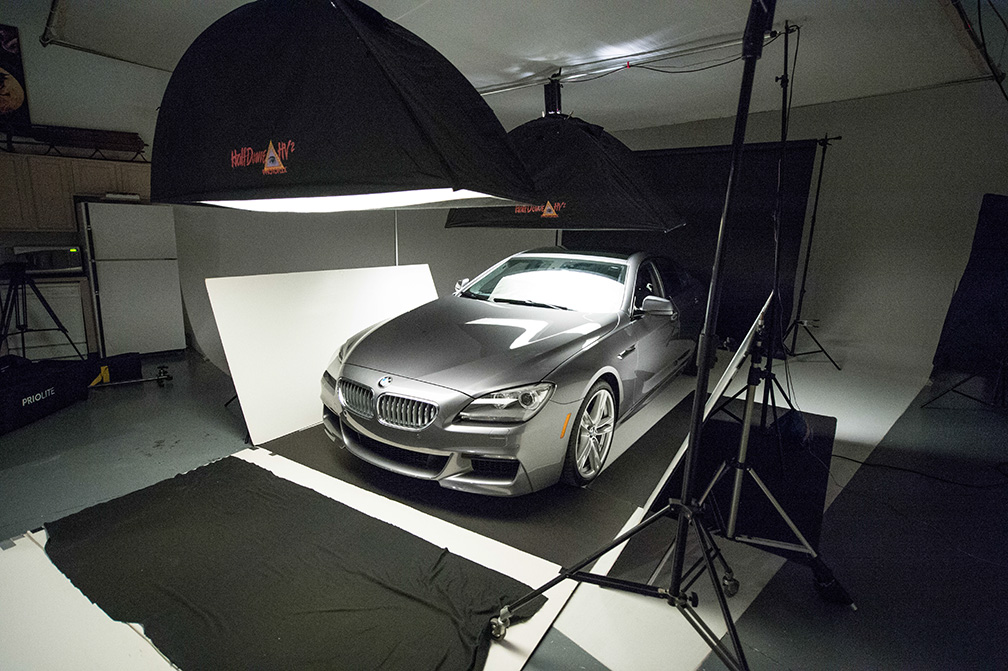
Above: Here’s a behind-the-scenes shot of where we finally ended up. lighting wise. It looks like a simple two-light set-up, and it is, but getting there was….was…wellâ¦it took a number of hours and there was a lot of “scrunching of my face” during the entire shoot to get it where I was hoping to be. We’ll start at the beginning, just after we put up a long roll of black seamless paper behind the car.
Above: I thought we’d start by putting a large strip bank softbox over just the very front of the car, since I was going for a very dark, dramatic look. So, we put the stripbank on a boom stand, put it right over the front of the car and I took a test shot at f/11 at 1/125 of a second shutter speed, just to see where we were as a starting place. It looked pretty awful (as seen above).

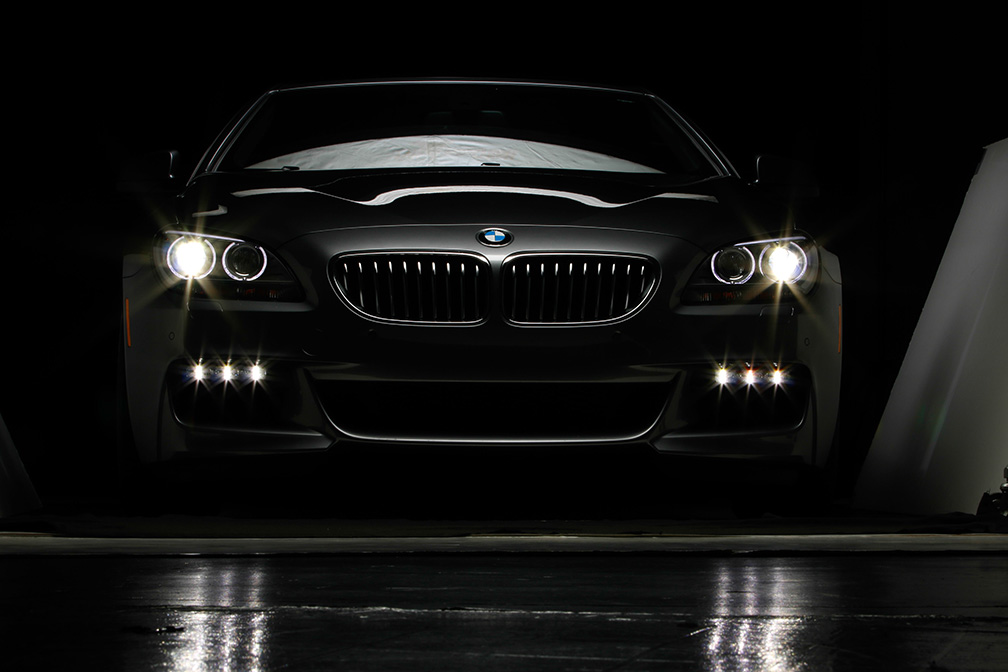
Above: Luckily, I knew I could make the light fall off to dark pretty easily by just using the “tried and true” f/stop I learned from Tim Wallace’s classes on shooting cars, and son of a gun if ol’ f/22 didn’t make a huge difference. We also moved the soft box back a little further over the hood of the car, but we lost all the highlights in the front grill.
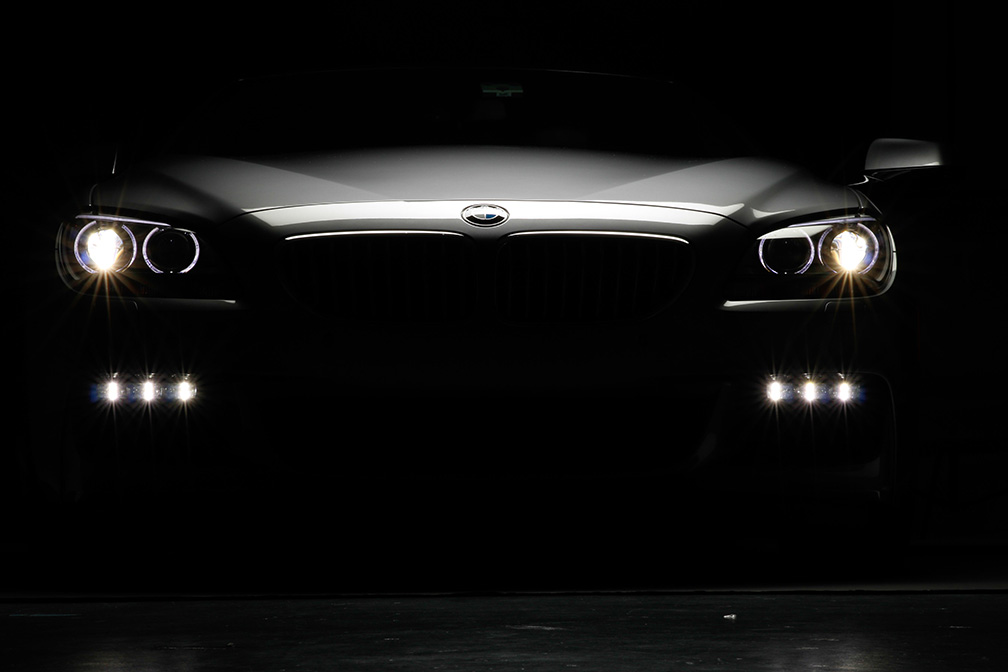
Above: I knew I wanted the headlamps on, so I had Brad jump in the car and start it (you had to start it to get the fog lamps on bottom to come on. I figured I’d have to do a bit of Photoshop magic when it came to the headlamps â” maybe blending two separate shots into one (one exposed for the lights, the other for the car), but I got lucky — the headlamps used LED lights, and it looked great first time out without any fancy stuff (and the f/22 gave us starbrights in the lights). Another lucky bonus. By the way, I’m totally cool with lucky things happening during a shoot. In fact, I embrace it!

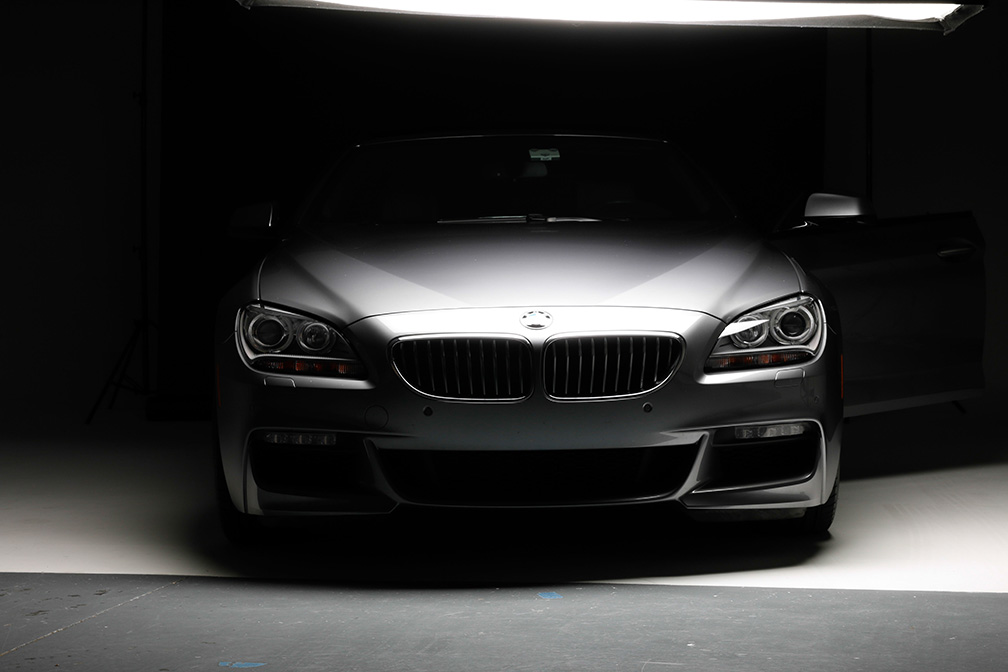
Above: So, I knew the headlights would look good, so I had Brad turn them off (and the car so we didn’t get asphyxiated), but the front grill was missing altogether so we moved the soft box just a tiny bit forward until the grill appeared again (as seen above). Then we put a large white v-flat on the ground right in front of the car, so we’d get some highlights to come out on all the edges (also seen above), but now it’s too bright right below the grill, so we fixed two problem and created one new one. Hey, I see it as a 50% win. LOL! The whole shoot was kinda like that, but I was mentally prepared for it after my last car shoot. It’s all a matter of controlling how the light reflects and having the patience (and enough black and white reflectors) to make it happen.
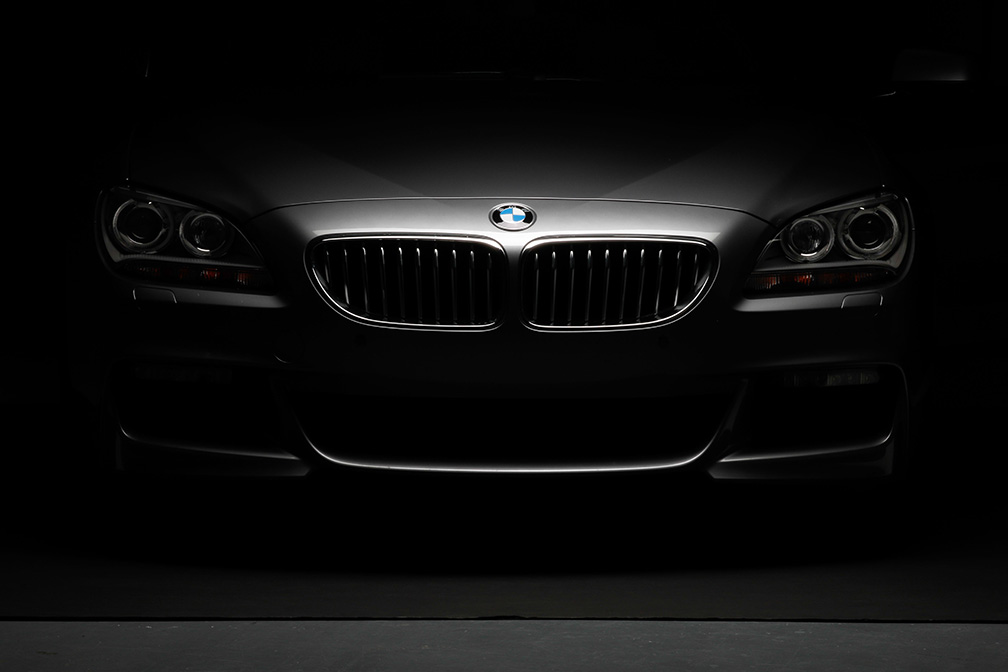
Above: I needed that area right under the grill to be dark, so I asked Dan (the owner of Studio 75) if he had a thinner black v-flat we could use to block part of the white v-flat that was reflecting the light back upward to bring out the highlights. He didn’t, but he had a thin roll of black felt material. We rolled it out on the floor way in front of the car, and Brad and Dan each picked up an end and walked it toward the front of the car until I yelled “Stop!” right when that area below the grill turned black. That little two-foot strip (see above on the floor right in front of the car), covered just enough of the white v-flat bounce card to do the trick. Sweet!
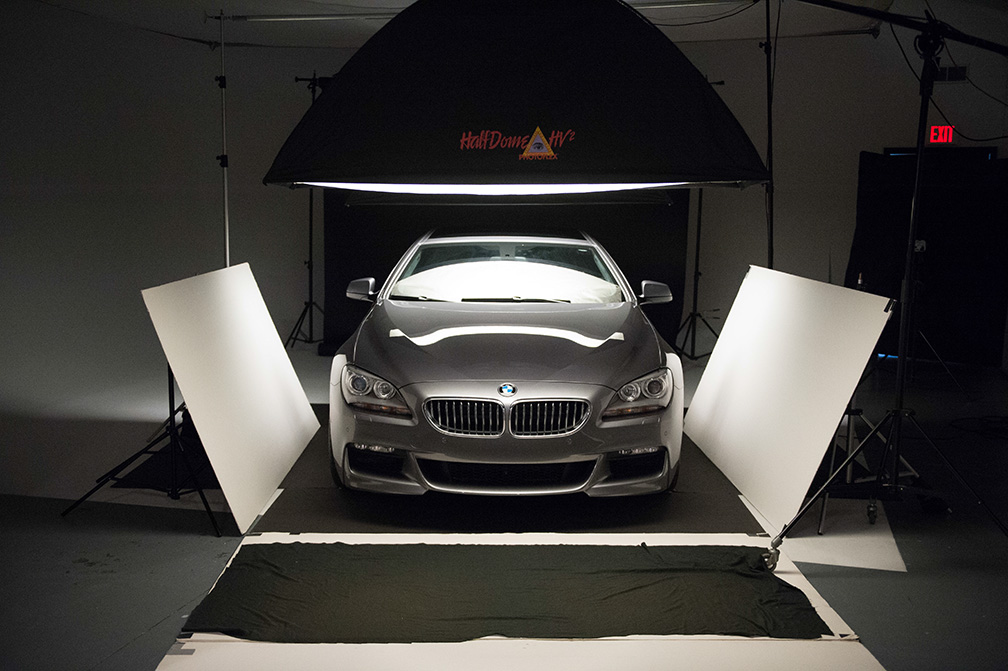
Above: I left like we were getting close, so I was starting to get excited, but it kind of looked like just the nose of the car was there, kind of floating on its own, so we added 2 large white v-flat fill cards — one one either side of the car to fill in the sides a bit, and it worked really well. I lowered the power of the overhead light a bit so I could see how the fill cards would look without being overpowered by the light (see above).
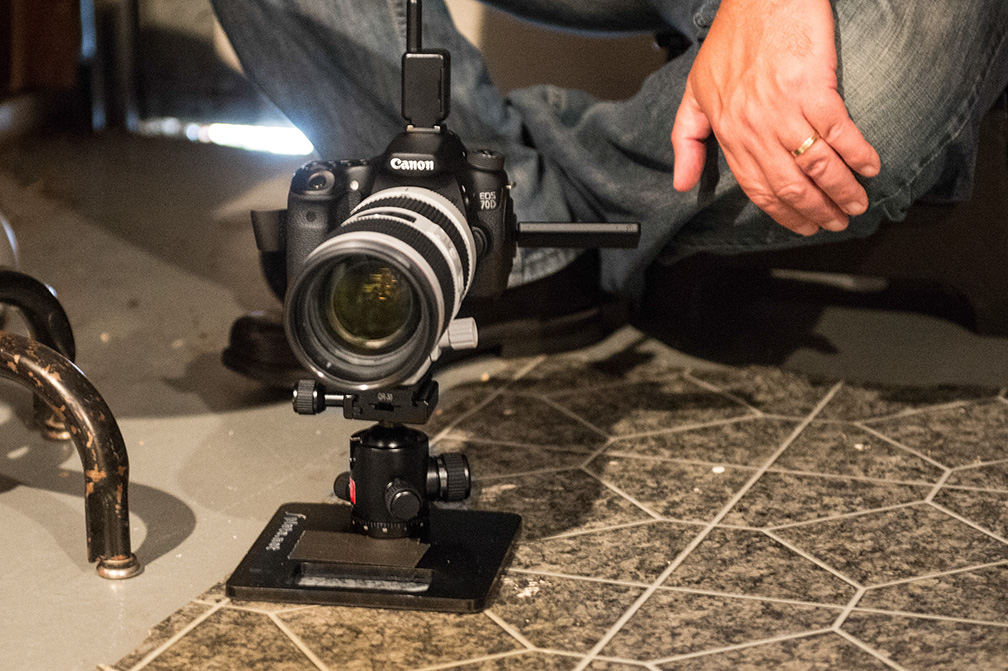
Above: Now that things are starting to get close, I wanted to get a really low perspective; lower than I got last shoot by just splaying out my tripod’s legs, so Brad came up with the idea to use a f/plate (the same one I use for shooting remote cameras at NFL games) with a Manfrotto bullhead (seen above). One reason it worked so well was I use trying out a Canon EOS 70D camera, and it had a tilt-swivel LCD screen on the back, so I could aim it back up at me and use Live View to aim and level the camera. Then I’d switch off Live View and take the shot (I couldn’t get the flash to fire in Live View mode, though I think there actually is a way). I also switched from a 24-70mm lens to a 70-200mm and moved all the way to the very back of the studio.

Above: I was happy where things were going, but I felt there was still something missing — I originally thought it would be cool just to see the front of the car lit, but the more I looked at it, the more I thought I wanted to see a least a hit of the windshield and side mirrors, so we rigged up another large strip bank and put it right over the enter of the hood. I knew as soon as I took the test shot above this was going to be what it needed. I had Brad jump back in the car and turn on the parking lamps (seen above), just to get an idea of where things were going. So far, so good, but we’re not quite there yet. NOTE: as I learned later, I probably should have stopped here. More on that in a moment.

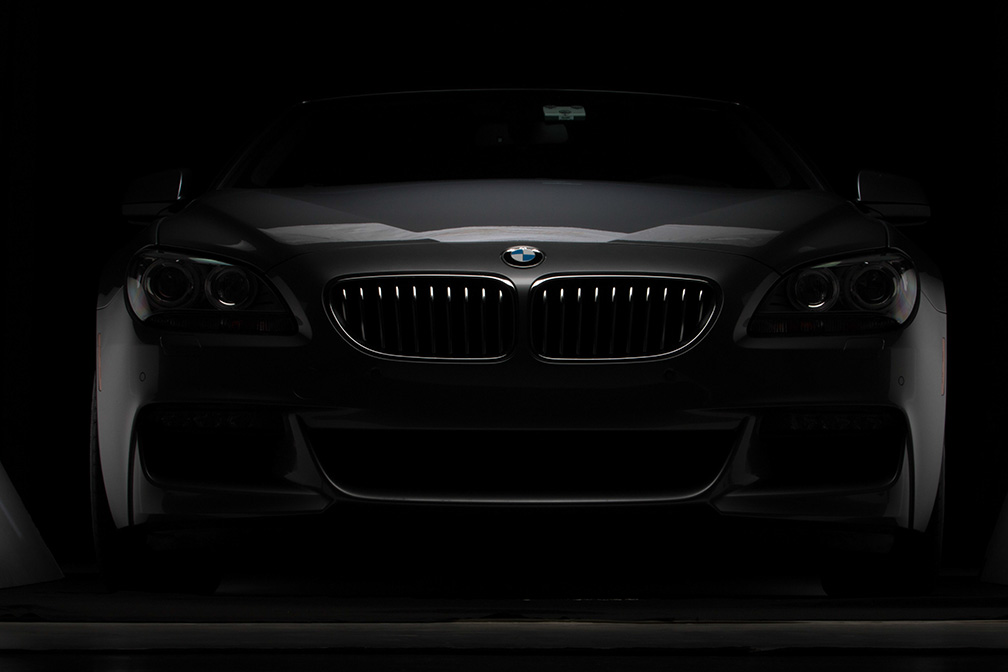
Above: I thought it would be cool to see a highlight in the windshield and more of the highlights on the rear view mirrors and roof. I was half right. Here’s how it looked after we moved the 2nd softbox farther up the hood, closer to the windshield.
Above: I liked where it was going (and I liked the way the 2nd softbox looked reflected in the hood), so I had Brad move it back even farther, so it showed up 1/8 of a circle in the windshield. It was almost time to turn on all the headlamps (with Brad inside the car again), and zoom out just a bit to take in a bit more of the floor.
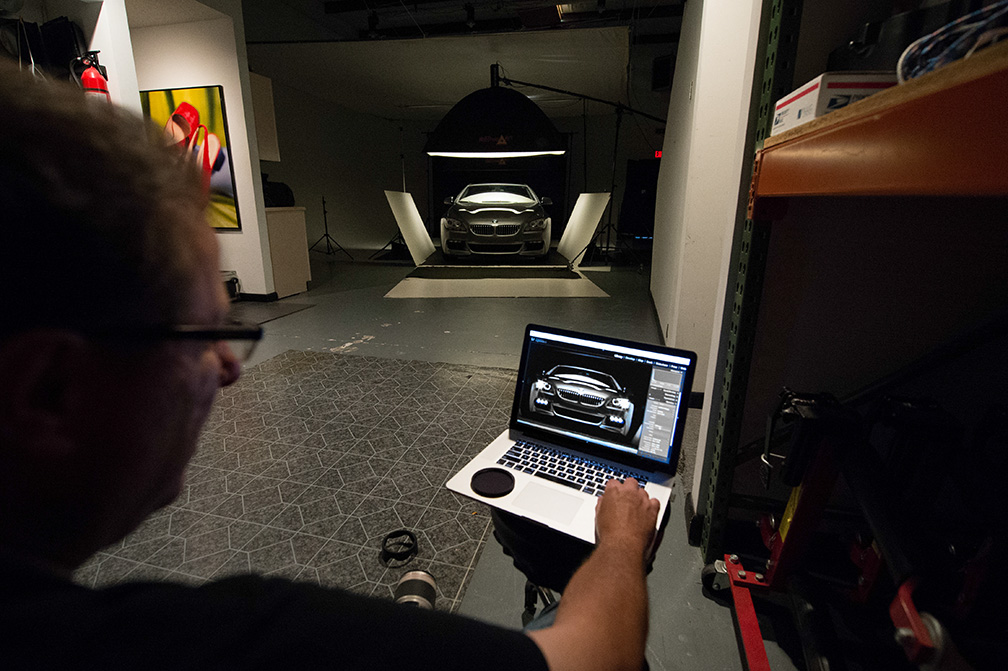
Above: Here’s the over-the-shoulder view from my shooting on the floor once we had all the lighting in place. You can really see the black strip in front of the car, and the white v-flats on either side and again in front of the car which is creating those strong highlights in the front.
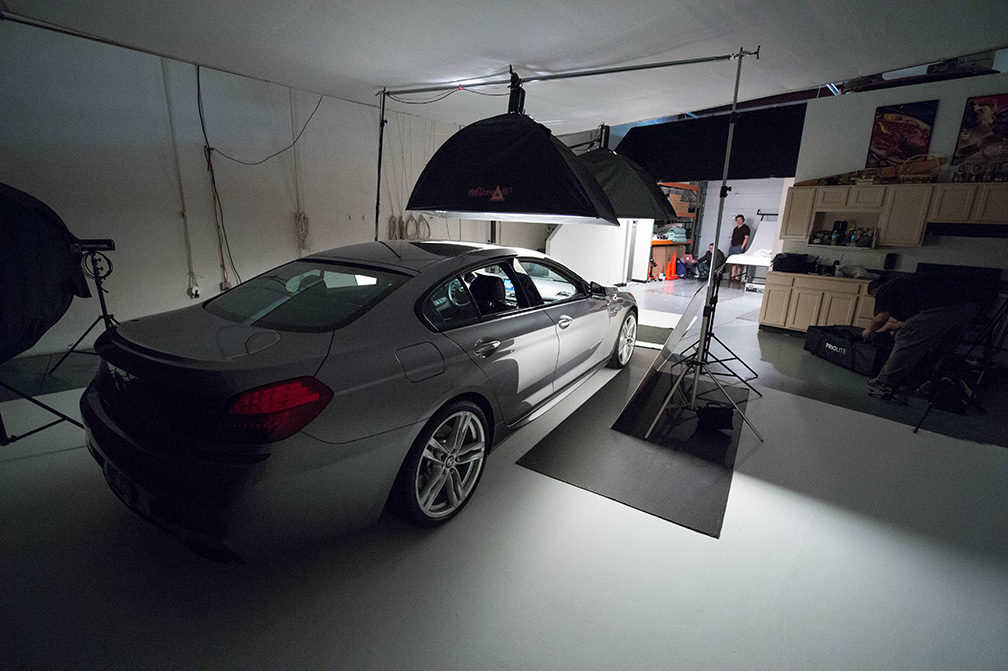
Above: Here’s the rear view so you can see the placement of the two softboxes right over the hood and windshield. Also, if you look way back in the back, you can see me sitting on the floor, and the incredibly helpful owner of Studio 75, Dan, so has a gadget for everything!

Above: By the way — how do you move a car around in such a small studio like this? With wheel lifts (and McGuyver-like took in Dan’s bag of tricks). You basically put this lift under both front wheels — lift them up, and you can just slide the car pretty much wherever you want it. It’s how we did the dramatic side shot I posted over on my Facebook page.
Above: Here you can really see that black strip of cloth that got rid of the reflection under the grill (of course, you see it from this angle without the flashes firing, but from the low perspective and with the flashes firing, it went solid black).
Above: Once I zoomed way out so I could see more of the floor, another lucky thing happened. Where the white v-flat ended on the floor, the gray paint in the work area just happened to perfectly reflect the headlamps. Since I was going to half to paint over the white v-flat on the right side in Photoshop anyway, I could just paint over the crack in the floor and the white line where the white v-flat ended. So, besides turning up the power of the strobes a bit more, this is nearly the final shot. Just a little tweaking here and there with the lights.
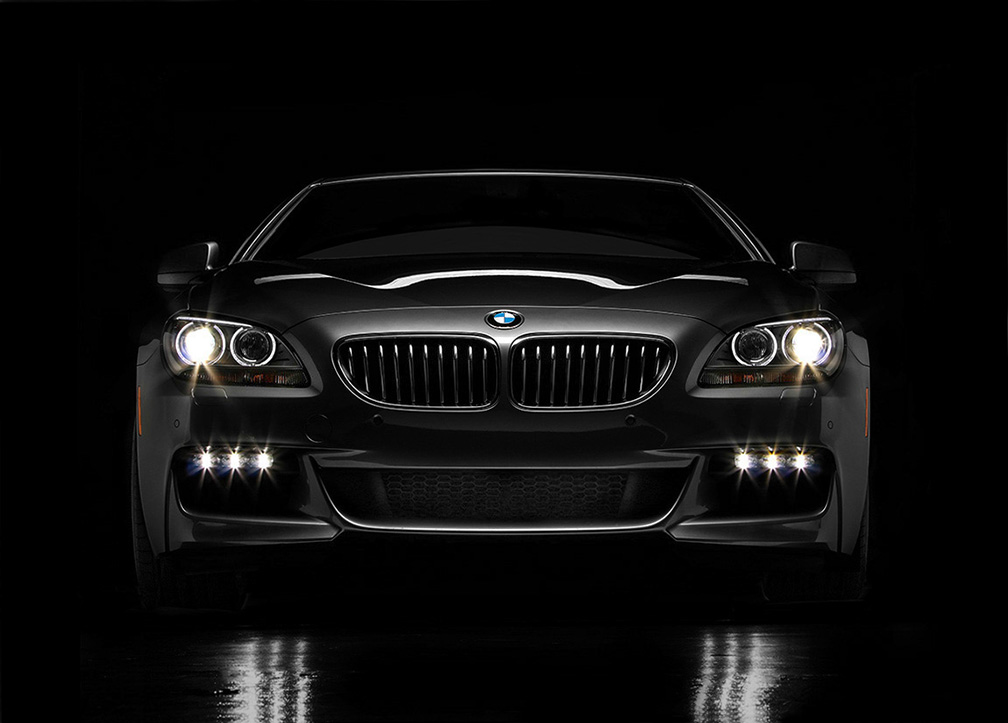
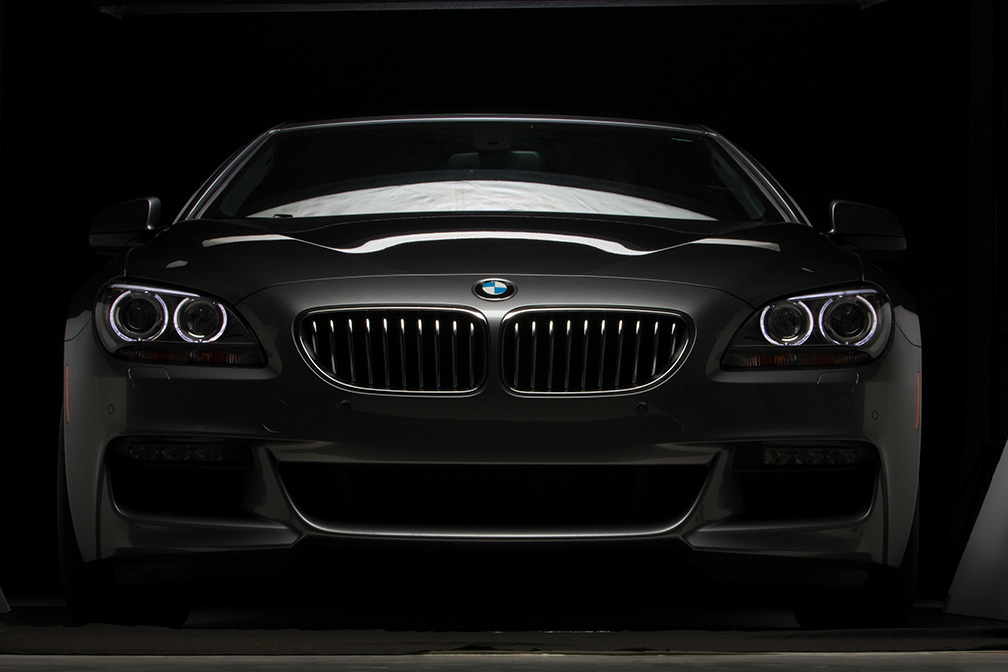
Above: Here’s the final image, but it wasn’t my original final. After I posted it on my Facebook page, I emailed my automotive photography hero, Tim Wallace, and asked him for his honest opinion, because I really value Tim’s opinion (everything I’ve learned about shooting cars, I’ve learned from Tim), and I really want to get better at this. Tim said he liked the lighting overall, but he would change two things:
(1) He didn’t think I should have that softbox reflection in the windshield because it took away from the what the shot was about — the front of the car. And…
(2) He thought I should make the highlights on the front of the car brighter and more prominent.
Of course, I immediately did both (I faded the windshield reflection to where you can hardly see it at all). He wasn’t as crazy about the headlamp reflections on the floor as I was, so I toned them down quite a bit in this final version as well.
I had a lot of lucky things happen during this shoot (I like to call them “happy accidents”), but at the end of the day, I’m luckiest to have Tim Wallace as a friend that will give me his honest feedback, and I know that when he gives it, he’s trying to help me move further ahead, and that means a lot. He’s a quite a guy (beyond his extraordinary skills as a photographer and a teacher).
I still have a long way to go…
But it won’t be for lack of trying. I’m out in Vegas now, trying to set up yet another car shoot — this time borrowing one of Scott Bourne’s new Jaguars and heading out to a dry lake bed not far from here. Not sure if the timing will work out right (ya know, with Photoshop World starting on Tuesday and all), but hey — ya never know!
Hope all these behind-the-scenes shots helped
…and I hope you weren’t cringing as much as I was during the process. I knew it would take a while for me to get the lighting where I wanted it (it always does), but I will say this — it’s sure a lot of fun getting there.
Above: Here’s a behind-the-scenes video we filmed during the shoot, since it was my first time trying out the Canon EOS 70D (Larry and Mia were doing a training class on how to use this just-released camera, and I borrowed it for this shoot, just for the day), so it’s a first-look at the camera (good and bad), plus you’ll see more shots from the shoot, and some of the details shots I did using a Priolite flashhead and a smaller stripbank.
Today’s a really good day!
I’m out here a few days early with my wife Kalebra celebrating our 24th Wedding Anniversary, so no work today — just lots of fun (taking in a show tonight, having dinner at our favorite restaurant in Vegas, and staying up later than we should, cause the next day things get really crazy as we kick off pre-conference workshop day). I’m all smiles! :)
Have a great Monday everybody, and if you see Kalebra and I walking hand-in-hand through the casino on our way to dinner or a show, make sure you stay the hell away from us. LOL! Totally kidding!!! Cheers everybody!
Nice final image, let me come help you light your stuff for a day. I promise, I will surprise you. you.
No cringing here. The final image is awesome and seeing how it came together is even more awesome. Good job!
I always find it refreshing to hear from pro photogs that their final image is a journey, rather than them knowing exactly what to do in every circumstance. I saw this in person with Joe McNally in Raleigh during the Flash Bus tour. His final hooraw of the day was a live shoot where he and his assistants shot someone, from the audience if memory serves well, up on stage. Anyway, it was a process. Joe would do this, adjust that, scrap such and such, try a different setting, use an expletive, move the light…until he came away with something he was happy with. Point being, I think that I tend to see the pros as having some kind of divine camera knowledge and can set up and shoot primo shots with little prep work. Nope, it’s the prep work and journey that gets them those pro shots.
Love the final image, love the reflections in the floor, love the dark dramatic look. Wondering about the black bars on the sides of the image though. Cropped to that size to avoid the fill boards? Try using black fill boards…LOL!
Happy anniversary kids!
Thanks Uncle Ken. Wish you were here. :)
See y’all in Atlanta, recovering from cataract surgery last week. I can see better now :)
I see you’ve made the move to from Nikon devotee to100% Canon! Why the switch???
For the last car shoot, just a few weeks back, I shot with a Sony A-99. :)
I always enjoy your behind the scene blog.
Happy and Healthy 24 Years to you and Kalebra!
I’ll see you in Vegas, I can’t wait!
Happy 24th! Have an awesome time today/night and don’t forget the best chocolate in Vegas Jean Philippe Patisserie…
At the Aria, right? We found it earlier this year. Awesome! Thanks Lavonne.
Cool Stuff. Looks great.
Happy 24th! I’m celebrating our 40th with my bride at Photoshop World with you and the NAPP gang! Can’t wait!
Hey — how cool is that. Congrats! :-)
Hey Scott, thanks so much for going through the lighting process. Its great to see how talented people get through a challenging shoot. I’m a big fan of Tim Wallace’s work. You did an awesome job with this one,Scott.
Thanks for the kind words, Chuck. It’s a work in progress, but I’m really enjoying the journey. :)
Happy anniversary to you guys! What’s your favorite restaurant in Vegas? See you in Miami in a few weeks!
We love to sit outside at Mon Ami Gabi :-)
Thanks for the video Scott, You are a inspiration! The lighting is amazing!!
It is so comforting for a beginner photographer like me to see all the trial and error shots of an accomplished photographer. It’s good to know that even you don’t get the perfect shot the first time you click the shutter. Thanks for sharing these “vulnerable” blog posts. They are so appreciated even if it’s just to boost up a beginner. :)
You’re very welcome Wendy. It’s a bit painful to share stuff like this, but if it helps, then it was all worth it. Cheers. :)
Happy Anniversary! Thank you for once again opening up the factory door and showing us how the sausage is made. I learn so much from this process, partly from knowing that it is a process. Great shot, built one step at a time…
Happy anniversary!!!!!!!!
Have a great Time in Vegas!
Thanks so much Mark. We’re already having a blast! :)
Happy anniversary to both of us actually;) My wife and I have 7th this year ;)
All the best !!!
Good post ! Congrats on the anniversary…
Thank you very much, Mr. Scott … I learned a lot from you in the field of photography, especially of the four books secrets of photography … Regards
Happy Anniversary! Thanks for showing the process – I love learning from you.
Happy 24th anniversary I wish you guys many, many more years of happiness…. thanks for everything you’ve done for us Scott, best wishes to you and your’s.
Happy Anniversary to you and Kalebra!!! Have lot of fun, enjoy each other staying up late LOL
Wonderful day, wonderful year and many many more!!! ;)
Thanks so much Helena
Hope you don’t get stuck in the mud at the dry lake. A little rain and the dry lake isn’t dry anymore.
Scott, I love these posts from you! they are so helpful to learning how great photos are made. I never would’ve guessed this iterative process from just looking at the gorgeous final image. Thank you!
Happy anniversary to you and your wife! Just celebrated my 18th. I wish you many happy returns of the day!
Happy Anniversary!!! Congrats on 24 years what an accomplishment for anyone let alone someone with your busy schedule. Love the car shots and all the info you provide on getting to that final shot. Thanks Scott for all you provide for your loyal followers.
Good post Scott, happy anniversary!
I’m surprised that you even considered leaving that white reflection on the wind shield in first place. For me it looks totally out of place.