

The Joy of Live Music Photography
First, thank you to Scott for the opportunity to do another guest post. And thanks to Brad for all the work you do here too. Both of you inspire me daily.
As you can probably guess by the title of this post, I’m a concert photographer, and I think every photographer should try photographing a concert at least once. It is one of the most fun photo environments you will ever encounter. It will also require that you can operate your gear without thought.
Unlike some other areas of photography, where we might position the subject, and control or shape the light, in live music photography you can’t do any of that. The lead singer may be in front of you with the perfect expression, and then gone before you can get focus. He may be in low light as you set exposure, and under bright landing lights by the time you shoot the shot. The lighting director will try to push the limits of what the human eye can see, and since the camera sees much less dynamic range than our eyes, your images may be clipped on both ends of the histogram.
For photographers that are accustomed to having full control, concerts will challenge you at every turn. Like with any type of photography, there is a lot more to concert photography than I can cover here. My hope is to give you a few general tips below, in case you ever try this yourself.
My first tip is to ignore the noise. We music photographers live at ISO settings that make some people cry. Just crank the ISO as needed to allow a fast enough shutter speed to freeze the action, and a sharp noisy shot is always better than a blurry clean shot. That is not to say you can’t play with motion and blur, just that when needed be sure you can get the shot you want or need.
What is Concert Photography?
The answer to this question is part of the reason I love this genre. At its core, concert photograph is really just Low Light Action Photography, similar to photographing some sporting events. But, it is also event photography, environmental portraiture, and photojournalism.
Depending on who you are shooting for it could be any one of those, a combination of some, or all of the above.
Getting Started
The most important thing to know about shooting live music is that you can’t just walk into a Foo Fighters concert with a pro camera. Major artists, the ones that play festivals and arenas, want press coverage.
That means you will generally need media credentials to shoot the show. How do get those?
You need to have a media outlet for your images. The good news is that along with the traditional newspapers, radio stations, and magazines, there are many online outlets available today. Between music news sites, general entertainment sites, and blogs, you’ll have plenty of options.
Now for the gotcha part, the Catch 22. As with any style of photography, you will need examples of your work to get a foot in the door. The issue is that you can’t shoot the big shows without an outlet, but you can’t get the outlet without a portfolio of work.
Luckily, there is an easy workaround – start small. Every city has local bands, playing local clubs. Most of those clubs will allow you to bring in a camera, and many of those bands put on a great show. In some cases, you’ll get the best shots in these small venues where the bands are hungry to succeed.
Use this time to learn. Practice shooting in the low light (without flash). Try to better understand how to compose good images, and images that are flattering to the artist, with all of the stage clutter, microphones, amps, cables, and lights.
After a while, as you get to know some of the bands, toss them a few low resolution shots for their Instagram account, build some trust, and ask if they need promo shots. Build those relationships, and always remember that even your favorite band was once a club band. Once you get some work together, contact some media outlets about shooting for them. Once you have an outlet, it’s time to reach out to PR teams, management, promoters, etc. and try to get credentialed.
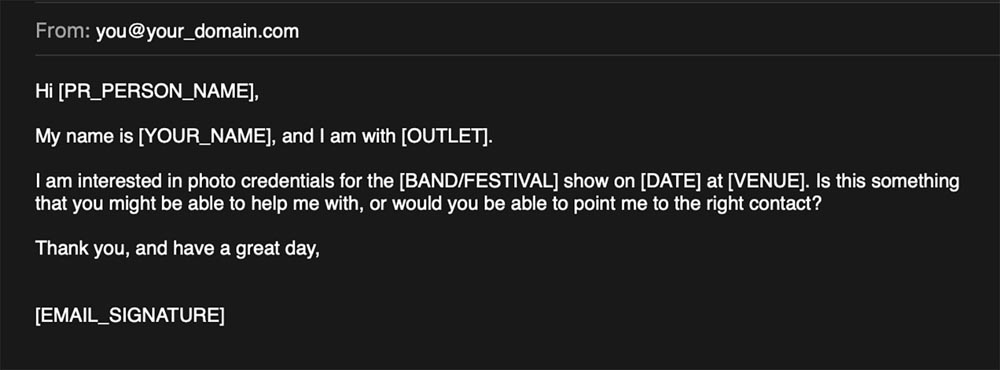
When you email requesting credentials, be brief. Very brief. These people get hundreds of emails a day, so don’t waste their time. Just let them know:
Who you are.
Who you are shooting for.
Who you want to photograph.
What show you want to photograph.
Where the coverage will be used.
All of your contact info.
Here’s a generic example:
After sending the request, you wait….. and sometimes that wait can be very long, sometimes you will never hear back. Don’t get discouraged when you are told no, it happens to all of us. Just keep trying.
So, You Got Approved! Now What?
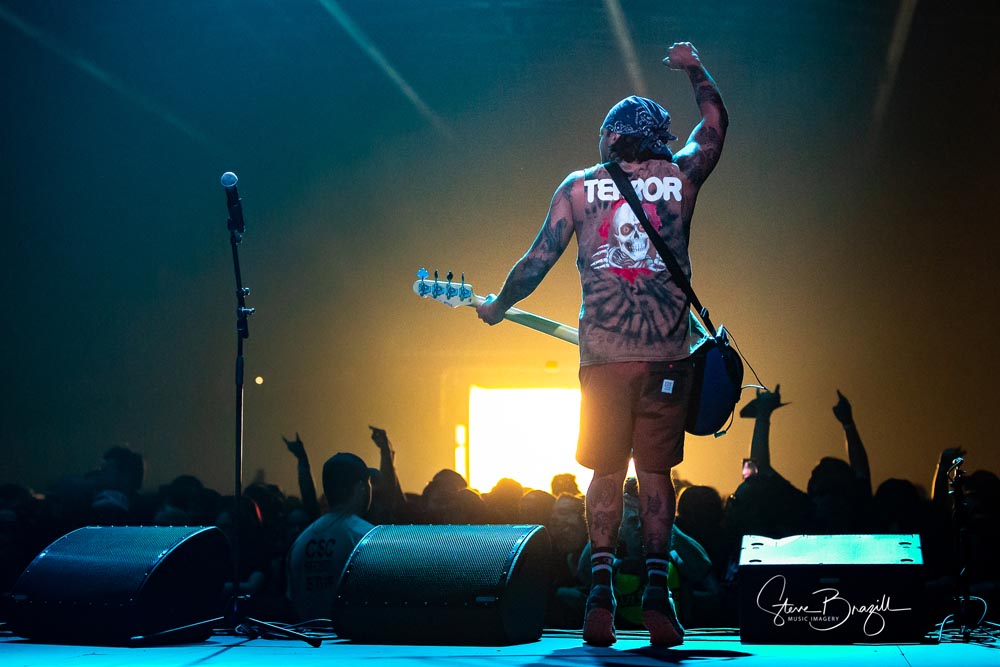
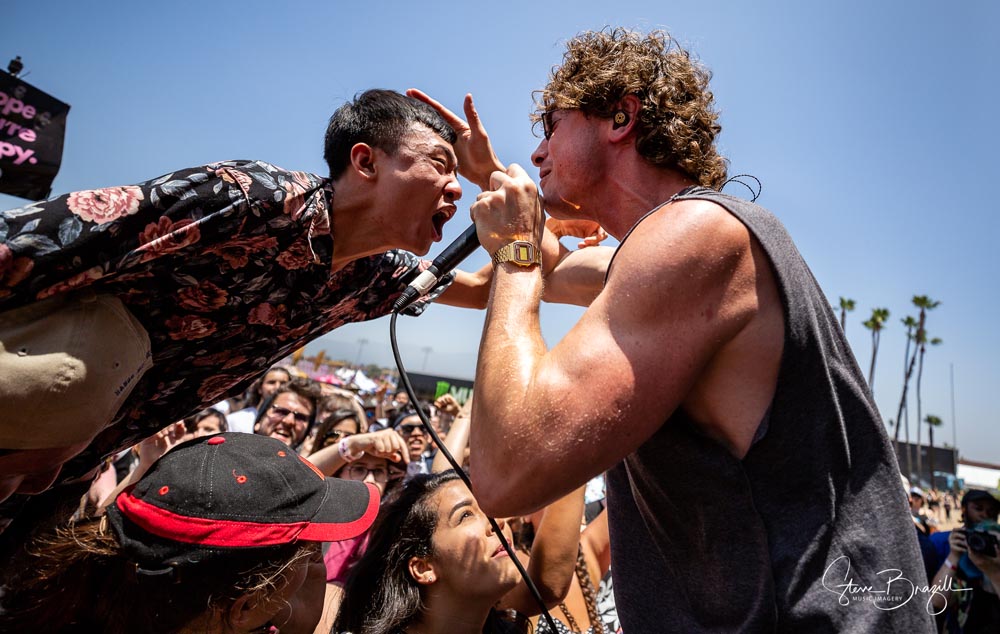
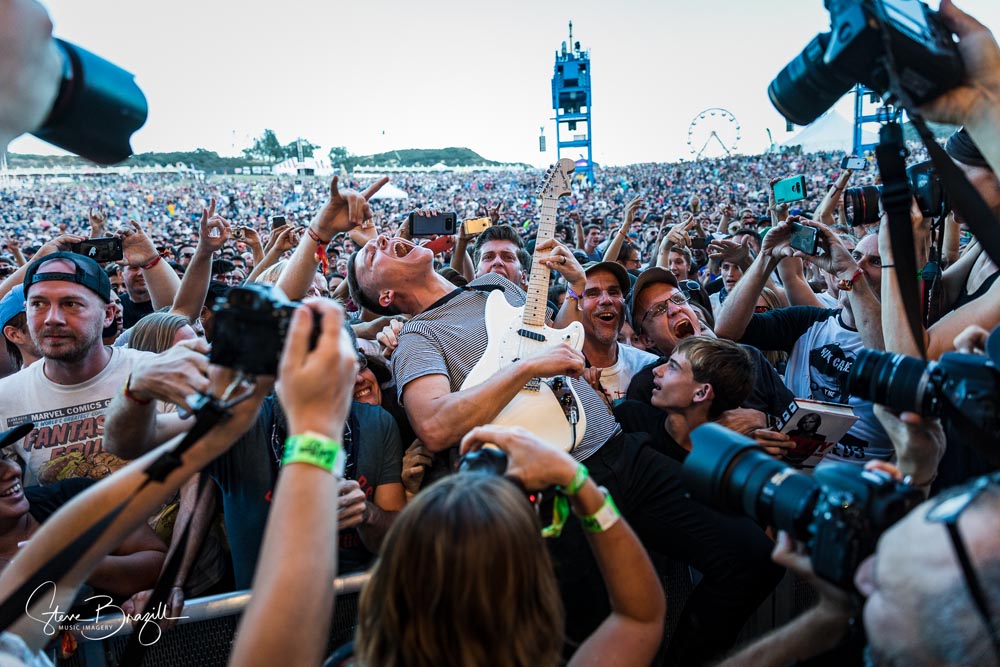
Before you go shoot a big show do a bit of research. Use Google, YouTube, and the artist’s site, to study the show. Check the lighting for the current tour, the stage setup, and the position of the players. Most importantly, check the angles. If a vocalist always holds the mic in their right hand then you may be better off photographing them from their left side. If when they pull back from the mic to scream they mostly turn slightly to one side, knowing that may help you capture better images. And if the lead singer likes to head into the crowd a lot, like Cage the Elephant’s Matt Shultz (pictured below) it can help if you know that ahead of time.
It’s Show Time!
On the day of the show get there early. You may need to go to Will Call to get your credentials, and you may need to connect with an on-site contact. I also suggest always photographing opening acts. Not only does it help to get you “warmed up”, but they are often really great photographically, because they are hungry to be a headliner, and you never know if they are the next big thing.
Photo Releases, Not Model Releases
I almost didn’t include this topic, it can get touchy. Sometimes when you arrive to shoot a show, and sometimes even before the day of the show, you will be presented with a Photo Release. Unless you sign it you usually can’t photograph the artist / show. Before we get into the signing part, let’s chat about why these releases exist.
For many artists their image is their brand, and like any other brand they may want to control how that image is presented. Sometimes they will restrict where you can use the images, or for how long. They may want pre-approval of the shots before posting to make sure they are not unflattering. These are generally considered pretty standard editorial releases, and I usually have no issues with signing them.
As always, there are exceptions. You have to read them and know what you are signing. In the worst case scenario they may even require that you give them copies of the photos, allowing them full worldwide commercial usage – without paying you. These are commonly referred to as Rights Grab Releases.
As I mentioned a second ago, I almost didn’t include this topic, but I can’t suggest you try music photography without at least mentioning it. Look, I can’t tell you what to sign or not, that’s on you. Still, I can tell you that I never sign Rights Grab Releases. I’m not expensive, so I am pretty sure that most every band can afford me. If you want a bit more on photo releases, I know one of Alan Hess’ old posts here also touches on them.
One tip however, always photograph the release. Snap a cell phone shot of it both before and after filling it out. Then store that with the photos. That way, if needed, you can reference what you had agreed to.
Three From The Pit, No Flash
Once you do finally get into a bigger show, there will be rules – and security people to enforce them.

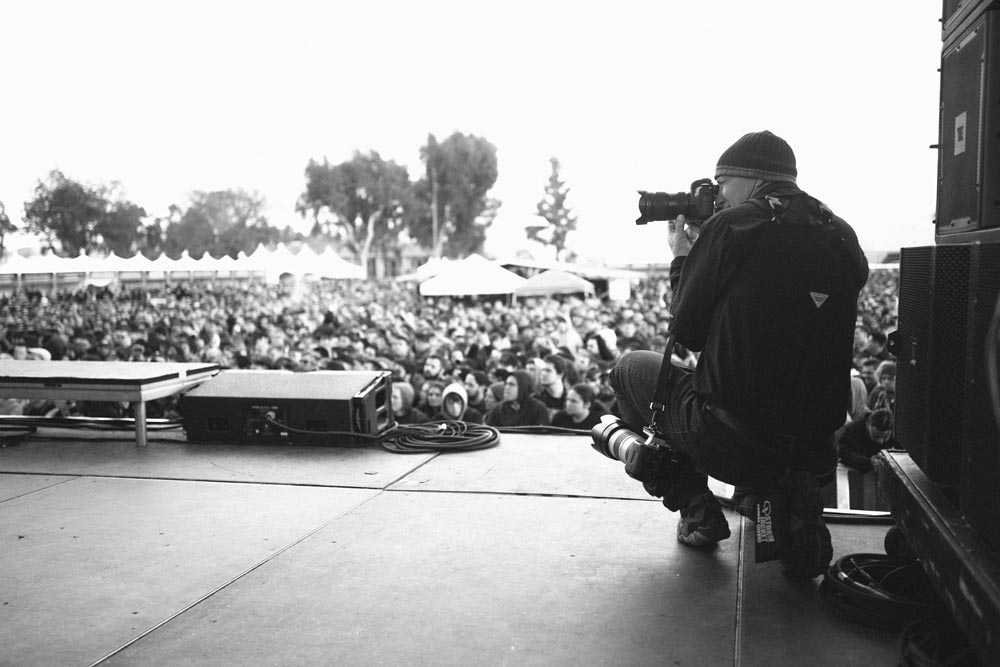
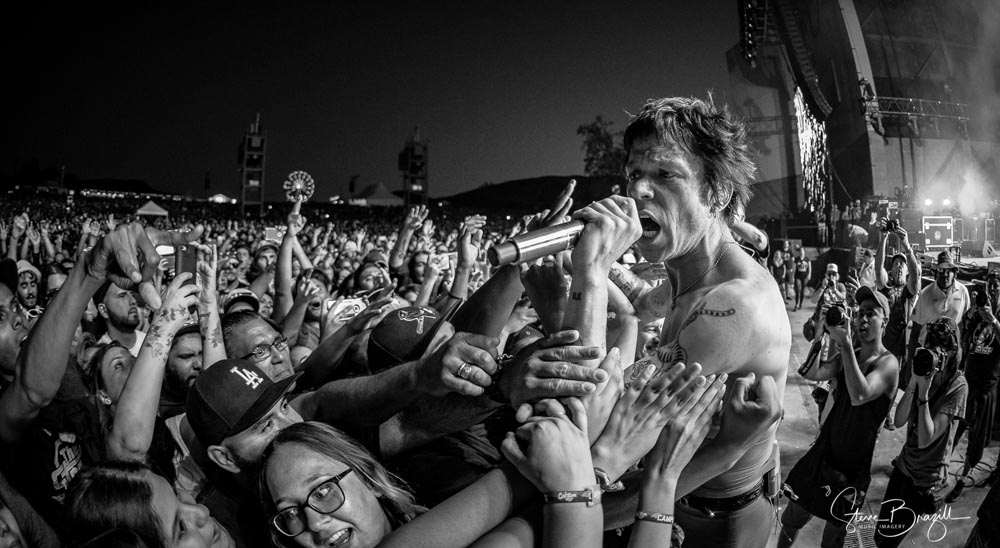
“Three From the Pit, No Flash” is a standard in live music. That means you get to photograph during the first 3 songs only, without flash, from the photo pit – which is the small area between the stage and the crowd. You may think of it as the area where the security people stand during the show. There are exceptions of course. Marilyn Manson is usually one song, Joe Walsh was two, and Roger Waters was supposed to be six until security miscounted.
Three songs sounds like a long time, but it really depends on the band, and in most cases it’s done so fast you’ll wonder if you got enough good shots to tell the story of the show.
Sometimes you will have to shoot from somewhere other than the pit. The soundboard, often referred to as Front of House, is a common spot for example. Depending on the venue the soundboard might be really far away, like at an arena, or in the back of a small 1,800 seat theater. If the show requires you shoot from the soundboard you will need longer glass, or at least a teleconverter. As an example, the shot below, of KORN’s Brian “Head” Welch, was shot at 400mm.
You will hear people complain about shooting from the soundboard, but if it happens try to focus on the positives. The angles are better than up the nose, and you can capture some great full venue images.
No matter what the rules are, there will be security people to enforce them. Here’s a tip… just listen to the security people. Their job is so much more difficult, and arguably more important from a safety point of view. They are trying to protect us, and the audience, so make that easy on them.
Technical Hurdles
As I mentioned above, live music photography is low light action photography. That means you will have a much easier time if you have the right gear. Fast glass, good focus tracking, and a good zoom range all help. If you can shoot with f/2.8 lenses or faster, great.
This is not to say you can’t do music photography with a kit lens, just that it can be much harder. When you use a variable aperture lens just the act of zooming in changes your exposure. For example, if you are shooting wide and at f/3.5, and then when you zoom in the lens switches to f/5.6, you’ve lost over a stop of light! Now you need to compensate for that with shutter or ISO. Having a fixed aperture just makes the work easier, so you can concentrate on composition etc.
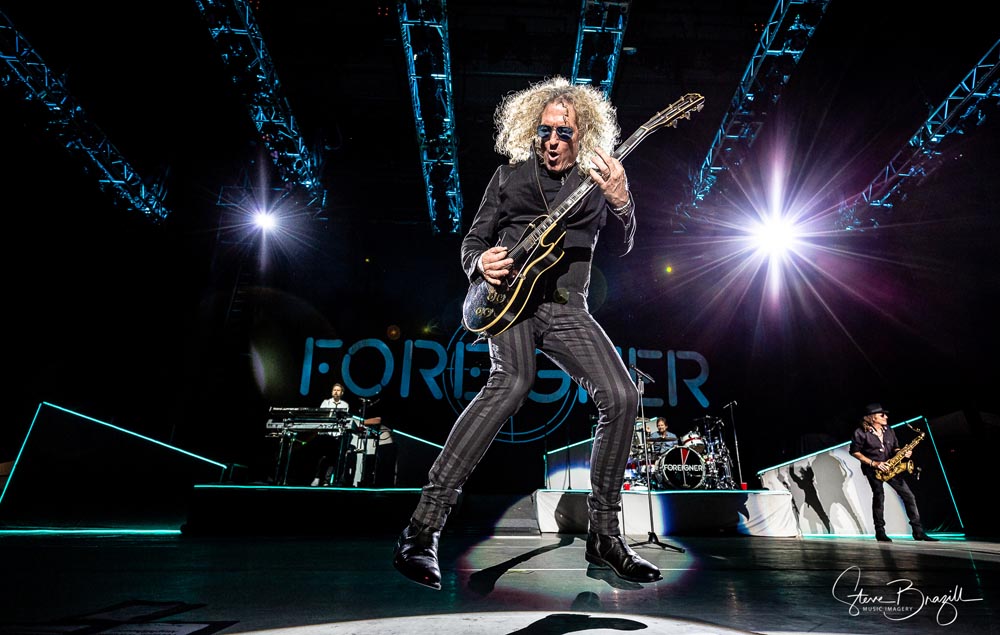
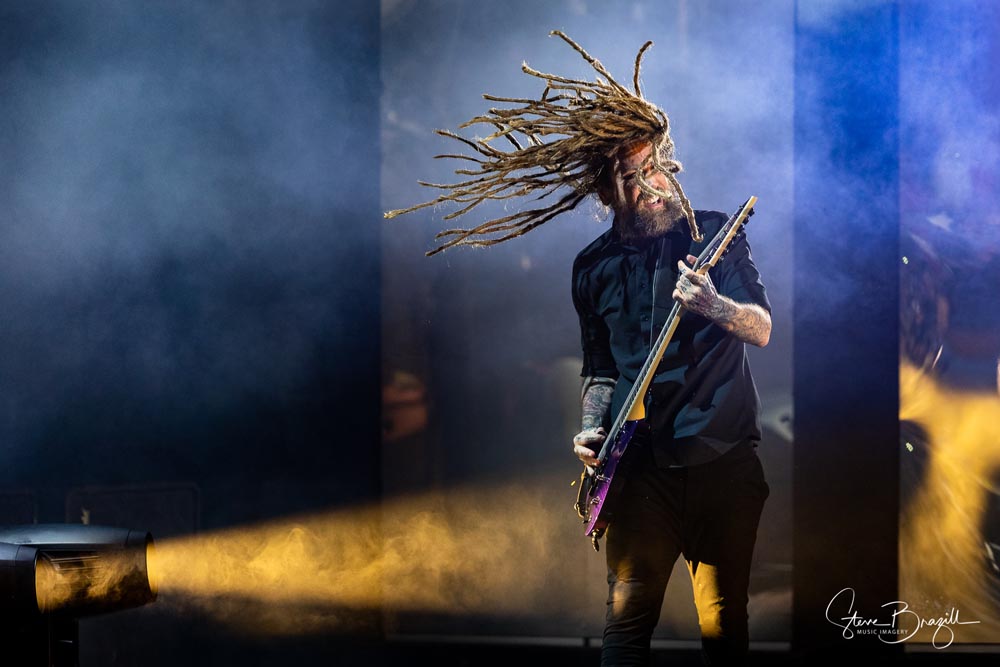
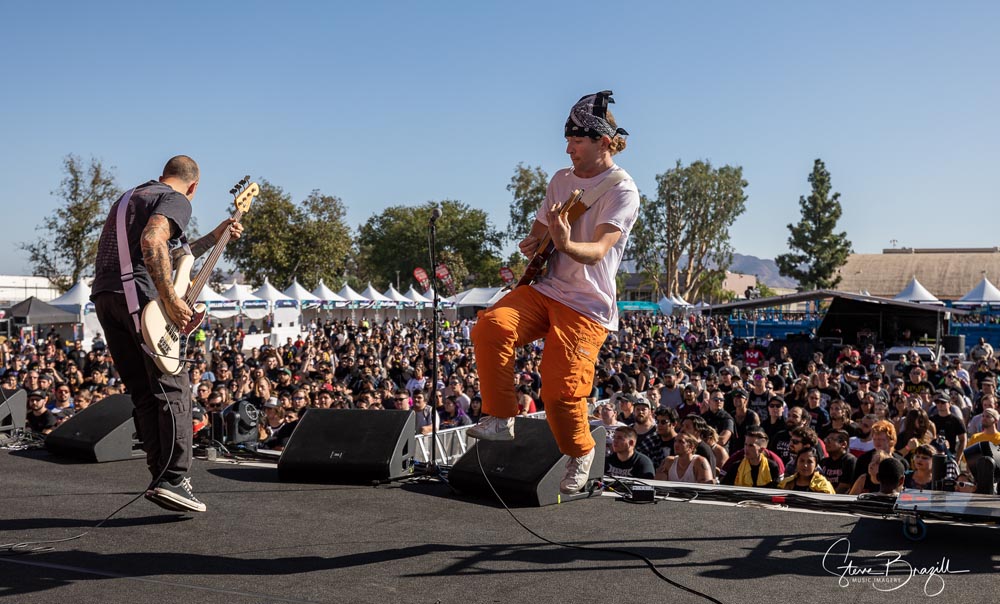
Concert stages are not setup for photos. There are monitors, lights, cases, wires, mic stands, and oh yeah… microphones in people’s faces. Not only can all the gear be in your way, but it can create some very unflattering shadows on the band members. By positioning someone in front of the stage lights you can create some nice backlighting effects. The gear and stage effects can even be used to help convey the environment.
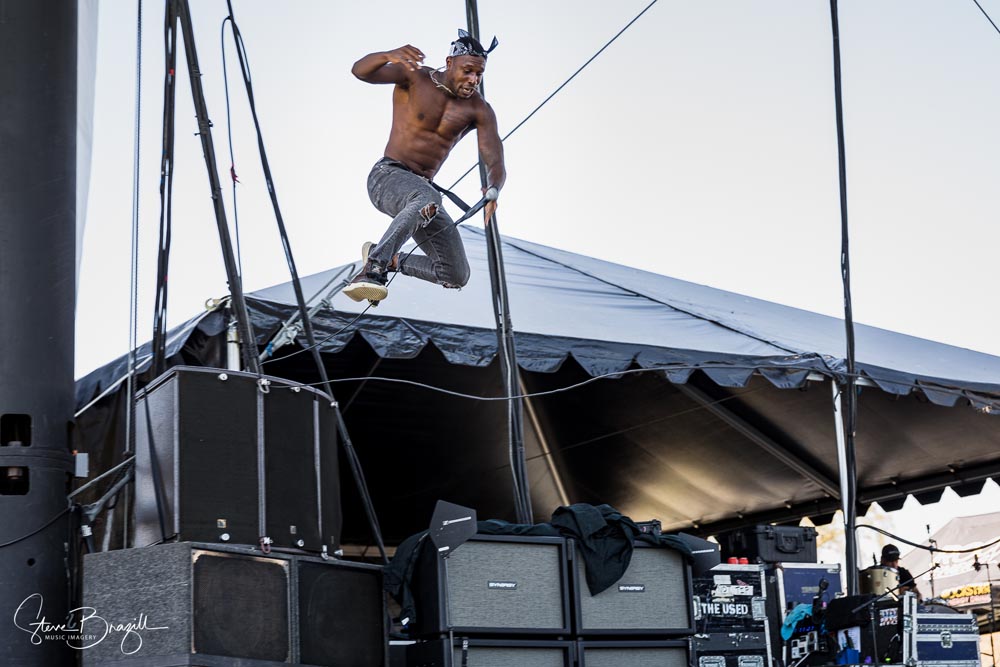
Some stages may be so high that the angle of the shot feels like you are shooting up their nose. In those cases think about the geometry of angles. Move to the far sides of the pit to flatten the angle and give yourself more control of positioning. When I saw Hyro The Hero climbing up the speaker stack that is exactly what I did, moving towards the opposite side of the stage.
Let’s chat about framing for a second. A singer may be right in front of you, and then be gone faster then you can take the shot. A guitarist may jump out of frame – which does make for some funny images. My tip is to try, at least most of the time, to keep things like guitar heads in the frame. To a musician their instruments are an extension of their body, so just like you avoid cropping a person at a joint you should be aware of when and where you lose an instrument. Shoot a bit wide to allow the subjects room to move, and then crop in post.
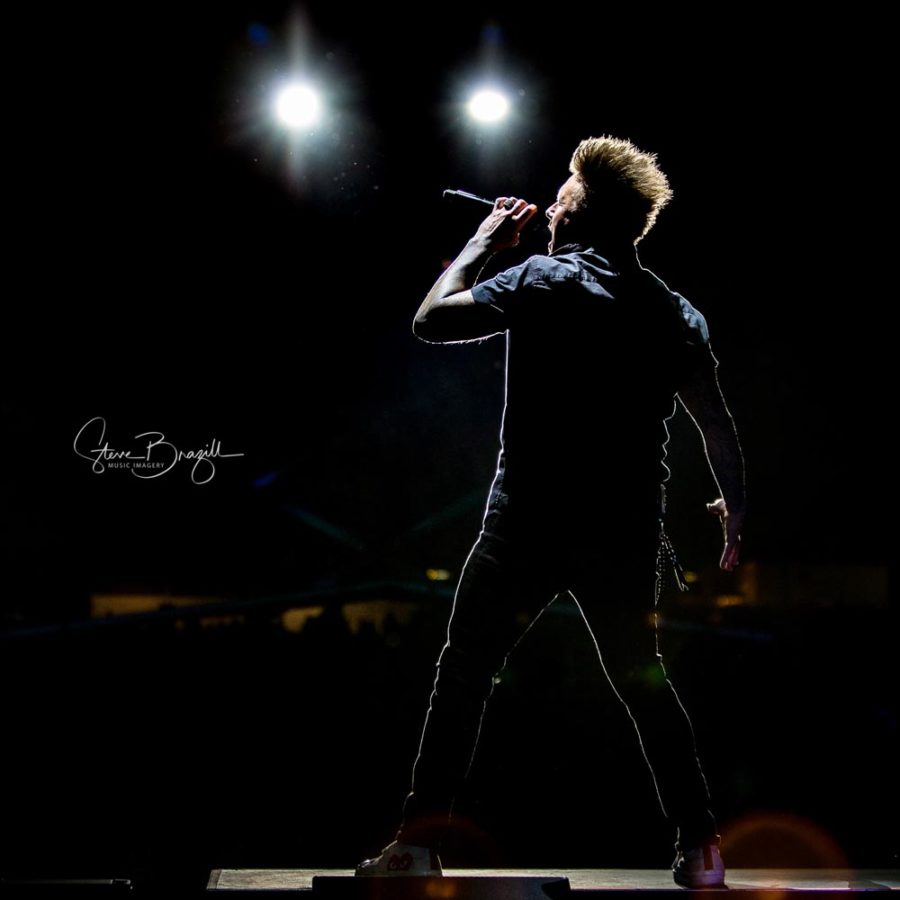
The hurdle you may hear mentioned the most is lighting. From solid red or green, to no light at all. This is where a combination of ideas comes into play. First of all, there is a lighting director telling a story with those lights, you know, the lights you hate. The photojournalist part of music photography is trying to tell that story. If the singer is a silhouette so what, tell that story. Red lights? OK, let that be a part of the image.
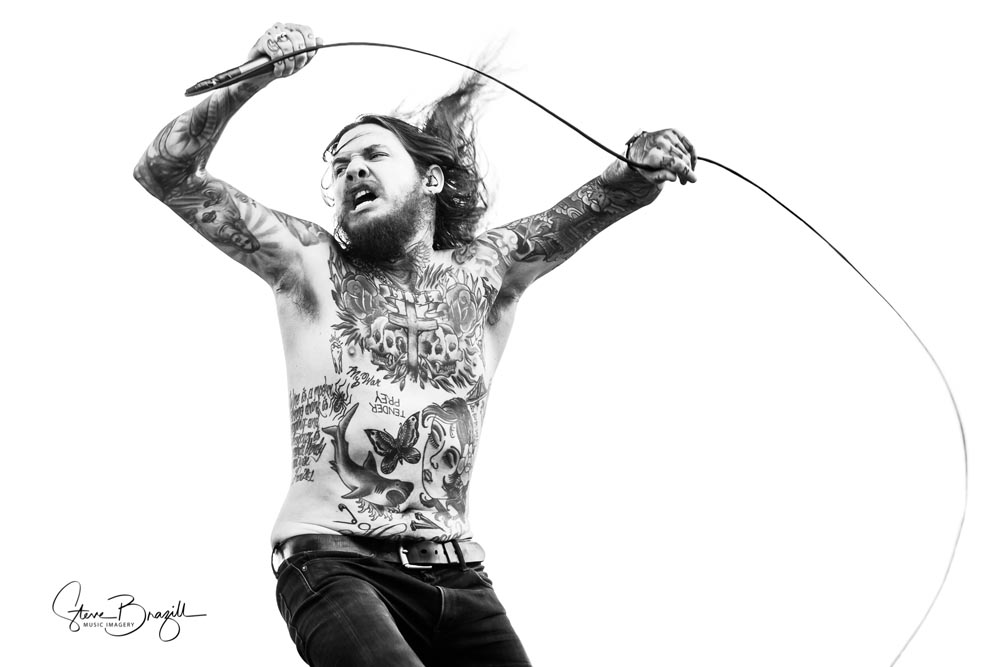
Another approach is to abandon the color completely. An image with a totally clipped red channel may still have perfect blue or green channels. Converting to Black and White may result in all the details coming back. And of course you can convert to Black and White even if the image isn’t clipped, removing color is a great tool to distill an image to it’s most basic story.
To me the hardest lighting is when you have a very fast moving band with virtually no light. In that case, we are back at the start of the post…. Just crank the ISO and get the shutter you need to capture the shot. You’ll be surprised what your gear can do when needed. As long as you still properly expose the shot you may not be able to tell how high that ISO was.
Pit Etiquette
And now for the most talked about part of music photography, Pit Etiquette.
At a wedding there may be one main photographer that tells the crowd “please wait to take your photos until I have taken the formal shots, so I don’t end up with a lot of flashes going off. When I am done I will make sure they are posed for your shots too”. In a photo pit there may be one, two, five, 15, or 50 other photographers, and they all have the same right to be there that you do. It’s a working environment, and having respect for your co-workers is needed, not to mention having respect for the audience that paid to be there, and the artist.
Share your position. Take your shot(s) and move, so someone else can shoot from that great spot.
Avoid doing a Hail Mary, which is where you hold your camera over your head. When you do that your arms and camera are affecting other photographer’s shots. The same goes for live view. If your camera is above eye level you are in someone else’s way.
Now, that said, we have all done it. If you feel the need then go to the sides or back of the pit to make sure that you are not going to block someone’s shot. Then take the photo quickly and lower the camera. With all that said, it’s going to happen to you at some point. When it does think about using the cameras in the air as part of the story!
Having a flash on your camera falls under this one too. You are not going to use it in the pit, so take it off. I have seen flashes sticking straight up like they are doing bounce flash…. off of the sky outdoors. If you have All Access there may be a need for a flash, but during the first three songs I would suggest still removing it in the pit.
Photo pits can be very tight places, so another thing related to etiquette is the gear you carry on you. Backpacks don’t work well in the pit. Every time you move, turn, or walk you will bump someone. I have had my camera bounced into my face from a backpack. Take it off and leave it at the entrance to the pit.
The Drummer is a Band Member
Everyone shooting live music wants to shoot the lead singer, the guitarist, and the bass player, but a lot of times they leave out the drummer. Could you imagine shooting the Beatles and not shooting Ringo? What if there were photos of Led Zeppelin’s Robert Plant and Jimmy Page, but none of John Bonham?
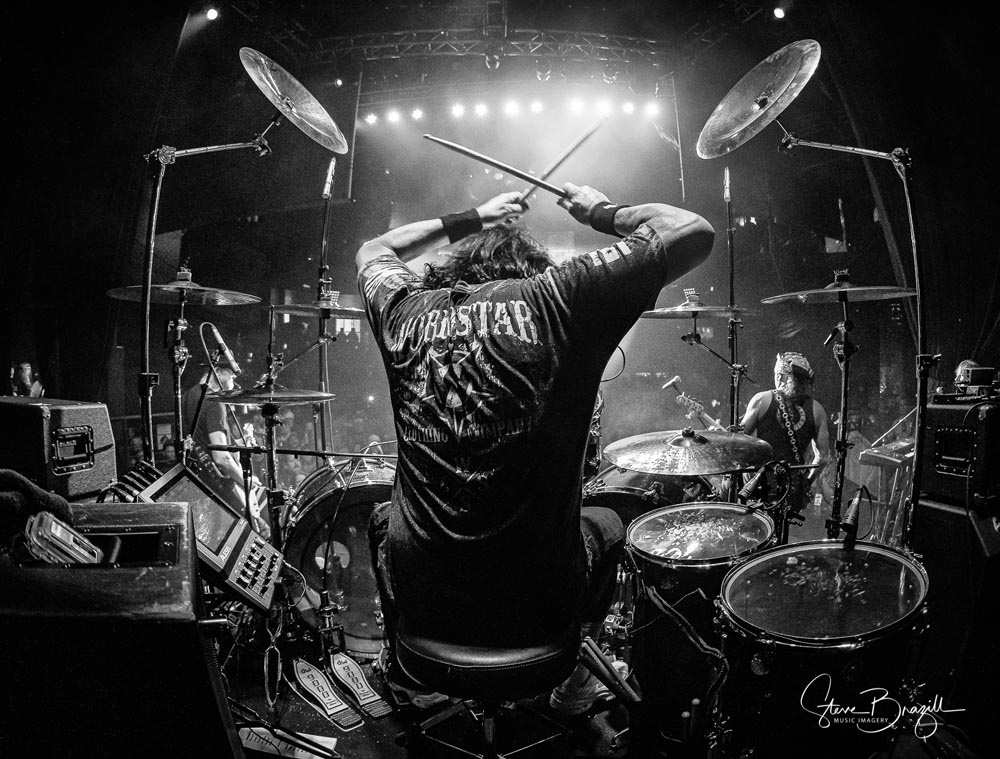
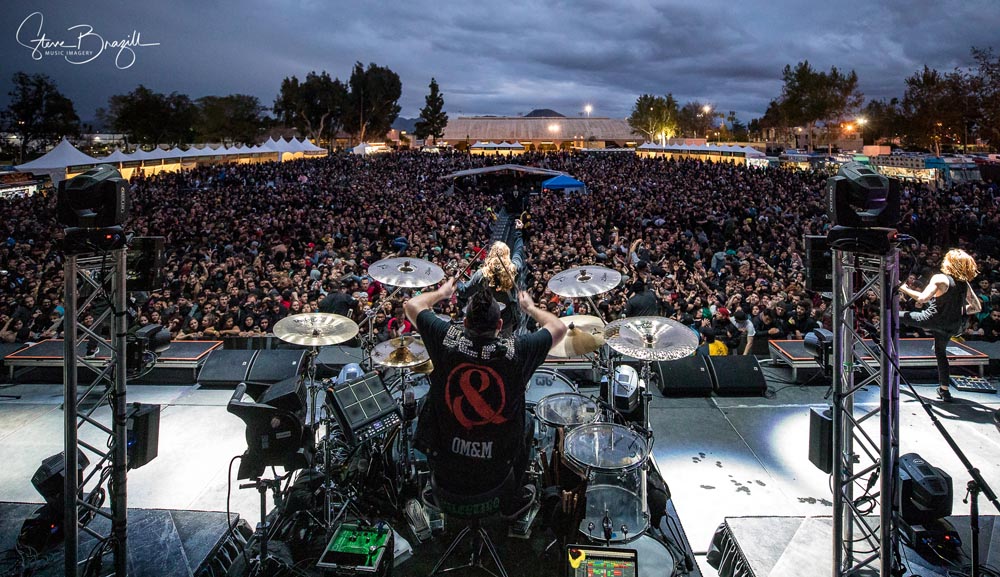
When photographing live music, shoot every band member. Sometimes that can be tough. I’ve seen drum kits so large that I can’t even see the drummer, let alone take a photo, but you need to try. Another option, is to include the drummer in a shot as a background element. I always try to get a wide shot of the whole band too.
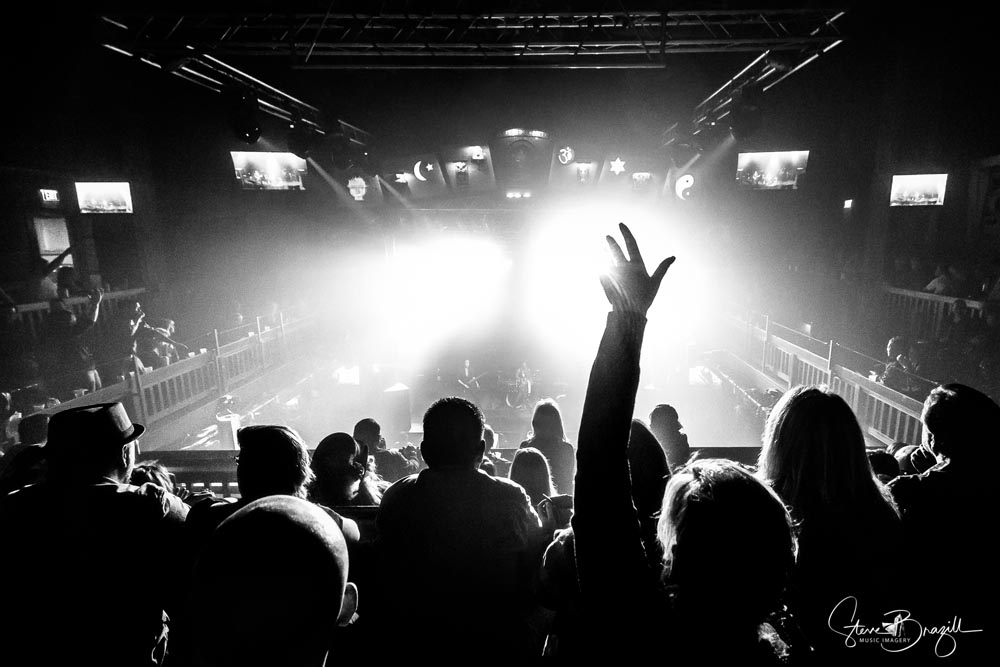
Remember the Audience
Whenever I shoot a concert, I always turn around to shoot the audience. 50% of the show is in the crowd – and arguably it can be much than that. Better yet, try and shoot the crowd with the band, or venue, to help tell the story.
Take the shot below as an example. I actually pre-visualized it, and it is almost exactly what I wanted. I say almost because in my vision the hand wasn’t there. I was behind five rows of standing people upstairs at the old House of Blues in Anaheim, shooting a great 16 year old performer named Gabbie Rae when she opened for Great White. I was holding the camera, with a 10-22mm, over my head and trying to get leading lines from the side balconies going into a blown out stage (yes, I said over my head, but I was back up against a wall and out of anyone’s way).
After a few shots, I was getting close to the angle I wanted, and then… this guy put his hand up. In my head I screamed NOOOOOO – but then I saw the shot and actually thanked the guy. I ended up thanking that guy.
A Few Final Tips
Before I wrap this up I wanted to share a few small tips:
Shoot RAW! Concerts are a dynamic range nightmare come true. Give yourself the best chance you have to get the shot.
Shoot for the story.
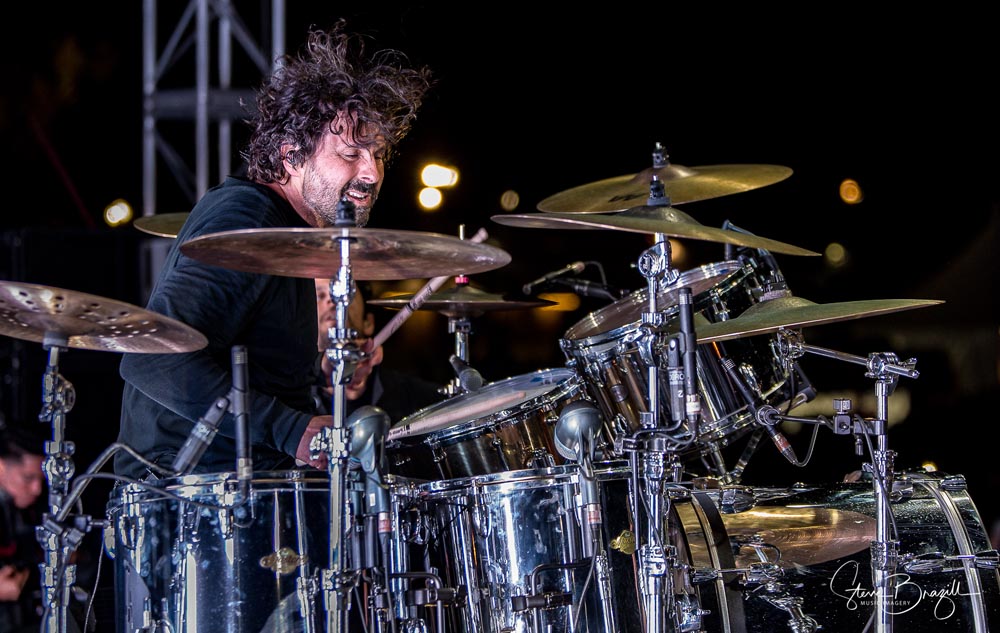
Focus on shutter speed. That could be to freeze the action, or to blur the drum sticks.
Noise is almost always better than blur.
If you are only using one body, but have multiple lenses, change lenses between songs.
Less really is more. Be careful of over sharpening or being heavy handed with clarity.
Embrace critique. I believe that one of the fastest ways to improve your photography is through a well done critique. Not all people doing critiques are equal. Put more weight on those who you believe in the most, but listen to all critique, even when you don’t agree. You’ll be surprised how others see your work, and that alone is a huge learning opportunity.
You will rarely find a great image that doesn’t pay attention to standard composition concepts.
Show your work, but only show images that cause people to see you the way you want to be seen.
And A Quote
One of my favorite tech writers, Andy Ihnatko of Boston Public Radio (WGBH) , once tweeted:
“Self-criticism is useful until it impedes your ability to identify a success”
I love that.
Thanks for reading this long post! Now, ignore the noise and let yourself succeed.
Thanks again Scott!
Check out Steve’s fantastic podcast, Behind The Shot, for some amazing insight into how your favorite photographers created some of their most memorable images!
You can see more of Steve’s work at SteveBrazill.com, and keep up with him on Twitter, Instagram, and Facebook.


1 comment