

Not to be dramatic or anything, but discovering Photoshop probably saved my life. I don’t know what would have happened to me without it and I don’t want to know! I came to Photoshop in a round about way. I graduated from the Kansas City Art Institute with a degree in painting (my poor parents), and I credit all those hours of live drawing classes with my ability to build complicated composites and convincingly manipulate the anatomy of the subjects in my images.
I didn’t, however, go from graduation to Photoshop. There was no Photoshop back then. I traveled and painted for many years then ended up in Haiti (for a long time). Eventually I knew I had to return to the U.S. since it was pretty tough to make ends meet in Haiti. It was year 2000 and I didn’t even know how to turn on a computer. I had to reinvent myself and find a way to make a living. My mother told me to do something with my “art” on the computer and she showed me Microsoft Paint. Being a painter (a real one) I thought this was the stupidest thing I had ever heard.
In confusion, I went back to Haiti. But while there, a good friend, a photographer, had bought a computer and one day I saw him using…PHOTOSHOP. My hair stood on end. I flew back to Kansas City where my father lived and took over the 2nd floor of his house and his little tiny (hilarious from this vantage point) computer. I bought a copy of Photoshop and made it my job for the next 6 months to teach myself how to use the program. I spent a minimum of 8 hours a day doing this.
I’m not sure that I knew what it was I wanted to do with Photoshop, I just knew I needed to know everything about it. Soon, I saw an ad for a job in the paper, and it said you needed to know Photoshop so I went for it. Boom. I got my first job as a retoucher for H&H Color Lab.
I worked there for two years retouching wedding photos, family portraits, children’s portraits and high school senior shots. It was grueling. We worked horrifically long hours, but I never missed a day and I learned everything I could, including the printing side of things. I knew I needed to know everything! At night I searched for books or information online about higher end retouching techniques. In those years there wasn’t an avalanche of tutorials about retouching like there is today. I’m actually glad there wasn’t, because now there are some terribly misleading tutorials advocating poor retouching techniques and, some of the authors of these tutorials have very little experience.
For comedic affect here is one of my early retouches done at H&H: remove braces.
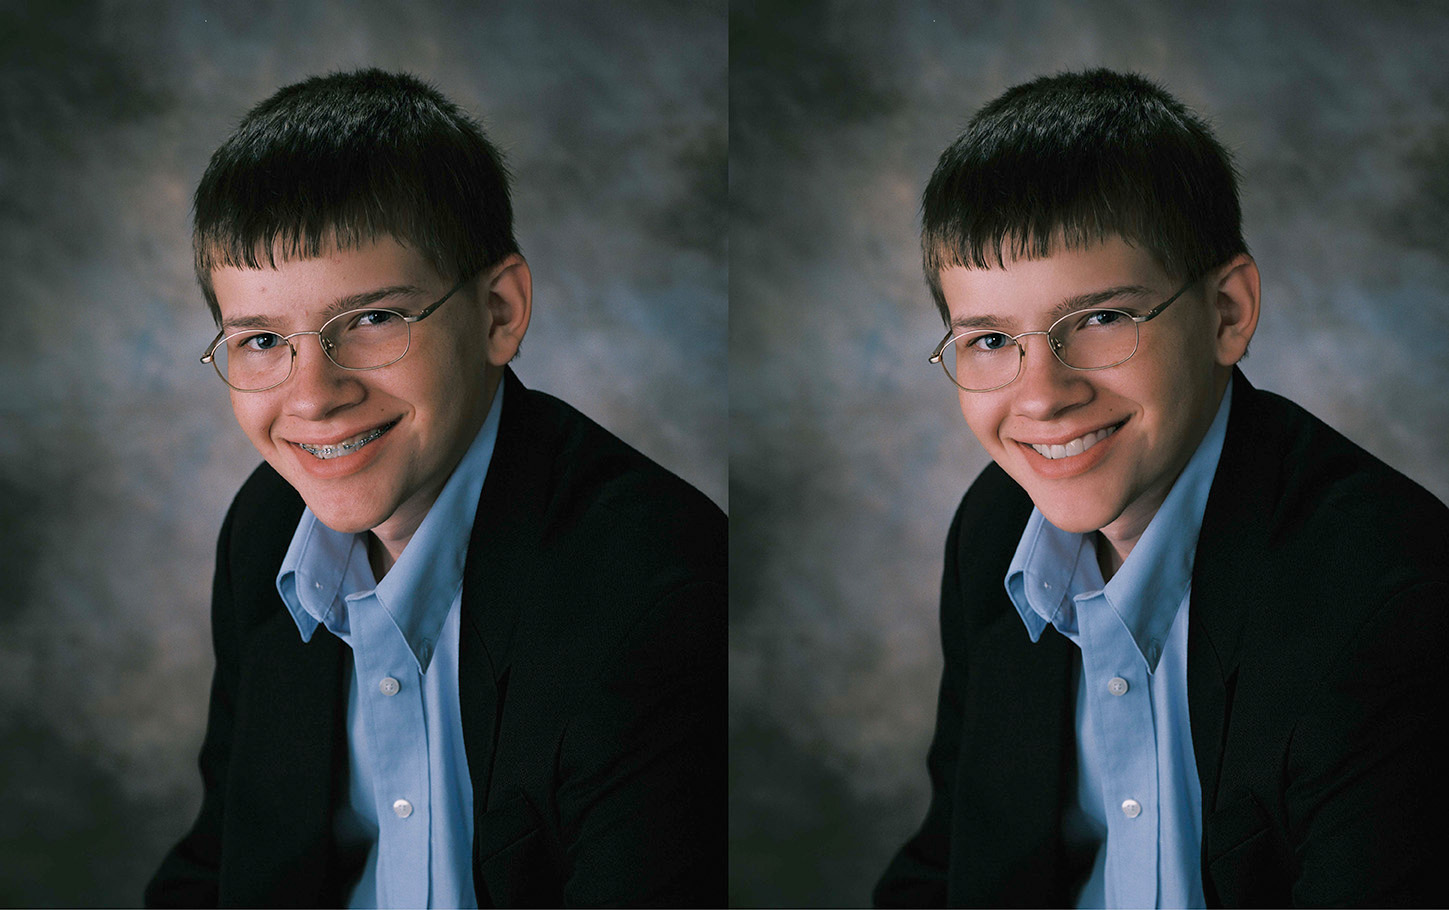
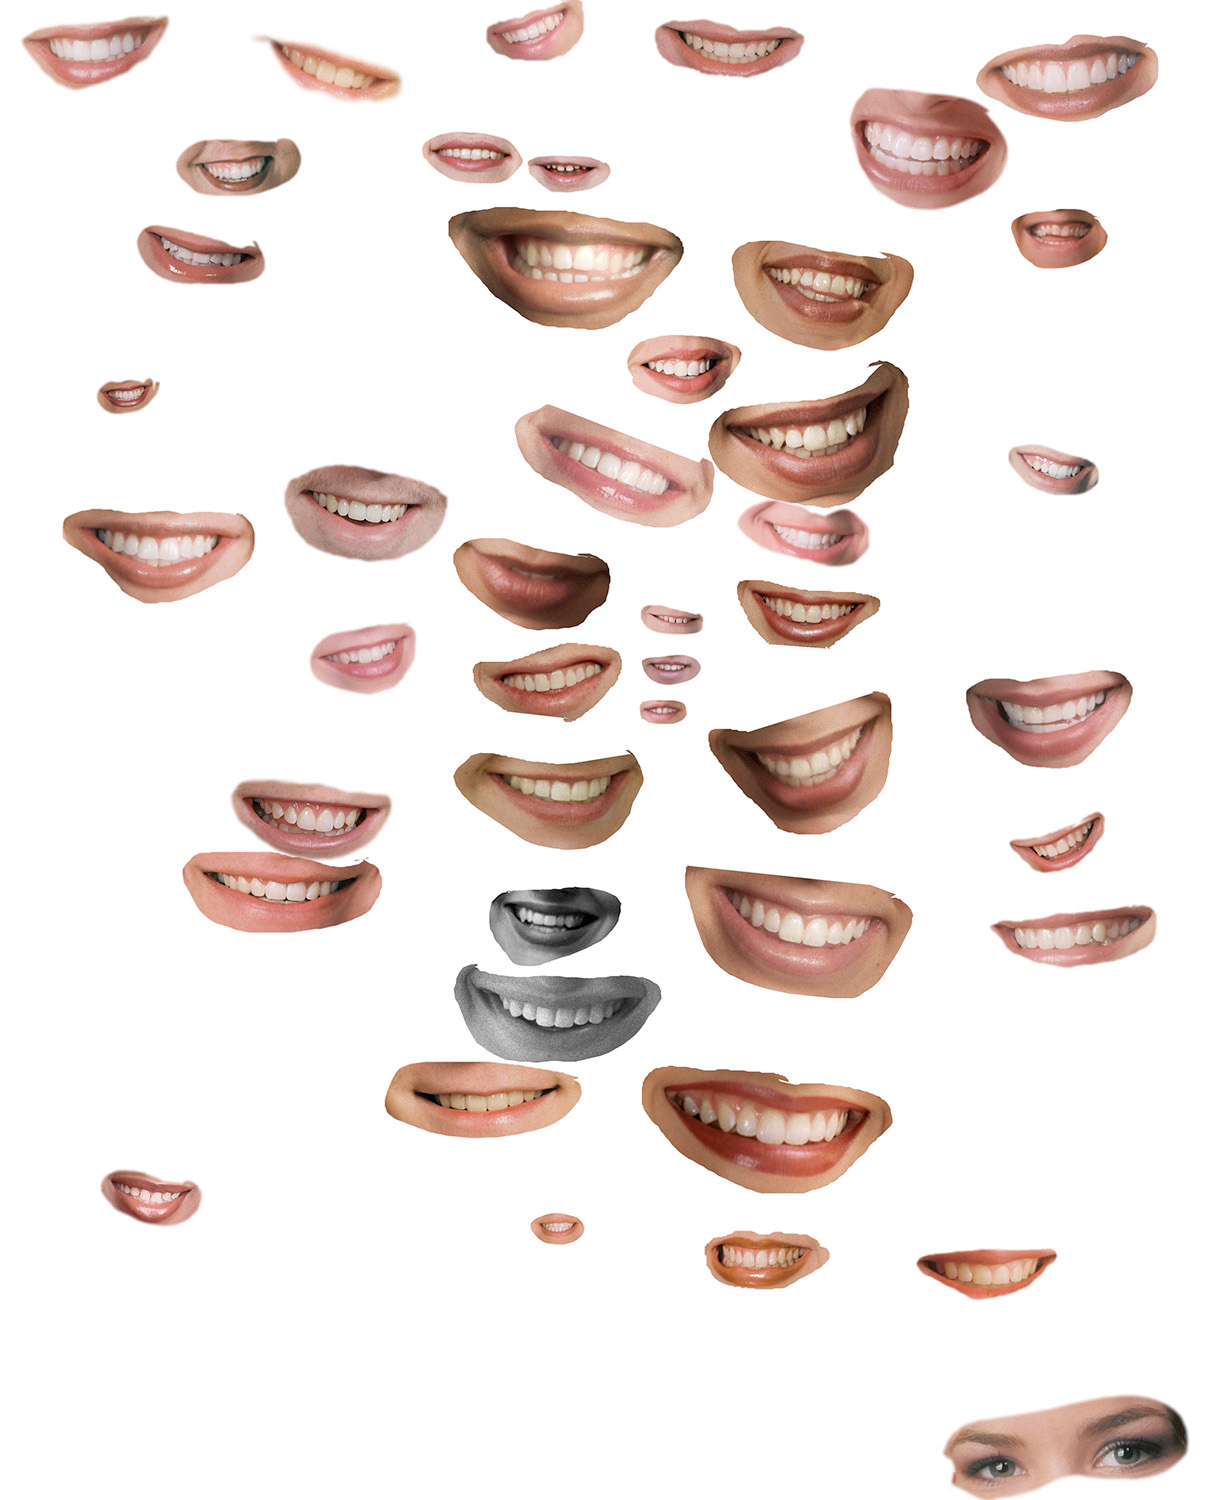
One of the frequent requests was for braces removal from the teen shots. I started a “body Parts” folder for teeth to swap out. I still have a folder for “parts” today, but instead of teeth I keep silo’d hair wisps, good eyelashes, various textures for skin and clothing, fingernails, etc.
Here is my teeth folder from back in 2002. Pretty funny.
Eventually I snagged a test retouch for a high end retouching house in NYC. I was surprised when I opened the DVD (yes, that’s how we used to share files: via snail mail, ha) and found an image of Cameron Diaz. I was on 12 hour shifts Monday through Friday and 8 hours on Saturday, but I stayed up all night and retouched throughout my Sunday off. In the end I was offered the job.
It was great to finally work on images shot by high end pro photographers. I don’t regret the time I spent at H&H; it strengthened my skills fixing the mistakes of less than stellar photographers. The long hours and the pressure to work fast was good training. You have to pay your dues.
I can’t show images from my time at my first retouching studio, but after 2 years there I began to freelance and work for individual photographers. One of the first ones was Rick Day Here are some of the collaborations from that partnership. Below is a beauty retouch.
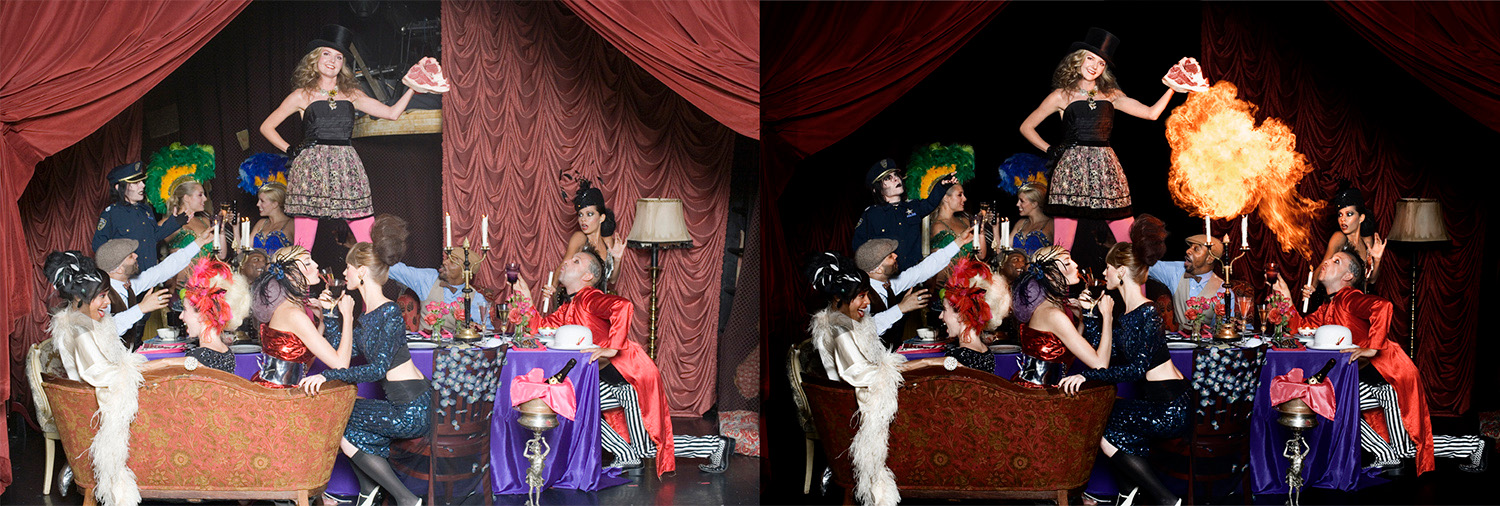
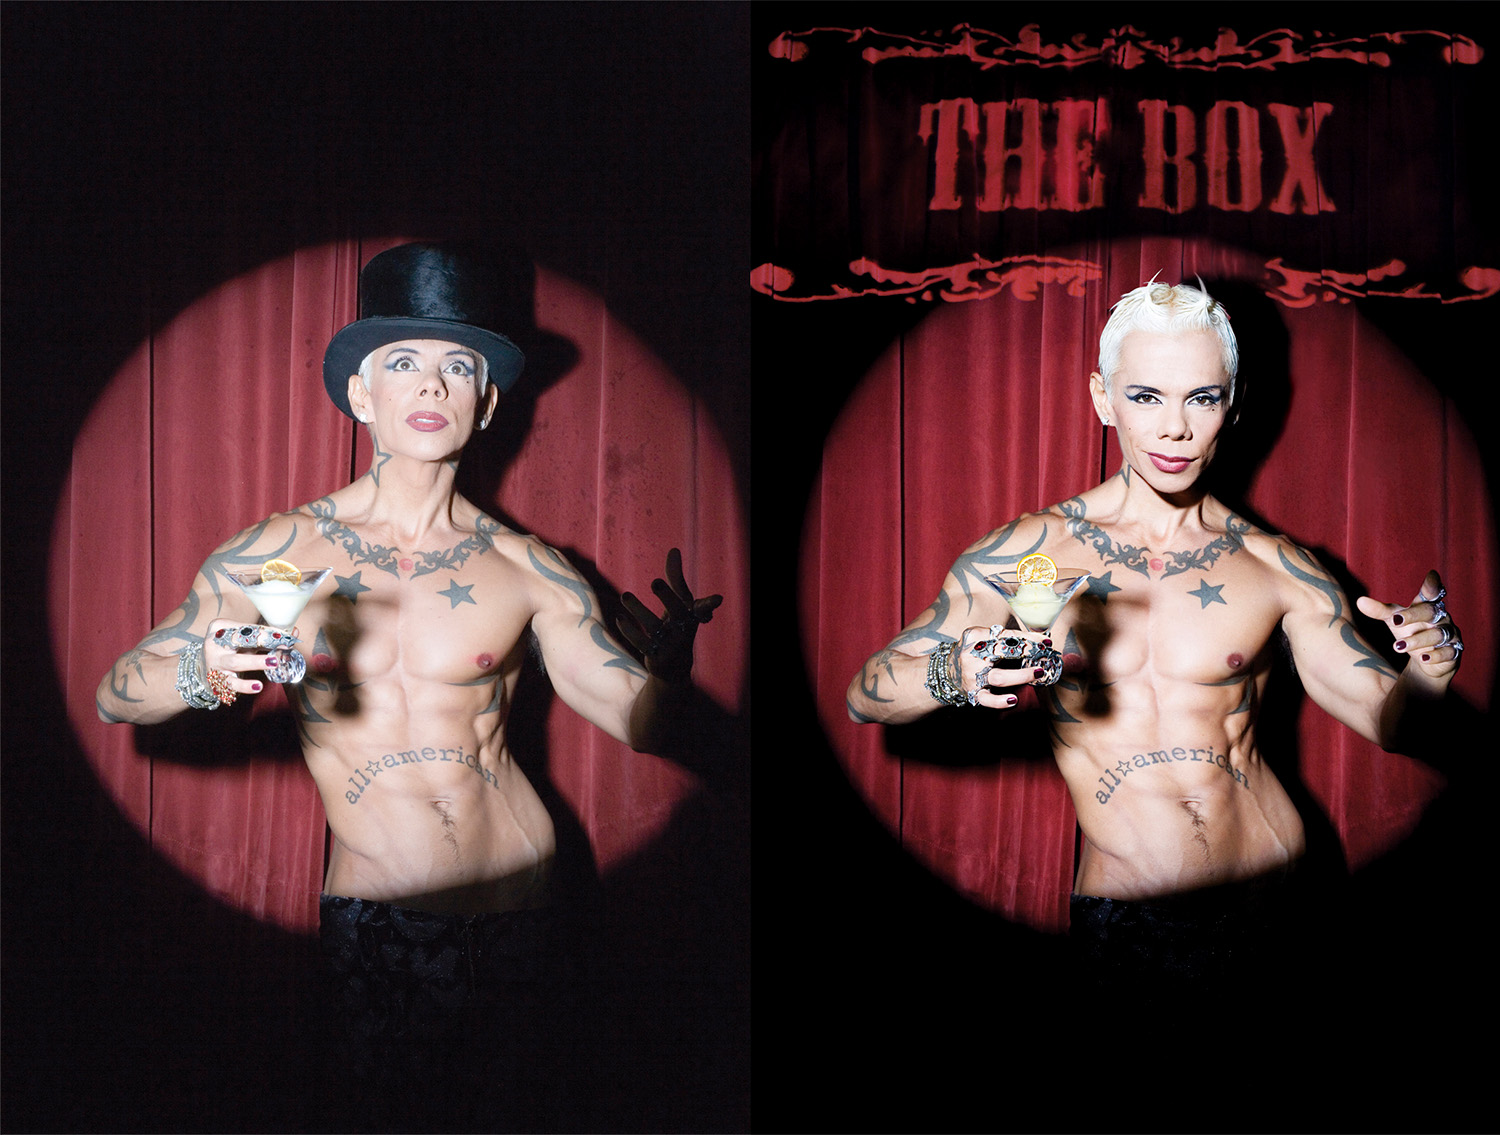
And here are some compositing pieces Rick shot at The Box nightclub.
Back when I started retouching there weren’t a million tutorials all over the internet like there are now. One of the problems with the abundance of tutorials out there is figuring out which ones are showing you the right way to retouch like the pros and which ones are bogus shortcuts. I’m glad that I learned mostly from working with other experienced retouchers on the job.
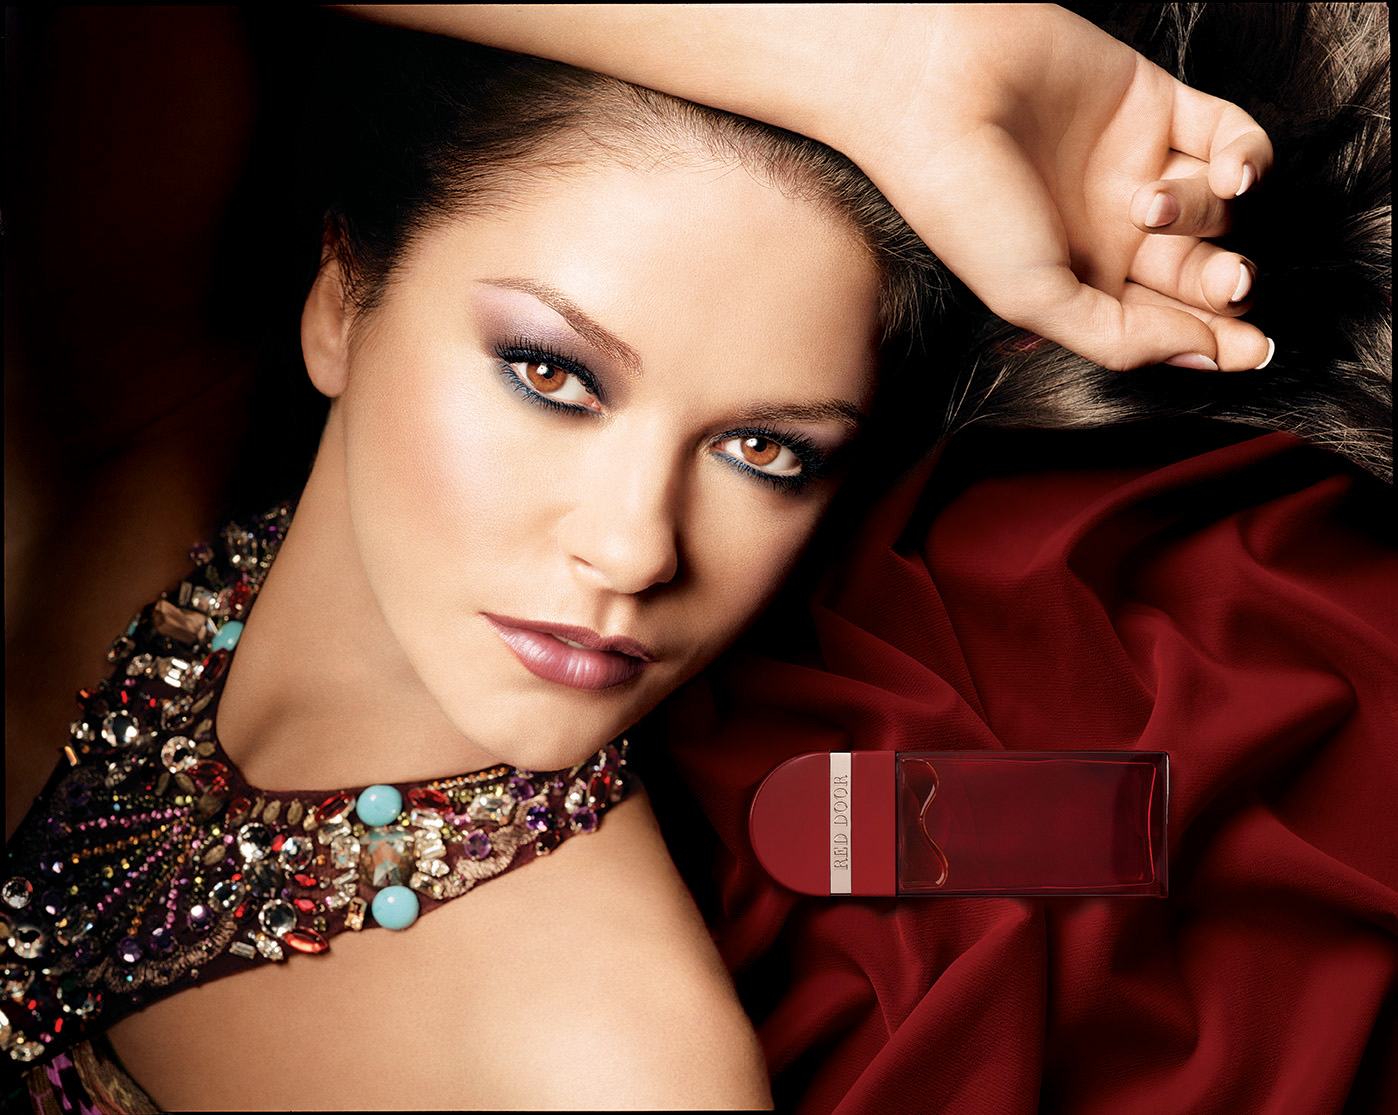
I spent another two years freelancing at various studios in NYC, working with some of the best retouchers in the city. I subcontracted at Graphic Systems Group and helped them regain beauty ad work for Elizabeth Arden. This was a few years ago, so the retouching is much more “polished” than it typically is today. See below for some ads I did with Catherine Zeta-Jones shot by photographer Michael Thompson.

The past few years there have been a lot of people advocating a technique called Frequency Separation, although I’ve noticed a lot of people abandoning it in favor of the tried and true “dodging and burning” for skin retouching. I’m not going to go into why I personally do not use this technique (I’ve explained it over and over again in Facebook groups and to my classes at the School of Visual Arts).
Rather than spend time learning trendy shortcuts, a retoucher would be better off learning how to control and adjust your brush tools for the particular job at hand. I spend the first three hours of my retouching workshops discussing brushes and how to set them up for optimal retouching.
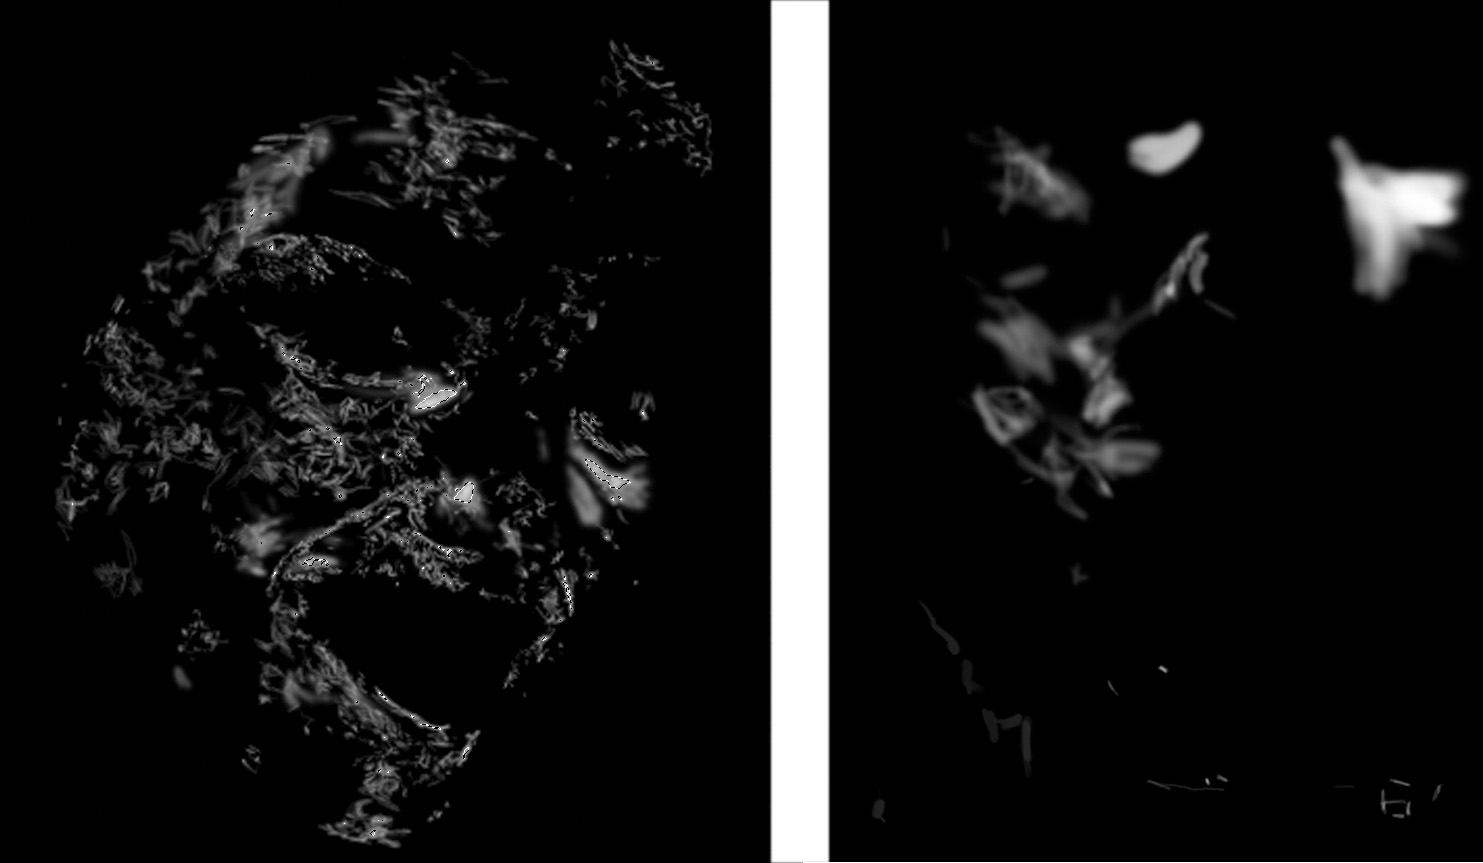
One great tool for teaching fell into my lap when I was given the PSD of another retouching company to “fix.” Below is a screen shot of one of my masks and one of theirs.
The first image is THEM.
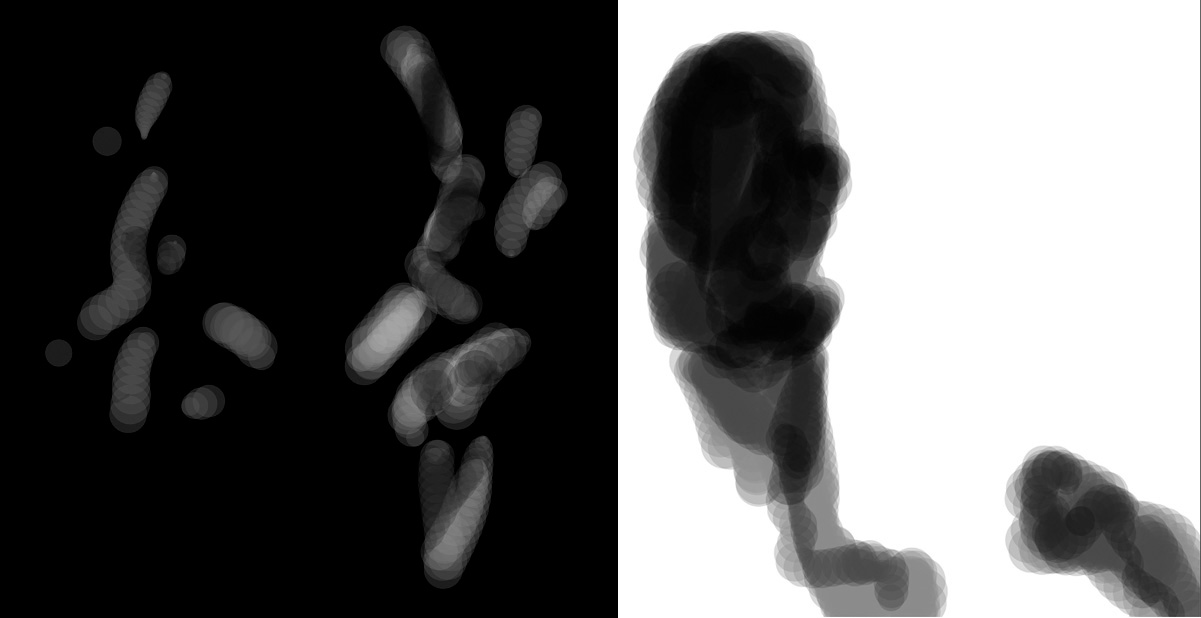
The below image is of CarrieNYC masks:
Unless you are making a hard edged mask for something like product you almost always want a soft brush that blends. I am a proponent of using FLOW rather than OPACITY and for my dodge and burn brush. I always have TRANSFER turned on and the Controls set to Pen Pressure (I don’t need to say that you should be working with a stylus and not a mouse, right?)
The first thing to do in the Photoshop brush panel is to TURN OFF SHAPE DYNAMICS!!!!! It’s a weird brush setting and I only use it to do tricky stuff like draw hair or eyelashes.
Here is my brush panel for Dodge and Burn. The Brush is set at 10% Flow and AIRBRUSH is turned ON.
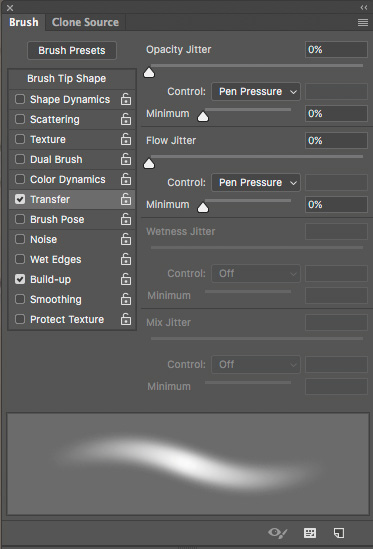
The “THEM” example is using a default brush, Shape Dynamics is on, they are using Opacity rather than Flow, and their brush is set to a hard edge. Not optimal for what they were trying to do.
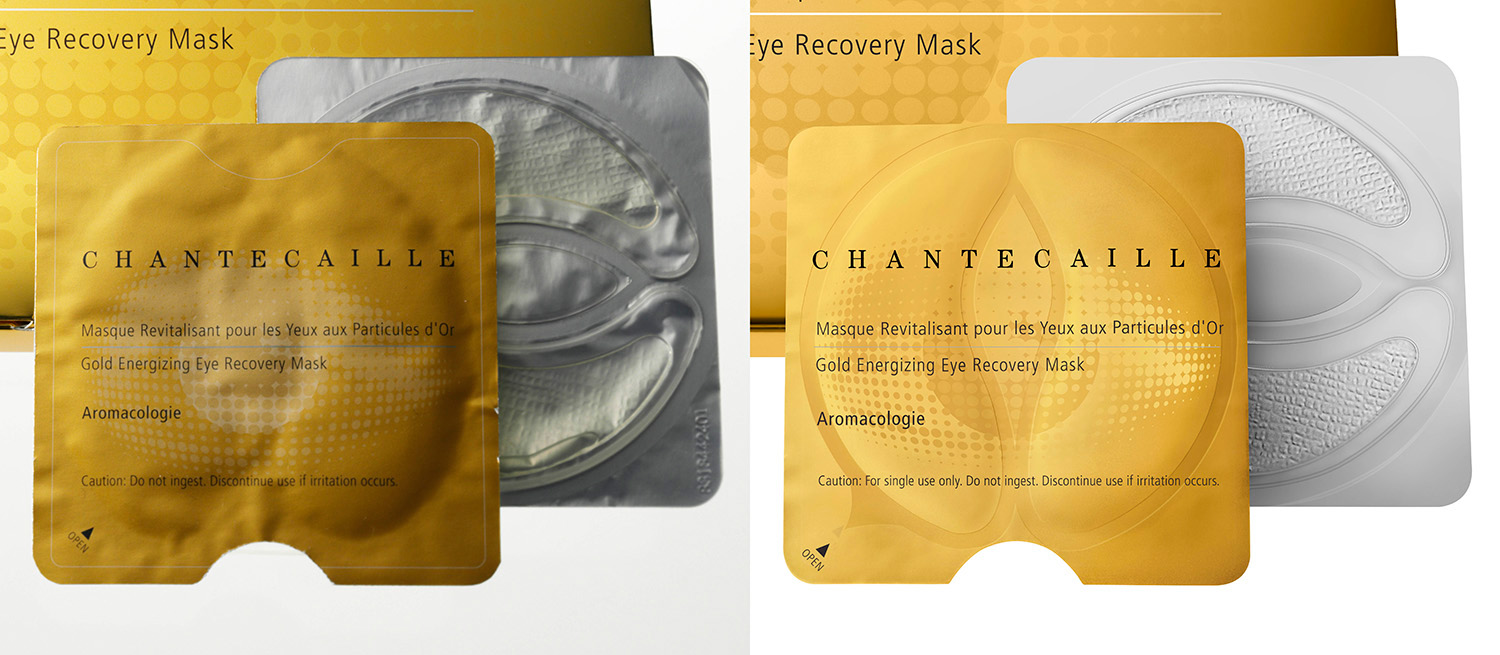
My suggestion for retouchers honing their craft is to learn Photoshop inside and out, even things you might not think you would need as a retoucher. Inevitably, your clients will ask you for some crazy things, and you have to find ways to make it happen. We really aren’t allowed to say ‘that can’t be done.’ For example, below is a product shot that hadn’t actually been produced yet, and I only received the final product after the fact.
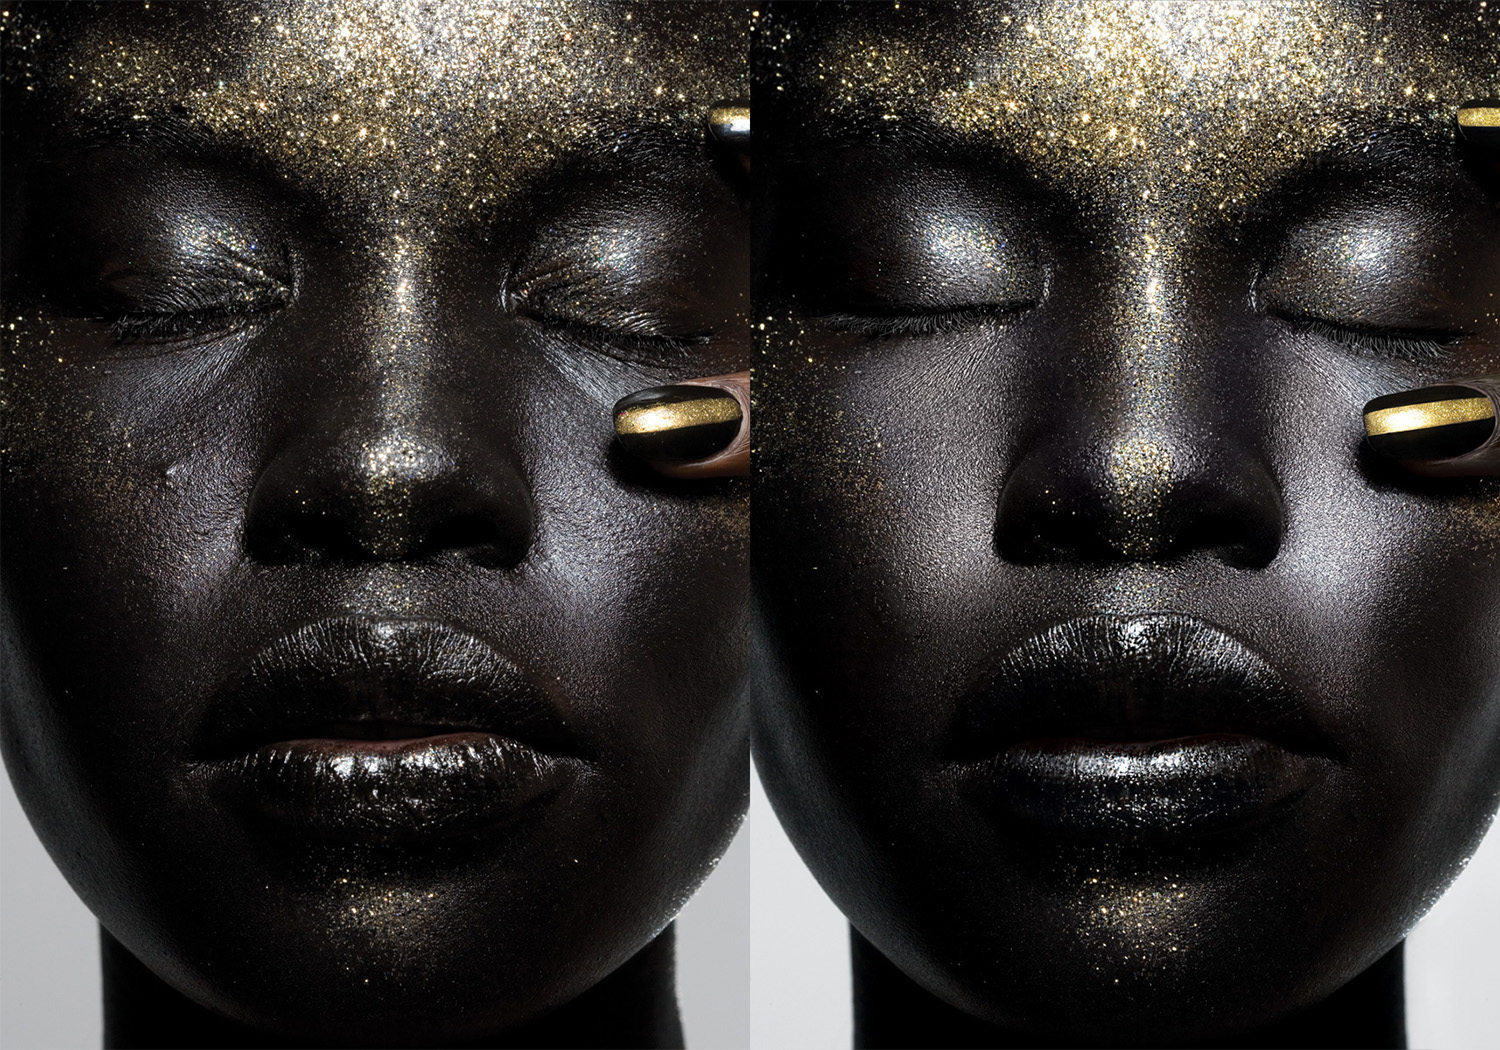
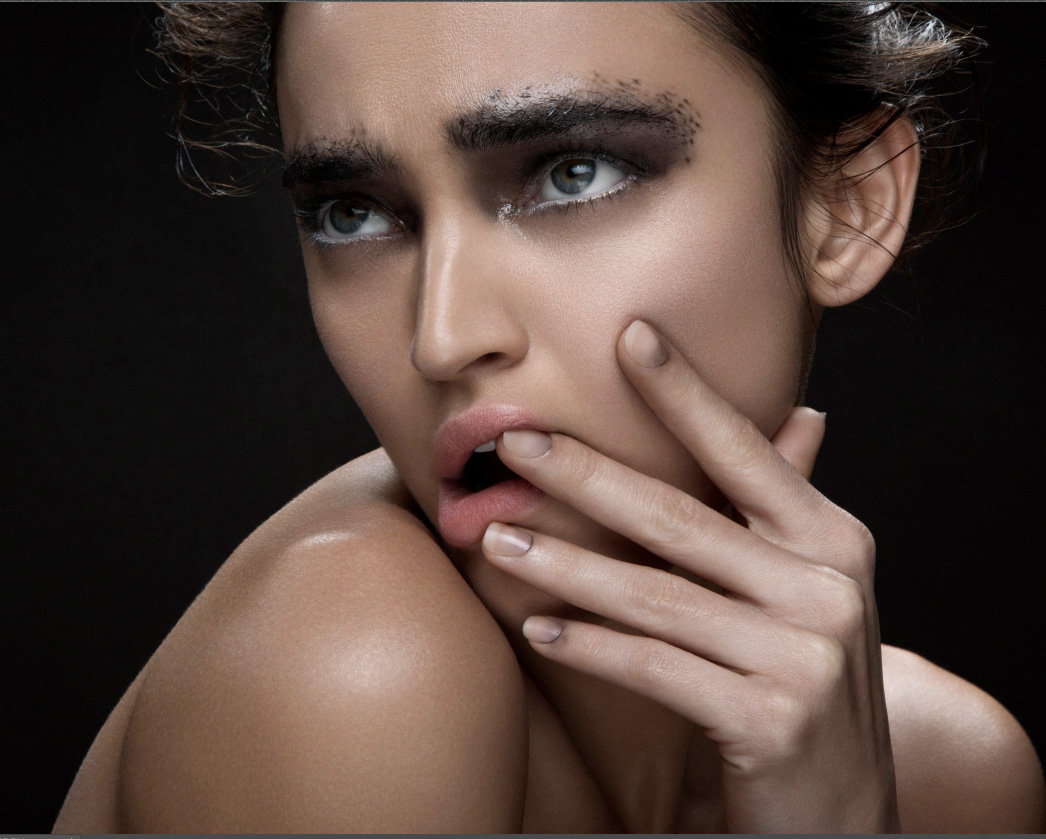
So in wrapping up, let me show you a lovely beauty shot by Rick Day NYC that shows what you can accomplish with good ole Dodge and Burn.
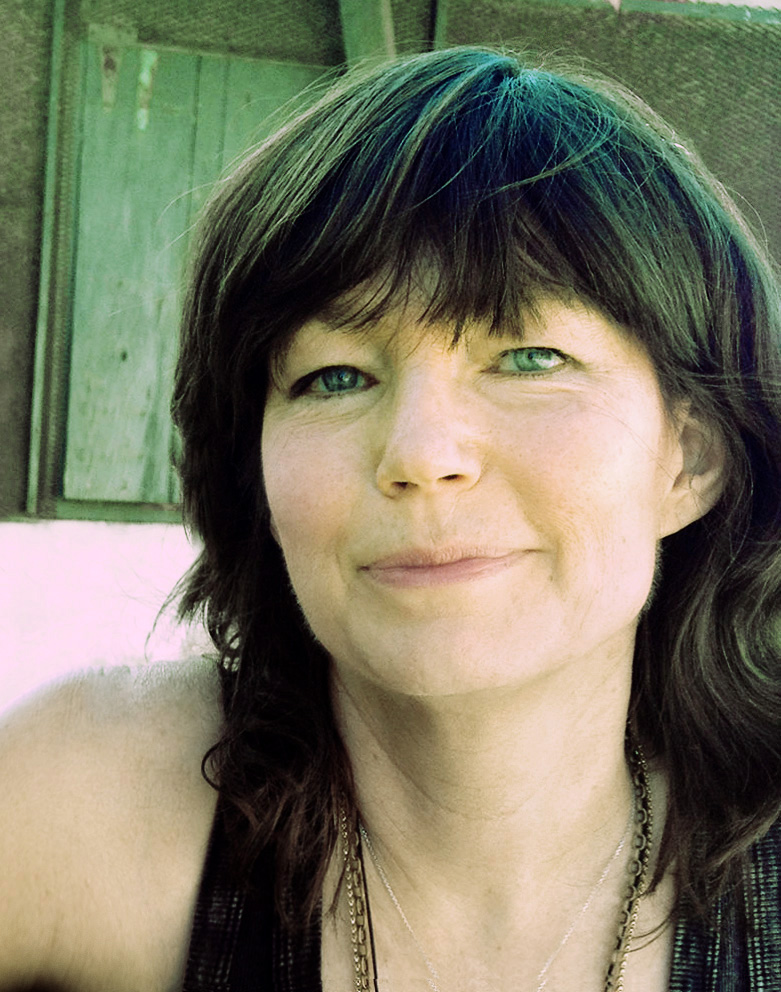
While I love retouching and am so lucky to have it as my job, I still love painting! I have a studio, and that’s where I get to be the real me. Here is a self portrait of me sitting at my retouching station (It’s not retouched at all, that’s the real me!)

Thanks for listening!
You can see more from Carrie at CarrieNYC.com and CarrieBeene.com, and keep up with her at @carrienyc and @carriebeenestudio (painting) on Instagram and her Facebook group for retouchers, Real Retouching: Learn and Teach.
You can also get her book Real Retouching: A Professional Step by Step Guide on Amazon, and you can take one of her retouching workshops at the School of Visual Arts in NYC! There are six per year, and the next one is June 23-24.

What a small world! I worked for GSG a million years ago (production/art direction). As much retouching as I do, I have to admit I never know where to set my Flow. I’ll have to read more of your work! Great stuff! I love the “teeth folder”—actually LOL. :-)